How to Enable Two-Factor Authentication (2FA) for Users and User Types
 Overview
Overview
Two-factor authentication (2FA) adds an extra layer of security to your accounts by requiring not only a password but also a second form of verification, such as a code sent to your phone or generated by an app. This significantly reduces the risk of unauthorised access, protecting sensitive student information from potential breaches. By enabling 2FA, you ensure that even if someone obtains your password, they won't be able to access your account without the second factor, enhancing overall security and safeguarding your data.
Your SMS allows you the option to enable or disable two-factor authentication requirements for your users and user types, giving you the flexibility manage security of your SMS based on your organisation's policy.
Let's dive in and learn how to activate this essential feature for your student management system.
 Step Tutorial
Step Tutorial
Enabling Two-Factor Authentication for Individual System Users
To enable 2FA for specific system users only, follow the steps below:
Step 1. Navigate to People page, add a new user or enter a user name to edit.
Step 2. In the Access Information section, locate the toggle for Enable Two-Factor Authentication.
When toggled on, an additional button will display, allowing you to reset the two factor authentication key.
Step 3. Click Update to save changes.
Enabling Two-Factor Authentication for User Types (People, Students, Companies)
Two-factor Authentication can be enabled for User Type instead of specific users only. Enabling 2FA for User Type ensures that all users within that group are set-up to use 2FA, increasing the security of your system and reducing manual enabling of 2FA for each individual.

Note: Two-Factor Authentication for Companies and Students can only be enabled through User Types. Enabling 2FA for select Company user or Student user is not possible.
Step 1. Go to Administration > Settings. In the Security section, toggles for enabling 2FA for user types is displayed.
There are three User Type available for the Two-Factor Authentication:
- Main Users - enables and requires 2FA for all your internal system users (e.g. Admin, Trainers, etc).
- Companies - enables and requires 2FA for all users that are Company Contacts.
- Students - enables and requires 2FA for all Student users
When any of the toggle switch is turned to YES, users within that User group will be required to set up two-factor authentication when they next log in to the SMS.
The "Reset Two Factor Authentication Key" button will also display in the following areas for the following users when 2FA is enabled. This will allow system administrators to reset the Authentication Key in the event that a user is having issues with their Authenticator app.
- Main Users - Settings > Details
- Students - Students > Select Student > Details >
- Companies: Companies > Select Company > Contacts > Edit Contact Action button.
Using 2FA in the SMS for the first time
When 2FA is enabled for users or user types, logging in to their SMS account will require additional authentication using an Authenticator App such as Google Authenticator. Users will be asked to set up their 2FA in the Authenticator app during the first use. Download an authenticator to your mobile device such as Google Authenticator to set up your 2FA.
- Navigate to your site URL.
- Enter your email and password. Click Continue.
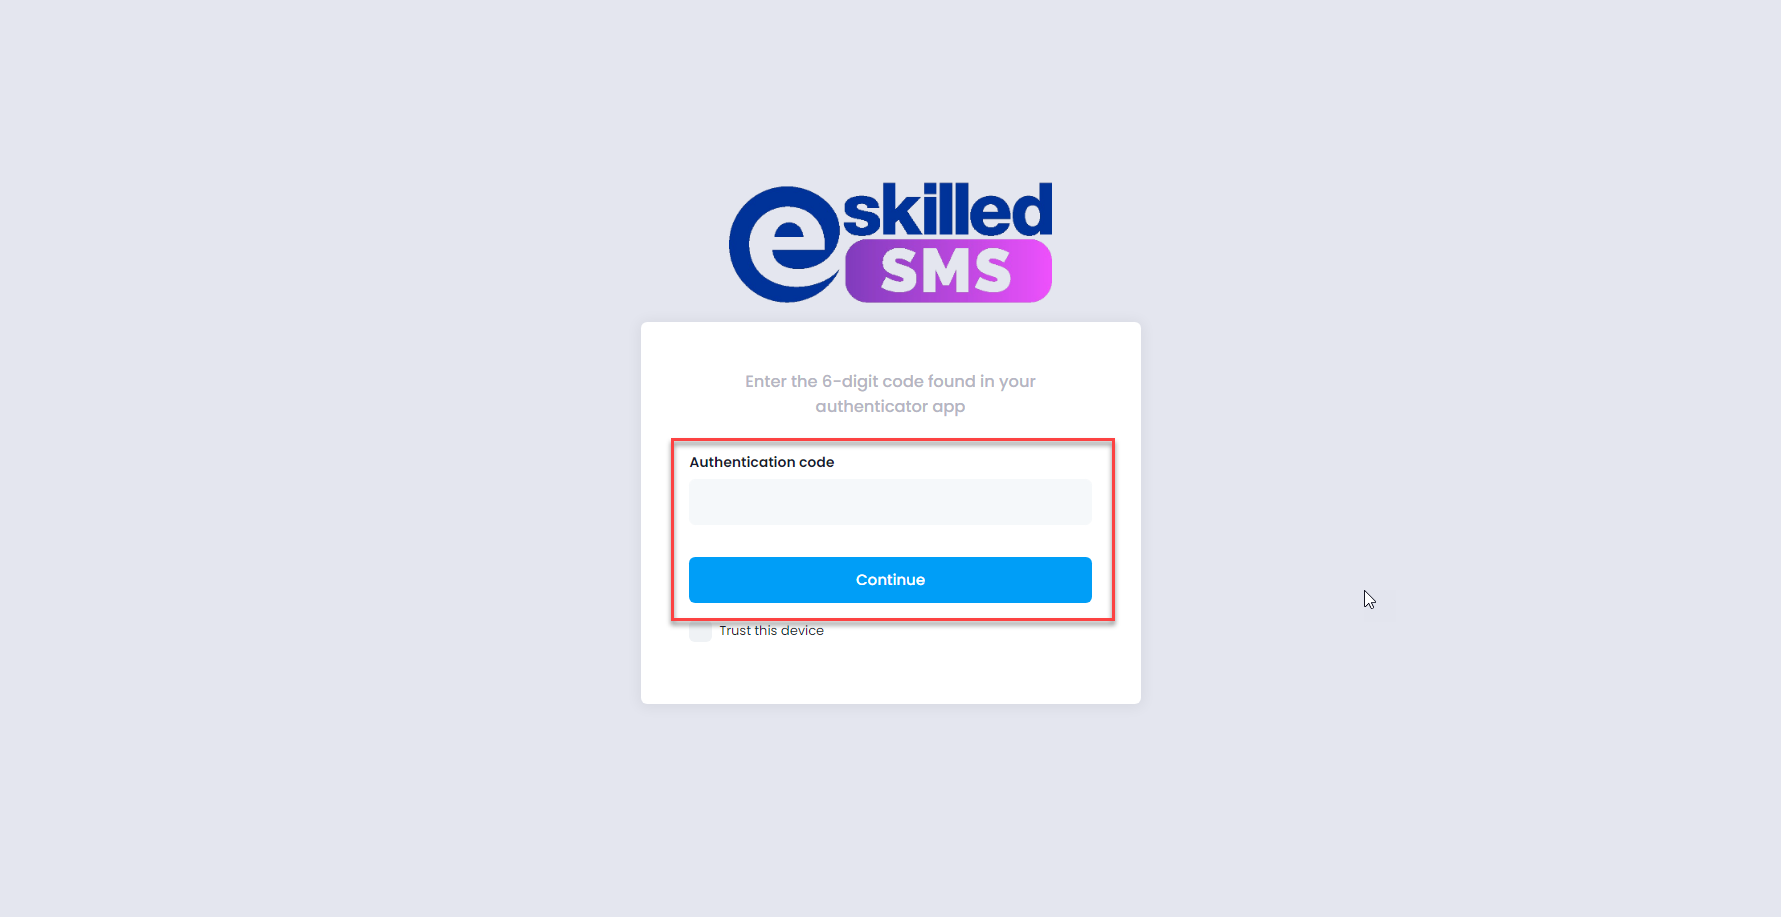
- User will be directed to the 2FA page. Open the Authenticator app. User can opt to use the Scan QR or Enter key option. To use the Scan QR, select this option and scan the QR Code (a) provided in the login page. Alternatively, users can also use the Enter Key option and enter the provided key below (b)
- The Authenticator app will add the site and provide a 6-digit authentication code. Enter this code in the field "Enter Authentication Code". Click Continue to login.
- User will be logged in to the SMS.
Important Note: Generated 2FA codes expires after 30 or 60 seconds depending on the Authenticator app used.
Logging in to the SMS after 2FA is setup
Once your 2FA is set up already, subsequent logins will require user to open their Authenticator app and enter the Authentication code generated for the site.
Users also has the option to trust the device (recommended only if the device being used is personal and is not accessible by other users) and this will postpone asking for the 2FA code within a preset period.
Setting up two-factor authentication increases the privacy and security of your data and helps ensure compliance to privacy and security laws. This tutorial has provided you with the steps on how to set up 2FA for individual users or enable it as a requirement for user types. You also learned how to use an Authenticator app when the 2FA is enabled in your SMS.
For more information on how to keep your SMS secure, visit our tutorials on Security
***
Related Articles
How to Customise Password Security Requirements
Overview Password security requirements are crucial for safeguarding sensitive information and preventing unauthorized access to accounts and systems. They serve as a frontline defense against cyber threats such as hacking, identity theft, and data ...How to Add a User in the SMS
Overview Managing users in your student management system is crucial for safeguarding student information and maintaining efficient administration. This tutorial will guide you through the process of adding users, granting appropriate system access, ...How to Enable Waitlist for Groups
Overview We're excited to introduce a new feature called Waitlists and Contacts to our Student Management System. This feature is designed to streamline the process of managing individuals who wish to join specific student groups that are not ...How to Allow Creating of System User and Student with the Same Email Address
Overview In the Student Management System (SMS), system users refer to Admin and Trainer users who added on the People page. Admin users have administrative rights, allowing them to add or edit SMS settings, create programs, manage events schedules, ...How to Manage Roles and Users
Overview In this article, we will address both Roles and Users, which are included on the Staff page. PART 1 - ROLES Roles define a user's capabilities, allowing us to assign either full or limited permissions to each role. To create a role, follow ...