Enrolling a Student in a Funded Program Instance (VIC)
Enrolling a Student in a VIC-Funded Program Instance
There are multiple ways to enrol a student in the Student Management System. A system administrator can manually create a student and then enrolling them using the Enrolment Wizard. Another option is to Enrol a student using the Online Enrolment Form. In this tutorial, we will learn how to create students in the system and enrol them in a funded program using the Enrolment Wizard.
Step 1. Create a student or select the student you want to enrol in the Program.
In this tutorial, we will select an existing student and enrol that student in a funded program for VIC.
Go to Students in the side menu. Click on the Please select student drop-down menu.
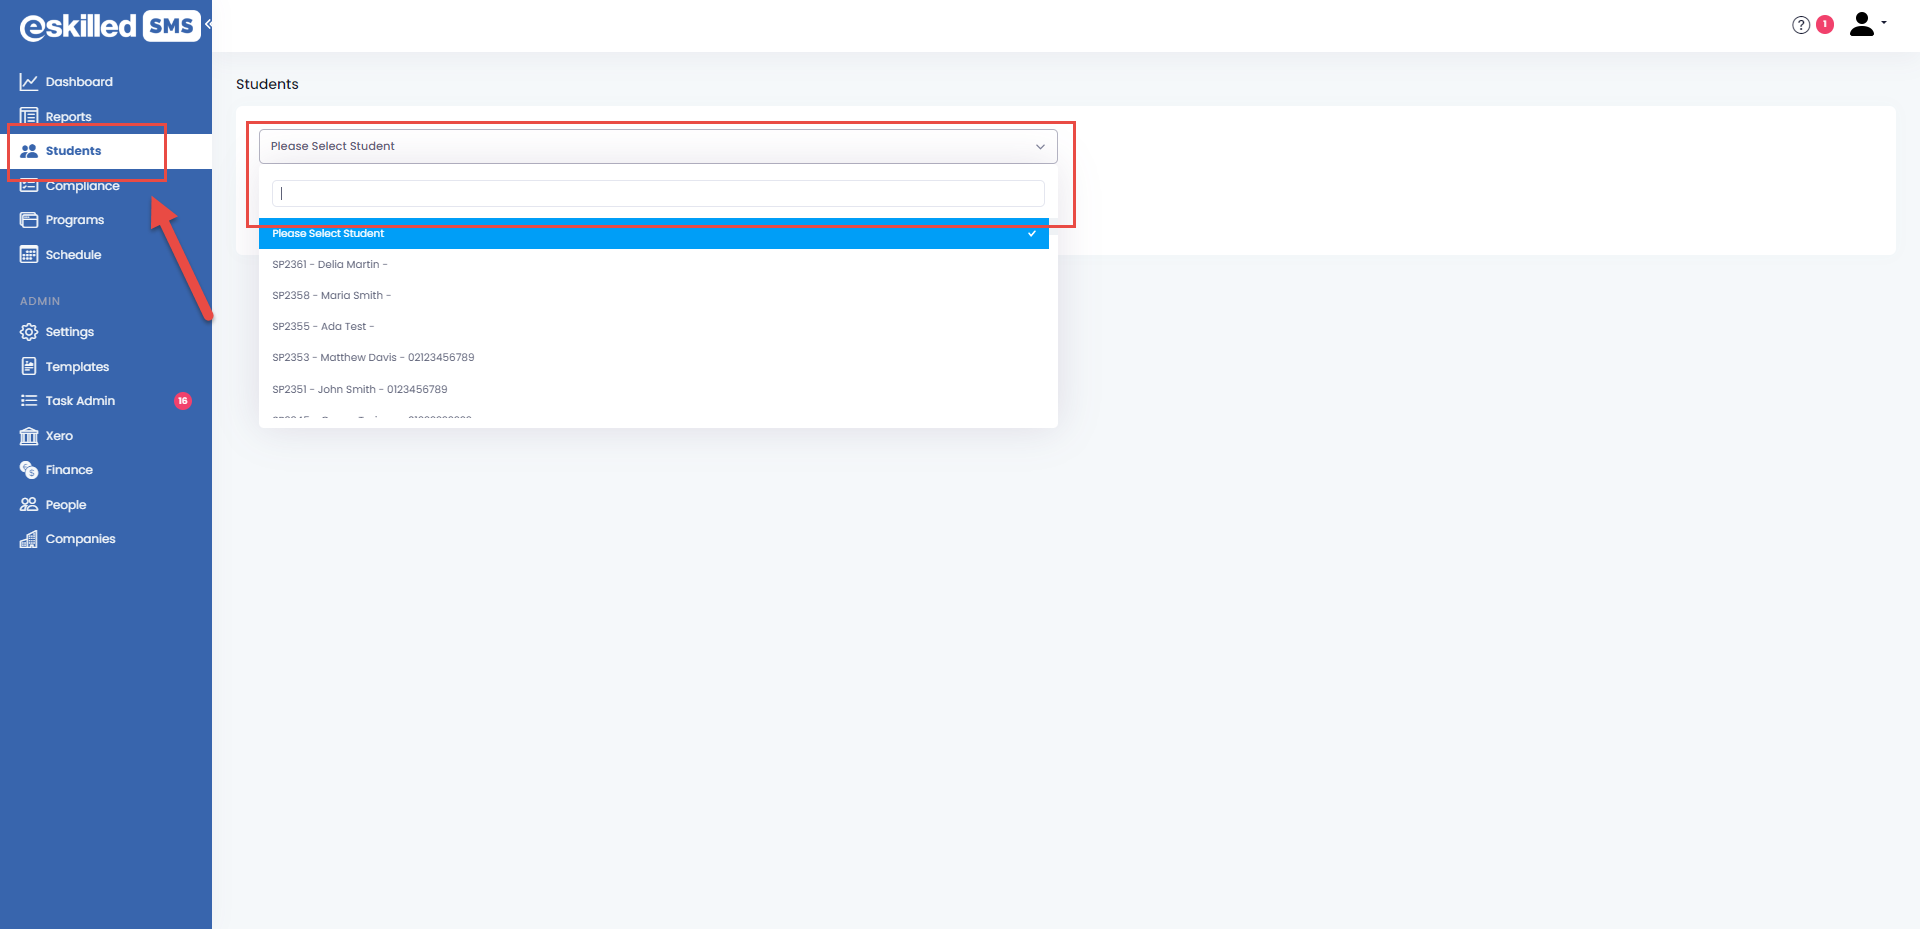
Search for the student you want to enrol.
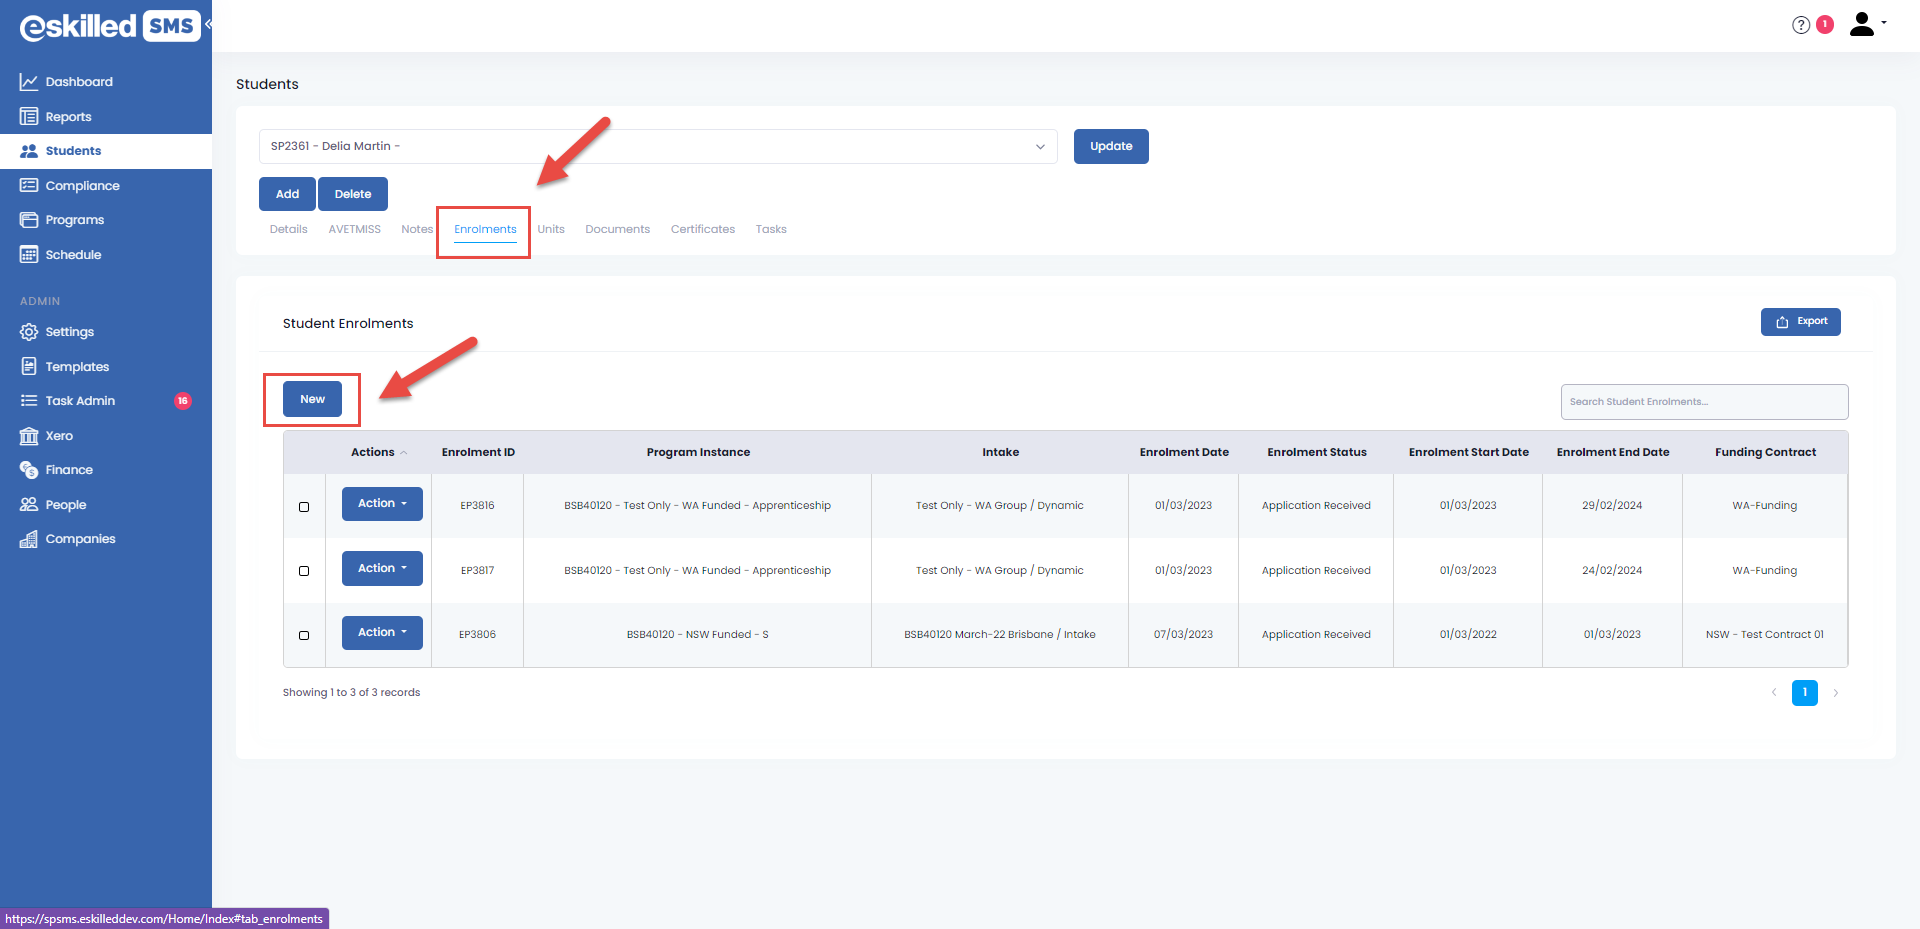
Go to the Enrolments tab on the Student page and click on New.

If you've entered information in your Unique Student Identifier, you can validate USI from the VALIDATE USI button.
Step 2. Enrol a student in the funded Program
Go to the Enrolments Tab. Click New.
This will open up the Enrolment Wizard Modal.
The Enrolment Wizard will initially show only the Standard three tabs: Enrolment, AVETMISS and Units. If the program instance you are enrolling in is funded, the AVETMISS-CONTRACT tab and the Payments Tab will also be available. Suppose the Program Instance is also tagged as YES for either Apprenticeship, Traineeship or School-Based Apprenticeship or Traineeship (SBAT). In that case, the Enrolment wizard will also show a Training Plan tab.
Complete the Program details in the Enrolments tab of the Enrolment Wizard.
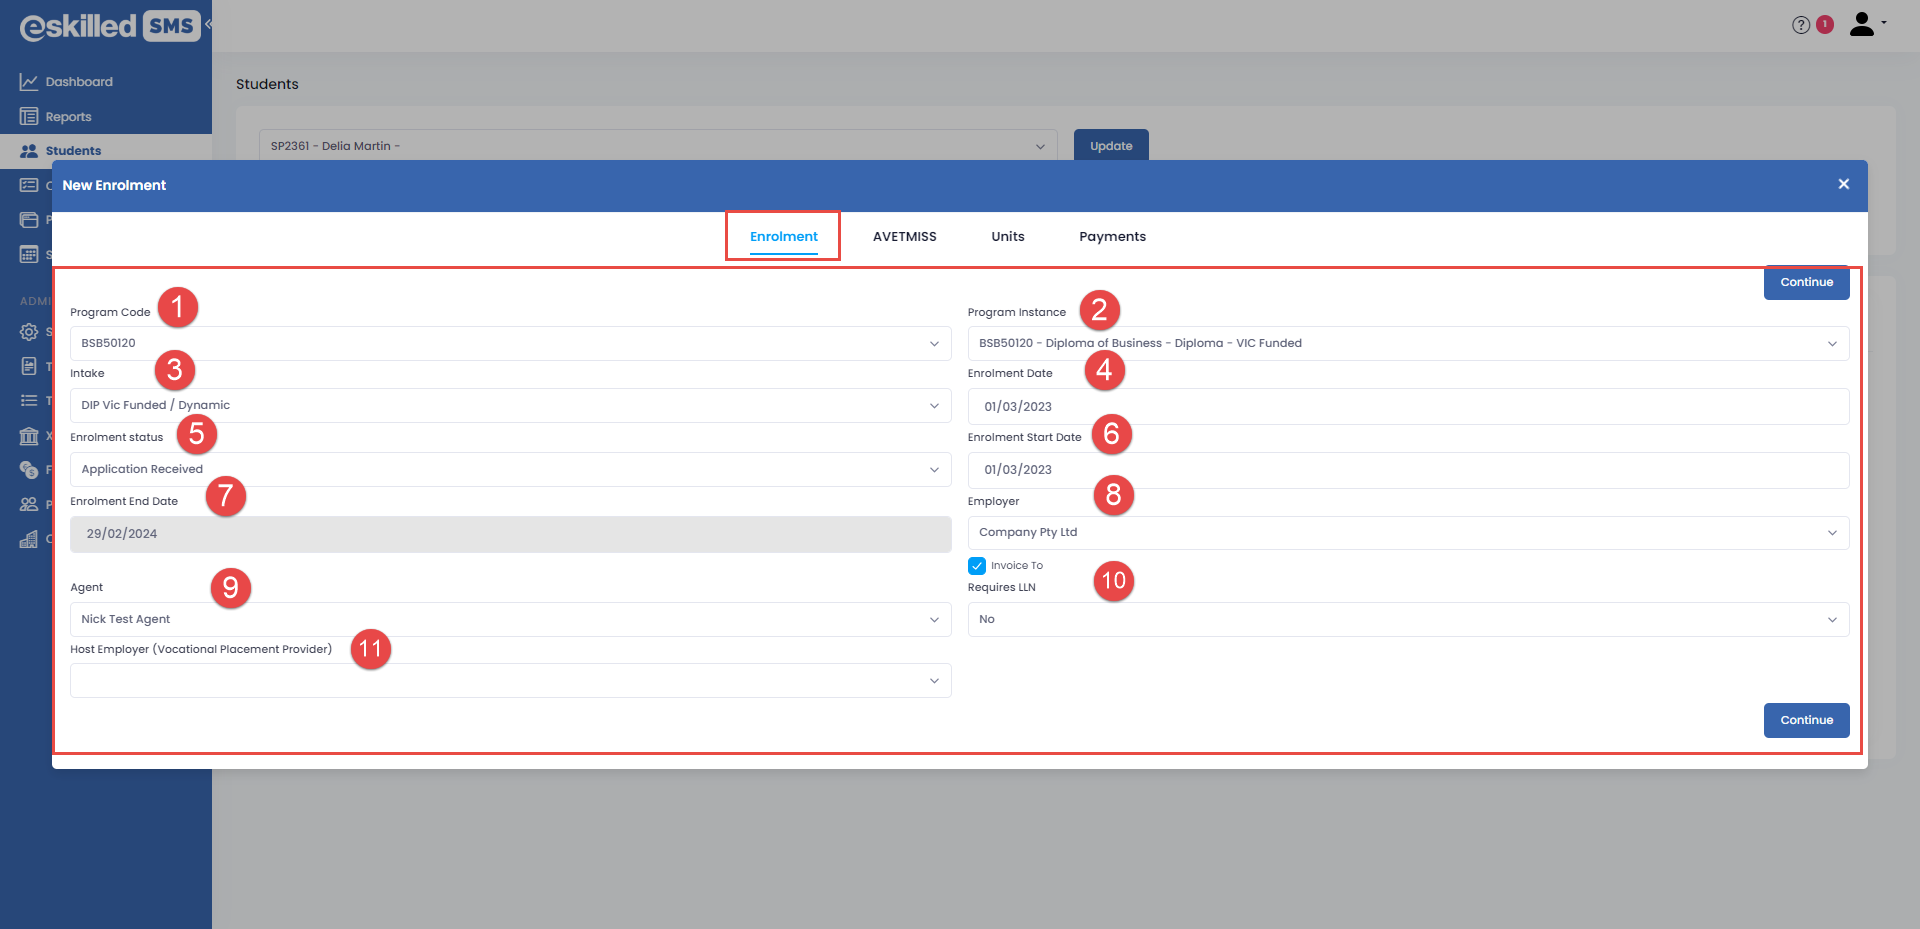
- Program Code - Select the program code from the drop-down. This will automatically populate available program instances for that Program. Choose the program instance on the following field.
- Program Instance - Select the Program Instance you want to enrol the student in.
- Intake - Select the schedule you want to enrol the student in.
- Enrolment Date - Enter the date of enrolment using the date picker
- Enrolment Status - Select the enrolment status of the student.
- Enrolment Start date - Select the start date for the student's enrolment period. This will be the duration of when the Program is available to the student to complete.
- Enrolment End date - This will automatically calculate from the Enrolment start date and the duration of the program instance. For this example, the course was set to 365 days.
- Employer - Select an employer from the drop-down for the student if applicable. Tick the box below if you want the Employer to be invoiced for this enrolment.
- Agent - Select the agent for this enrolment if applicable.
- Requires LLN - Select YES or NO if the program instance requires Language, Literacy and Numeracy (LLN) to be completed for this Program.
- Host Employer (Vocational Placement Provider) - Select the Host Employer/Vocational Placement provider from the drop-down.

The Host Employer (Vocational Placement Provider) field will only show if the field "Requires Host Employer" in the Program Instance details is set to YES.
The drop-down options for Employer, Agent and Host Employer fields populate from the organisation set-up and are tagged as Employer, agent or host employer. If you don't see any options available, ensure you have already created them in the Companies tab.
Selecting YES for LLN will add fields specific to LLN:
- LLN Complete - Select yes or no if the LLN is completed.
- LLN Start Date - Select the start date for the LLN unit
- LLN Completed Date - Select the completed date for the LLN unit
- LLN Assistance required - Select Yes or No if the student requires assistance for LLN purposes.
Step 3. Complete the information in the AVETMISS - Contract tab of the Enrolment wizard
The AVETMISS tab includes most of the AVETMISS information required for National and State reporting. These fields are organised into different sections: Funding Source information, Contract information, Program Information, Culture, Disability, Employment and Education information of the student. The fields may change depending on which State you will be reporting.
Complete the Funding Source section
Select the Funding Source ID - State Training Authority
The drop-down options will populate from all the funding sources included in the Contract used for this Program Instance. If you do not see any options, confirm that your Contract has funding source codes selected.
Select the Funding Source National from the drop-down.
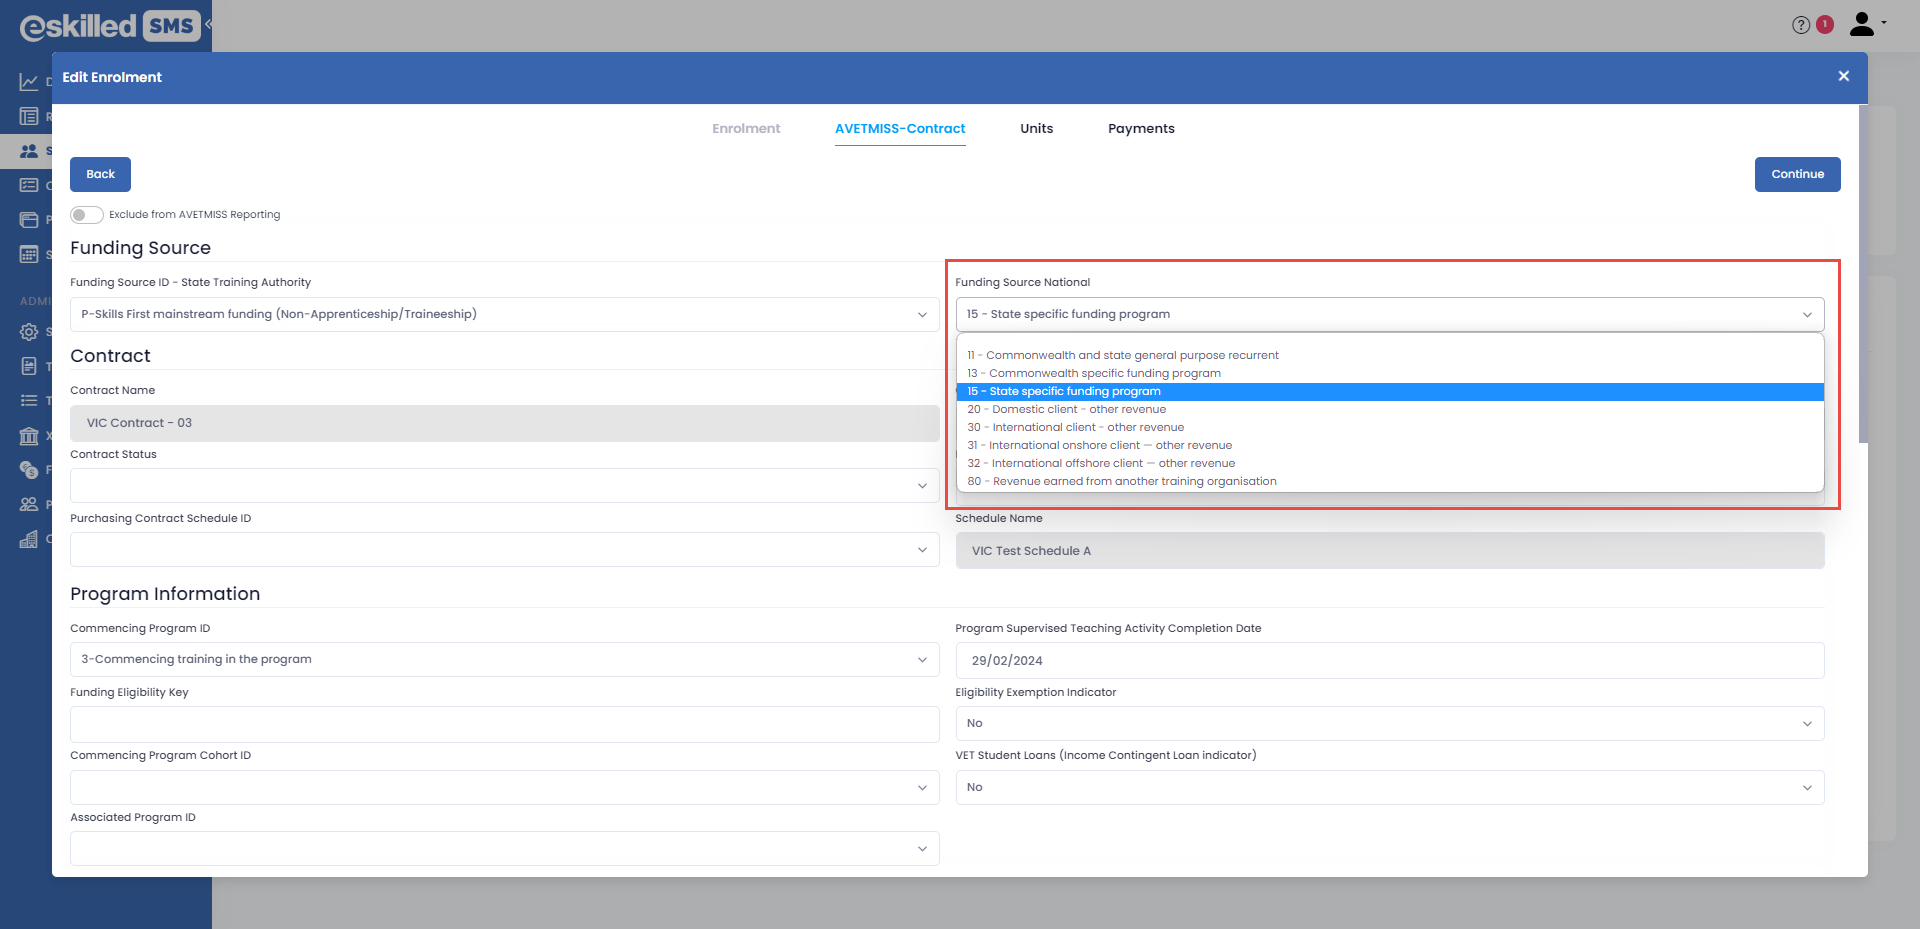
Complete the Contract section.
- Contract Name field - this will automatically populate the contract name used in this program instance.
- Contract Status - select if the Contract status is Active or Cancelled.
- Purchasing Contract Schedule ID - Select the applicable Purchasing Contract Schedule ID from the drop-down.
- Contract Status Date field - this field will automatically get the date when you toggled the Contract Status to ACTIVE.
- Purchasing Contract ID field - will populate from the Contract Name or can also be a manual entry depending on your contract information.
- Schedule Name field - will automatically populate from the funding schedule chosen for this program instance.
Complete the Apprenticeship and Traineeship section.
This section will only be visible if the Program you are enrolling the student in is for an Apprenticeship/Traineeship or SBAT program.
- Training Contract ID field - Enter the Training Contract Identifier in this field. The Training Contract Identifier uniquely identifies an apprentice or trainee training Contract registered with a training authority. Refer to your Training Contract for this information.
- Client ID - Apprenticeships - This ID is used to identify a client with an apprenticeship/traineeship training contract. This identifier can be sourced from the registering state/territory training authority.
Complete the Program Information Section
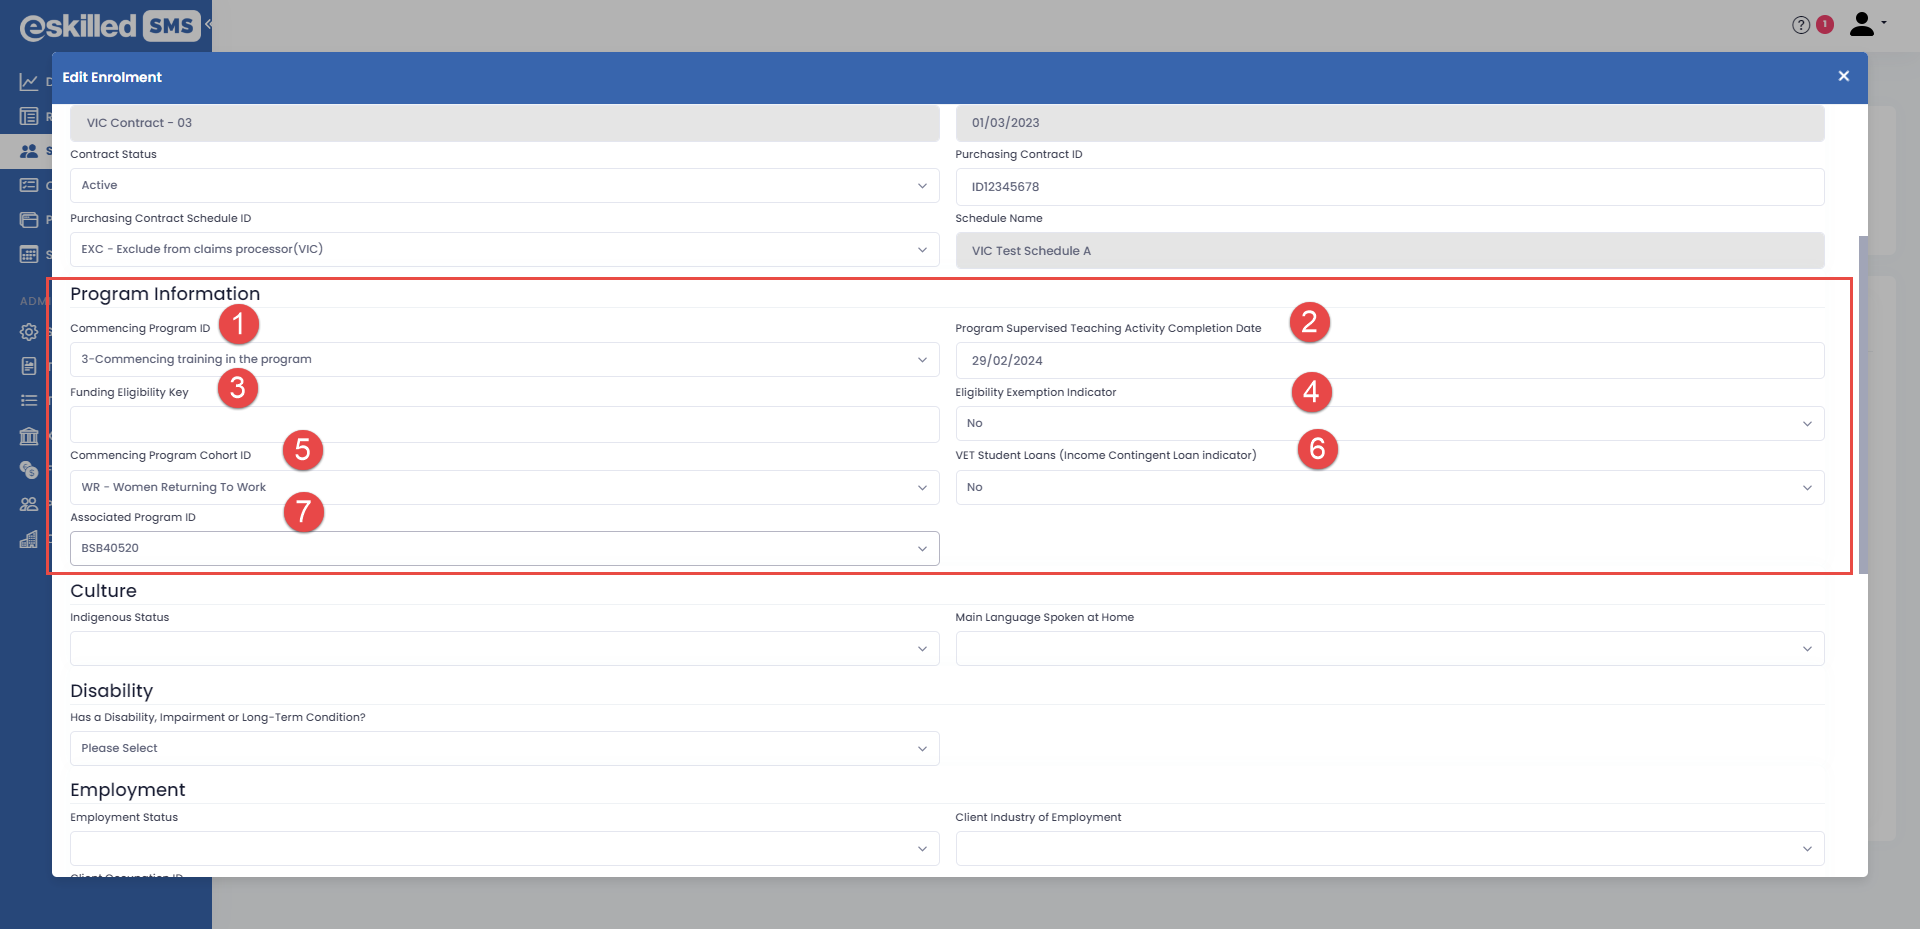
- Select the Commencing program ID from the drop-down options.
- Program Supervised Teaching Activity Completion Date - this field will default to the enrolment end date of the Program. You can set the date when you expect Program Supervised Teaching Activity to be completed.
- Funding Eligibility Key - Enter the student's Funding Eligibility key if available. These are keys provided by the Department to eligible students.
- Eligibility Exemption Indicator - Select Yes or No in the drop-down if the student has an eligibility exemption.
- Commencing Program Cohort ID - select the applicable Cohort ID for the student in the drop-down.
- VET Student Loans (Income Contingent Loan Indicator) - This field is only visible if the program qualification is a diploma level or above. Select Yes or No from the drop-down to indicate that the student has an income-contingent loan as financial support.
- Associated program ID - Select the Associated program identifier from the drop-down if the student is enrolling in a superseded program.
Complete the Culture section.
- Indigenous Status - select from the drop-down option if the student self-identifies as being of Australian Aboriginal or Torres Strait Islander descent.
- Main language spoken at home - select from the drop-down menu the student's primary language.
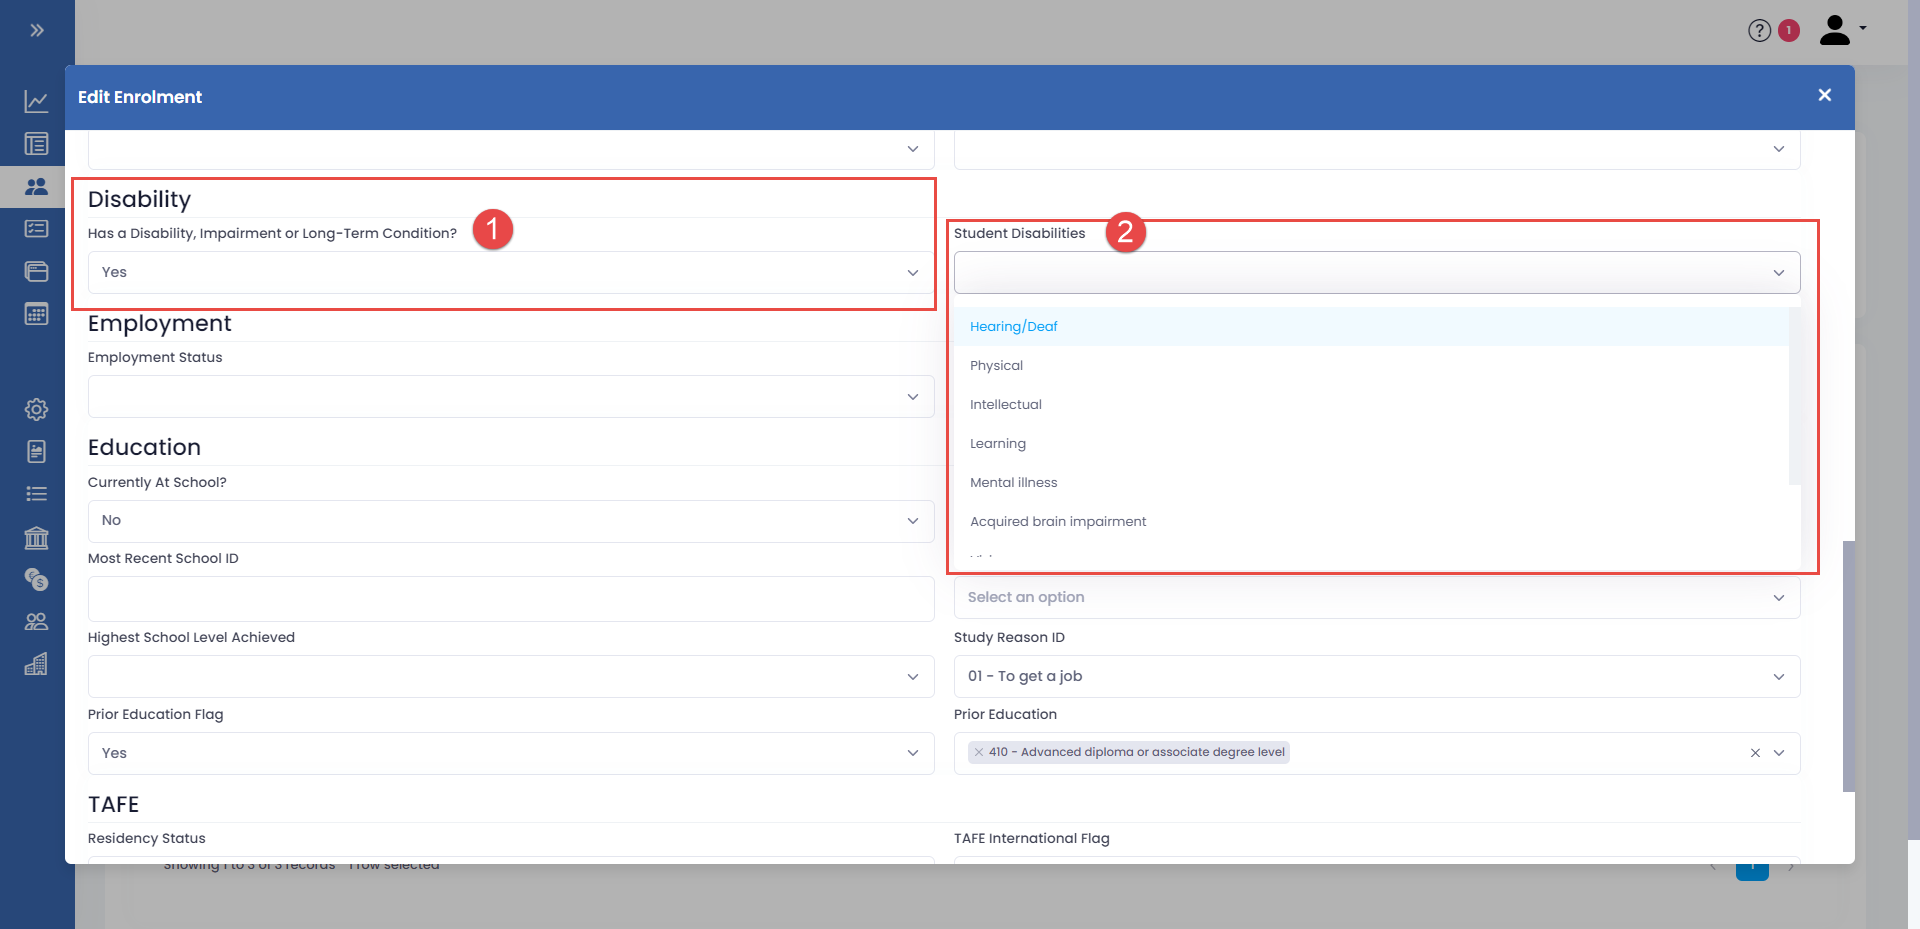
Complete the Disability Section
(1) Select if the student has a disability, impairment or long-term condition. If you select YES in this field, another field will appear (2) where you can choose from the drop-down the specific student disability.
Complete the Employment Section fields.
- Employment status - select the student's employment status from the drop-down menu.
- Client Industry of Employment - select from the drop-down the industry of employment of the student.
- Client Occupation ID - select the occupation ID of the student.
Complete the Education section fields.
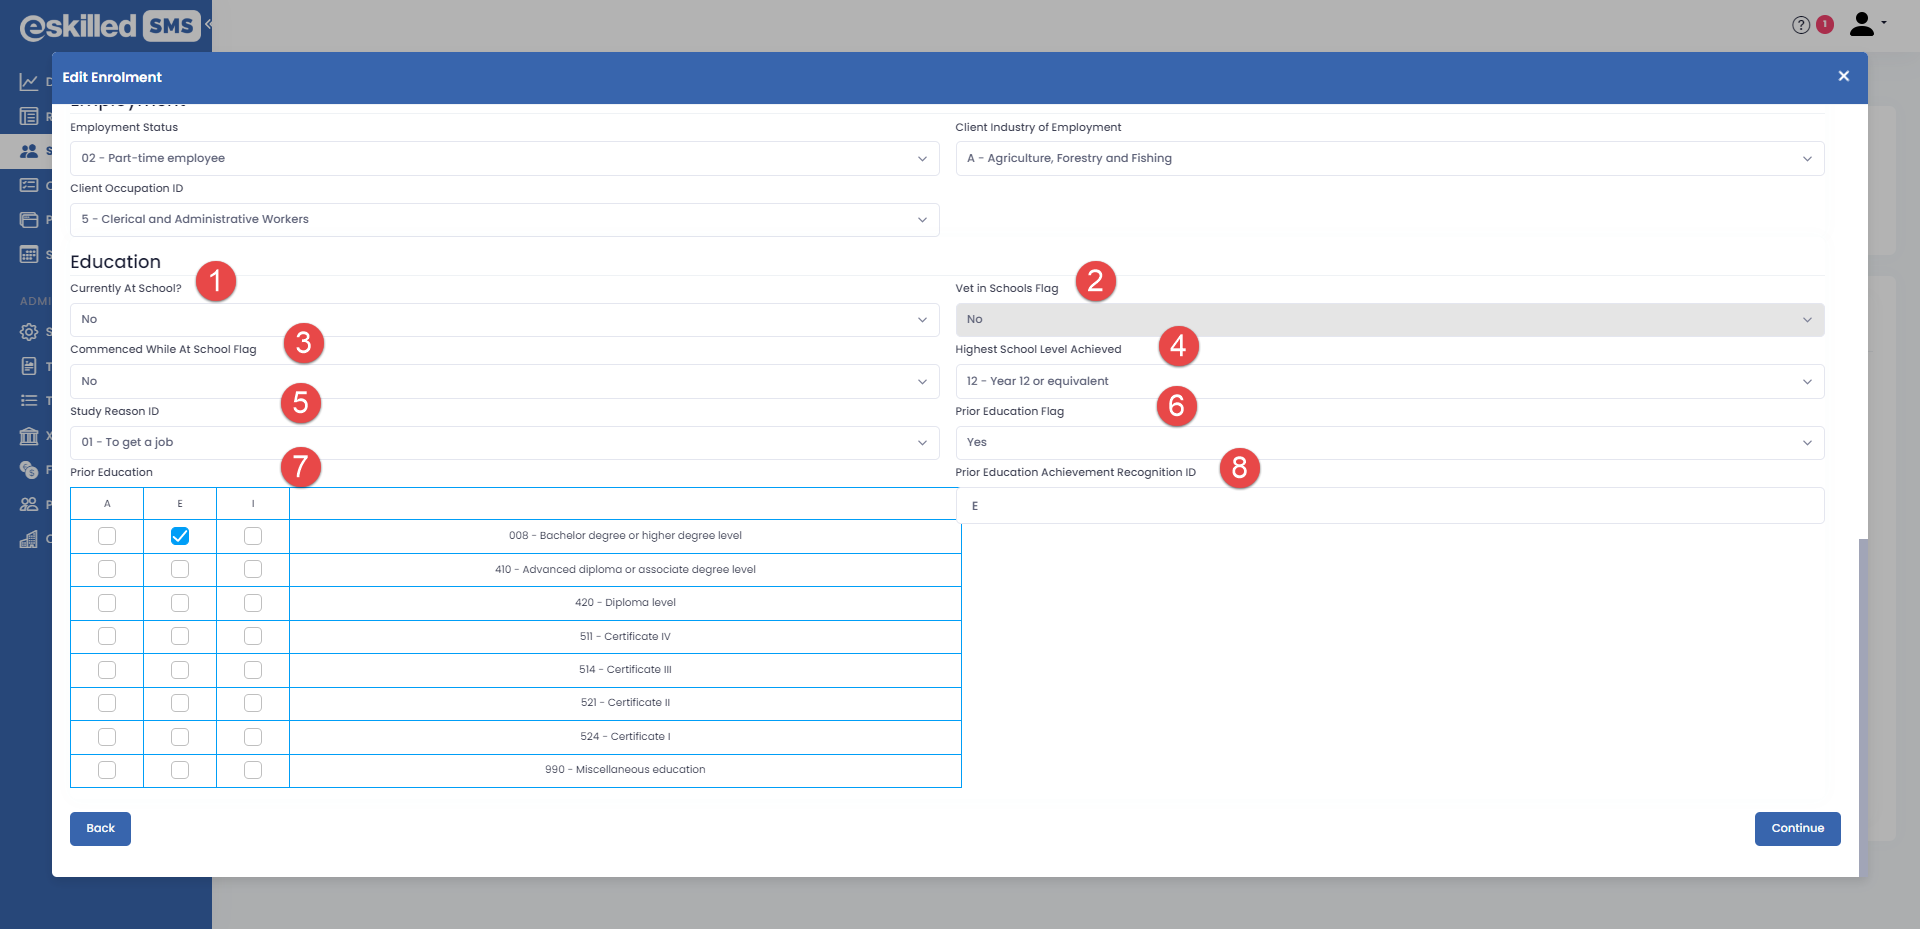
- Currently at school field - select if the student is presently studying.
- VET in School flag - If NO is selected in the Currently at school field, the VET in Schools flag will be set to NO. If the previous field is set to YES, then VET in School flag is editable to YES or NO.
- Commenced while at school Flag - select if the student will start the training while still enrolled in school.
- Highest School level achieved - select the highest school level achieved by the student.
- Study Reason ID - select the reason for studying.
- Prior Education Flag - select YES or NO if the student has completed post-secondary education.
- Prior Education Table - select the applicable record for the student's prior education.
- Prior education Achievement Recognition ID - enter the Achievement Recognition ID of the student.
Refer to the Table below to complete the Prior Education fields:
Tick the corresponding box for each prior educational achievement.
When all the AVETMISS-Contract fields are completed, click CONTINUE to proceed to the next tab.
The AVETMISS-Contract fields are state-specific and state-reported.
Student personal information will automatically populate for succeeding enrolments. These fields will be pre-filled with previous details but will still be editable.
Training Plan
A Training Plan tab will only be available if the student is enrolling in an Apprenticeship, Traineeship, or School-based Apprenticeship/Traineeship program.
A detailed tutorial for setting up your Training Plan is provided in the Help Centre.
Click Continue to proceed to the next tab.
Step 4. Check the Units details
In the Units tab, you can check the details of all the units available for this program instance. You can also Edit or delete a unit directly from the Table by clicking the Action button, then EDIT or DELETE.

Click on the Edit action to edit the Units details directly from the Units table:
- Unit Code
- Proposed Start and End Date
- LMS Course
- Group
- Scheduled Hours
- Predominant Delivery Mode
- Program Unique Supervised Hours
- Responsibility for training - tick the box for who will be responsible for training for this unit.
Click Continue.
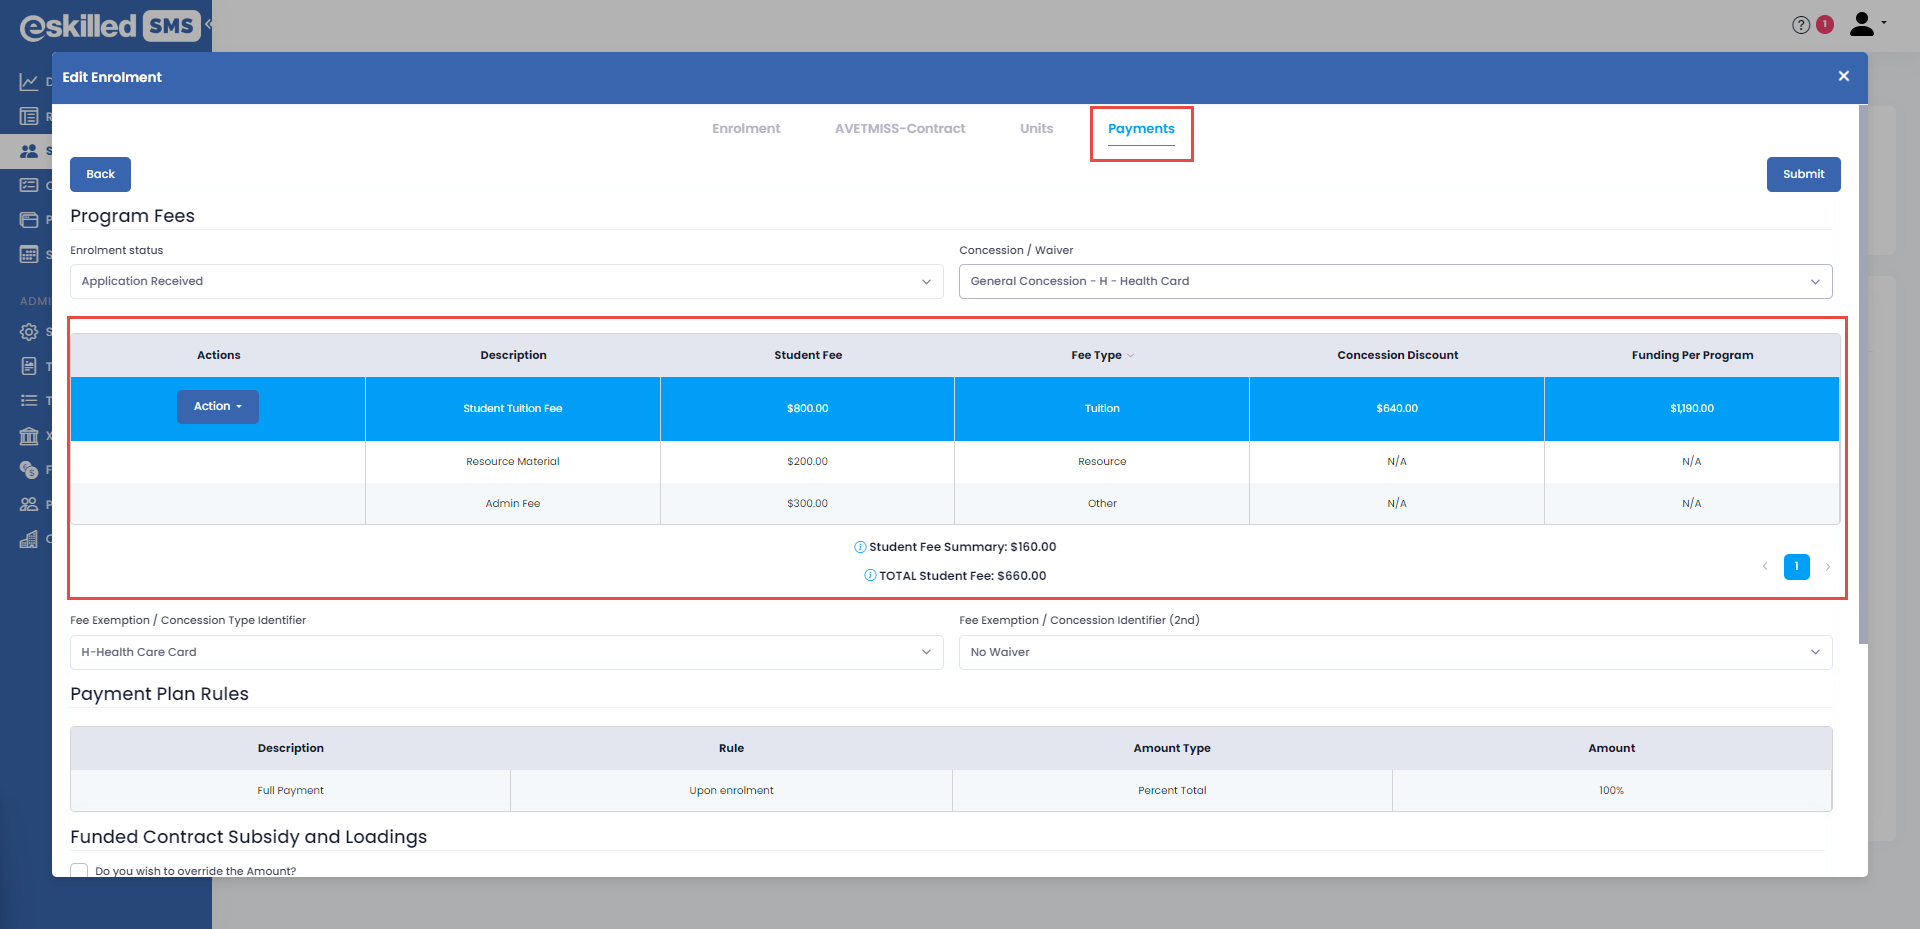
Step 5. Complete the Payments tab
In this tab, you can edit the Concessions and Waivers, select Program Fees, add Loadings, and see the Funding details of your funded Contract.
Program Fees
Complete the Program Fees information.
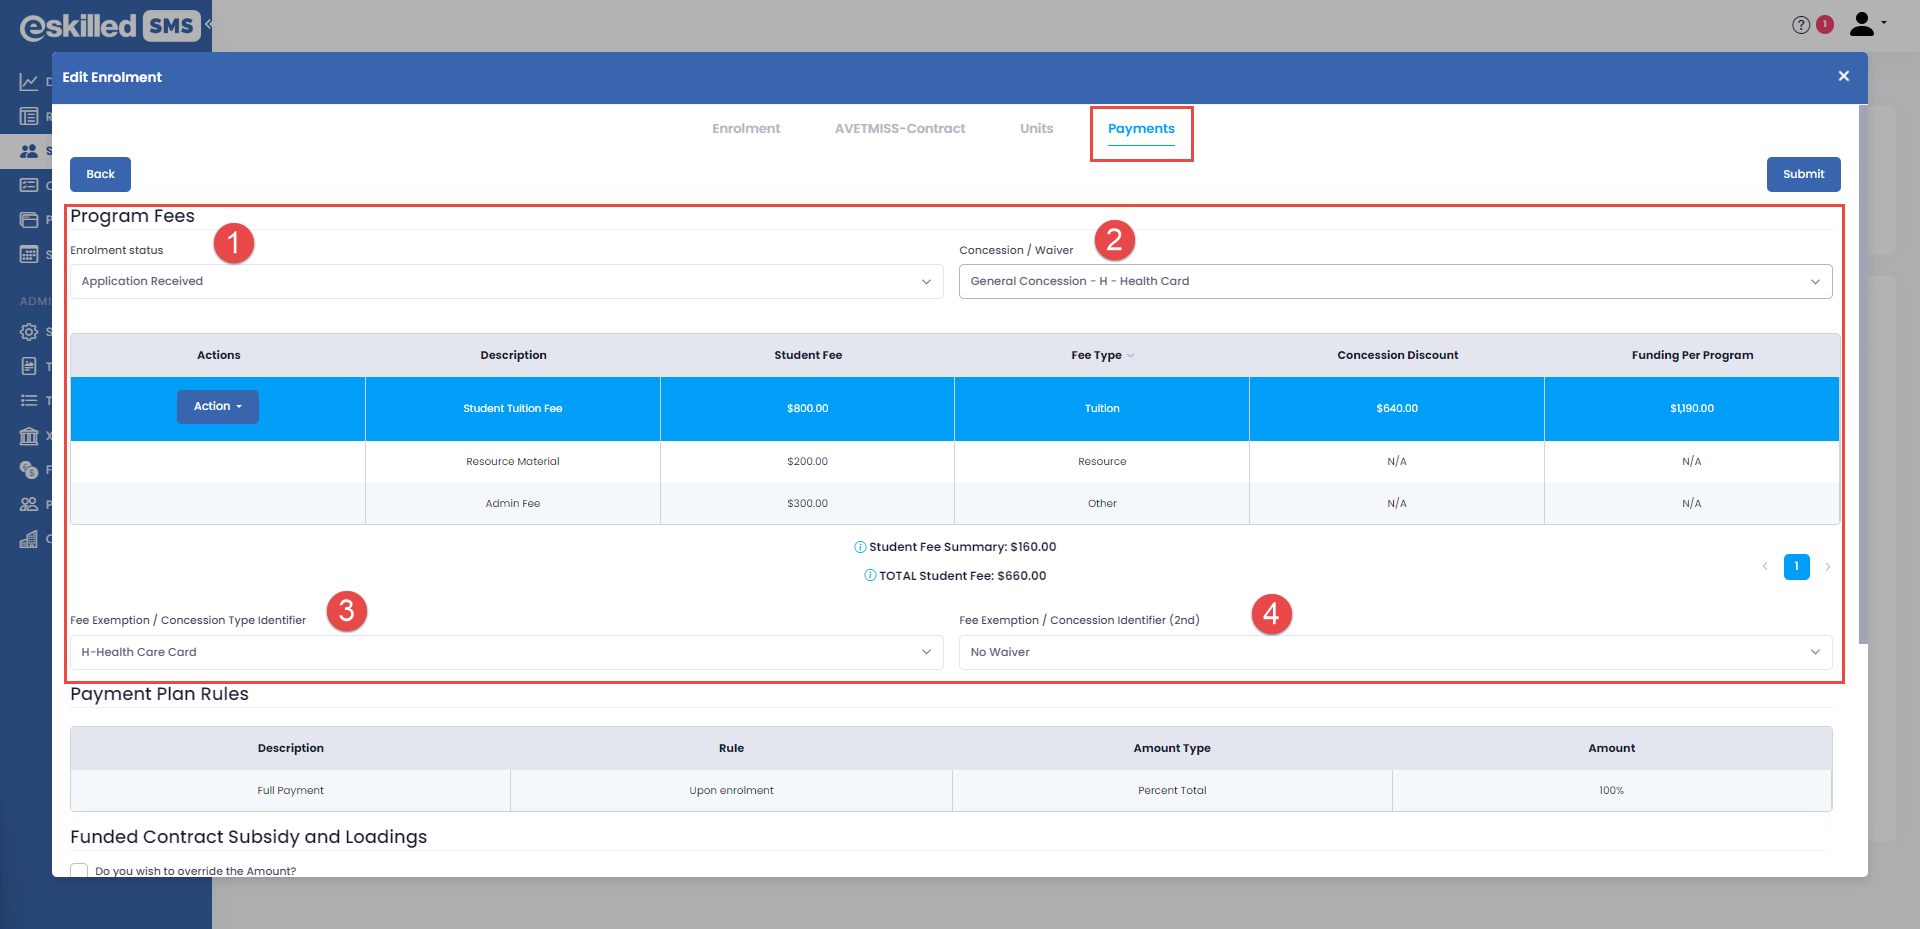
- Enrolment Status - Select the student's enrolment status from the drop-down field. The Enrolment status will determine if a payment needs to be made based on the Payment plan rules of the Program (e.g. full payment upon enrolment etc.)
- Concessions/Waivers - select the Concession or waiver that applies to the student.
- Fee Exemption/Concession Type Identifier - Select the applicable Fee Exemption/Concession Type ID based on your Concessions/Waiver choices. This field will default to the relevant identifier based on your concession/waiver selection.
- Fee Exemption/Concession Identifier (2nd) - If a Waiver is selected in the Concession/Waiver field, choose from the drop-down the Waiver identifier. This will default to NO Waiver if a Concession was selected in the Concession/Waiver field.
The Concession/Waiver drop-down will show options based on the funding schedule of the Contract for this program instance. Check your contract funding schedule in the Finance tab if you do not see any options here. Check if the concessions/waivers are also enabled in the AVETMISS tab of the Program Instance.
The Fees table will show all the Fees applicable for this program instance as set in the Financial tab of the Program Instance. You can click the Action button to edit the Student fee amount, which will only apply to this student enrolment.
If you do not see any program fees, ensure you have already set up Program fees from the Financial tab of your program instance.
Select the applicable Tuition Fee by clicking on the tick box. The Table will automatically compute based on the Student Fee and the Concession chosen.
If there is only one Tuition Fee set on the Financial tab of this program instance, the Program fees will default to that tuition fee.
- Concession Discount - this will be the amount discounted to the student based on the Concession you have chosen.
- Funding Per Program - is the funding per program amount set for this Program (Program Instance > Financial > Program Fees)
- Fees:
- Student Fee Summary - shows the summary of tuition fee to be paid by the student
- Total Student Fee - This shows all the student's fees, including Tuition, Resources and Other fees if applicable.
The payment plan for this program instance will also show in a table below the program fees.
If you do not see the Payment Plan table, make sure that you have selected a Payment Plan in the Financials tab of this program instance. (Programs > Program Instance > Financial > Payment Plan)
Funded Contract Subsidy and Loadings
In this last part of the Payment tab, you can see the computations for the expected Funding subsidy for this enrolment. You can further add Loadings if any are applicable for the student.
The information in this section is automatically calculated based on the program fees, funding subsidy, concessions or waivers, and loadings. You can still override amounts if manual entry is required.
- Subsidy Standard field - this field calculates the Subsidy expected based on the Funding for the Program plus any concessions or waiver amount granted to the student.
- Total Subsidy Expected - calculates the Subsidy Standard plus any loadings amount and fee waiver contribution if any.
- Needs Loading - select the applicable needs loading for the student from the drop-down.
- Needs Loading amount - indicates the Loading amount based on the percentage of the chosen Needs Loading. This field calculates the percentage amount from the Standard Subsidy.
- Location Loading - select from the drop-down the applicable needs loading for the student.
- Location Loading amount - indicates the Loading amount based on the percentage of the chosen Location Loading. This field calculates the percentage amount from the Standard Subsidy.
- Fee Waiver Contribution Subsidy Amount - calculates the fee waiver contribution subsidy for the RTO as granted by the State when a qualified student is given a fee waiver.
Fields that are grayed out show information that is automatically pre-filled or calculated. If you would like to Override any of the auto-calculated fields, check the tick box for "Do you wish to override the amount" below the section title.
Click Submit to save and update the enrolment details.
You have successfully enroled a student in a VIC-funded program instance!
Related Articles
How to Set Up Your Program Instance for VSL Report Collection
Overview VET Student Loans is a program that helps eligible students to enrol into approved VET Courses. All VET Student Loan (VSL) providers (‘providers’) that are approved under the VET Student Loans Act 2016 are required to report data for the VSL ...Creating a Funded Program Instance (VIC)
CREATING YOUR VIC-FUNDED PROGRAM INSTANCE Setting Up your Program Instance Details Step 1. Add a new Program Instance Go to PROGRAMS in the menu. Select PROGRAM INSTANCES in the Programs menu. Click ADD. Step 2. Complete the Program Information ...Enrolling a Student in a Funded Program (WA)
Enrolling a Student in a Funded Program Instance There are multiple ways to enrol a student in the Student Management System. A system administrator can manually enrol a student by creating a student and then enroling using the Enrolment Wizard. ...Enrolling a student in an NSW-funded program (Video Walkthrough)
In this video, we will walk you through how to enrol a student in a funded program in your Student Management System. You will need to have your Contract and Program already created before you can enrol a student. Refer to the Help Centre for ...Enrolling a Student in WA-Funded Program (Video Walkthrough)
In this video, we will walk you through how to enrol a student in a state-funded program for WA. You can also check out our step-by-step tutorials for detailed instructions.