How to Setup Campus
 Overview
What is Campus Feature in SMS
When to consider setting up Campus
If your RTO run training across multiple physical sites — different buildings, different suburbs, even different cities. Before campuses, there was no way to say "this group runs at the Parramatta site, not the CBD site" except by manually picking the right location each time. There was also no way for a user to say, "just show me everything happening at my campus."
Campuses solve this by letting you:
• Group locations under a meaningful name (the campus), so users see a short list of relevant locations instead of every delivery address in the system.• Assign program instances and groups to a campus, so the right campus flows automatically into schedules and enrolment views.• Filter entire pages by campus, so users at a particular site see only their own students, groups, and events — without changing how anyone else works.• Control access, so administrators decide which users can see and manage which campuses.

How to Setup Campuses
The Campuses tab shows a table with every campus in your organisation. The table displays:
• Campus Code — a short identifier (e.g. SYD-001)
• Name — the full campus name (e.g. "Sydney CBD Campus")
• Locations — a comma-separated list of delivery locations linked to this campus
• Active — a green checkmark or red X showing whether the campus is currently in use
A Show Inactive toggle above the table lets you include deactivated campuses in the list. By default, only active campuses are shown.
Step 1: Click the + (New) button to open the New Campus panel. The panel has these fields:
• Campus Code — a required short code. If your organisation has Auto-Set Campus Codes enabled (see Section 4), this field is filled in automatically and locked.
• Name — a required descriptive name.
• Active — a switch, on by default. New campuses start active.
• Locations — a multi-select dropdown listing every delivery location in your system. Pick the locations that belong to this campus. You can also click Create New Location to add a brand-new location without leaving the dialog.
Step 2: Click Save to create the campus. Once saved, It will immediately appear on the table.
Click the three-dot menu on any campus row and choose Edit. The same dialog opens, pre-filled with the campus's current details. Make your changes and click Save.
 Note: If the campus code was auto generated, the code field is locked on edit. Click the unlock icon next to the code field to type a custom code — but be aware that once you unlock it, the auto-set number is cleared, so the campus will no longer participate in the auto-generation sequence.
Setting | What It Does |
Auto Set Campus Code | A checkbox that turns the entire feature on or off. When off, users type campus codes manually. |
Campus Code Prefix | Optional text that goes before the number, e.g. SYD produces SYD-001. Leave blank for numbers only. |
Campus Starting Number | The first number in the sequence, e.g. 1 or 100. |
Campus Digit Padding | How many digits the number should have, e.g. 3 produces 001, 002, 003… |
When Auto Set is enabled and a user opens the New Campus dialog, the system:
Looks at every campus in your organisation (active and inactive) to find the highest number used so far.
Takes the next number, or the Starting Number — whichever is higher.
Pads it to the specified number of digits.
Prepends the prefix (with a hyphen) if one is set.
For example, with Prefix = SYD, Starting Number = 1, and Digit Padding = 3:
First campus → SYD-001
Second campus → SYD-002
After SYD-099 → SYD-100
Settings:
Output:
When editing a location in the Locations tab, you will see a Campuses multi-select — this is the new Campus feature. Check the campuses this location belongs to.
Step 2: Create or Edit a Group — Campus (Required field)
• Shows the Campus dropdown on the Group page (it is hidden when no campuses are linked)
•Makes it required — you must pick a campus before you can save the group.
•Filters the dropdown to show only the campuses linked to that Program Instance.
• Auto-selects the campus if there is only one option.
• Student enrolments in that group are associated with the campus (used for filtering on the Student page).
• Schedule events created for that group can auto-fill their Campus from the group.
• The Campus Switcher (Section 9) filters views to only show groups — and therefore students and events — belonging to the selected campus.
• Group Search can display and filter by campus.
Each role row includes a Campuses multi-select — but only if your organisation has at least one active campus.
The dropdown shows up to three kinds of options:
All Enrolment Data — the default. No campus filtering is applied. You see everything you normally would, including enrolments in groups with no campus set. This option is hidden for users who have not been granted access to uncampused data.
All Campuses — filters your view to show data across all campuses you have access to (your direct assignments plus any inherited from your role). Data in groups with no campus set is hidden.
Individual campuses — one entry per campus you have access to. Selecting one narrows everything to that single campus.
Click any option to switch to it. A check mark appears next to the active selection.
"I don't see the Campuses tab in Settings. Why?"
Your user account does not have the Settings — Campuses — View permission. Ask your administrator to add it to your role.
"Why can't I delete a campus?"
The system blocks deletion when the campus is still linked to one or more of: a Program Instance, a User, a Role, or a Group. You will see a message telling you which associations are in the way. The recommended approach is to deactivate the campus instead — uncheck the Active switch and save. This removes it from all dropdowns and filters without breaking any existing data.
"What do the options in the Campus Switcher mean?"
All Enrolment Data — no filter. See everything, including groups with no campus.
All Campuses — show data across all campuses you have access to. Groups with no campus are hidden.
Individual campus — show data for that campus only.
"Why don't I see 'All Enrolment Data' in my Switcher?"
This is the default setting for users with campus access — you see data within your campuses. You can still switch between "All Campuses" and individual campuses. If you need to see uncampused data, contact your administrator.
"Why does the Campus Switcher show 'All Campuses' when I log in?"
This is the default starting view for users with campus access. You can switch to any individual campus at any time. If you need to see uncampused data, contact your administrator.
"What's the difference between assigning a campus to a user vs. their role?"
Role assignment: Every user with that role gets access to those campuses. Best for broad access — e.g. "all trainers in the Sydney role can see Sydney campuses."
User assignment: Only that specific user gets access. Best for exceptions — e.g. a trainer who normally works at one campus but occasionally covers another.
Both types of assignment are combined, so a user's Campus Switcher shows all campuses from both sources.
"I don't see the Campus dropdown on the Schedule Event modal. Why?"
Your organisation has not set up any campuses yet, or has no active campuses. Once an administrator creates at least one active campus, the dropdown appears.
"Why is Campus required on the Group page?"
The Program Instance you selected for the group has campuses linked to it. When this is the case, the system requires you to choose which campus this group belongs to. If you do not want the Campus field to appear, either remove all campus links from the Program Instance, or select a Program Instance that has no campus links.
"What happens when a campus is deactivated?"
The campus stops appearing in all dropdowns (Campus Switcher, Group page, Schedule Event modal, filter bars).
Existing data is not changed — groups, users, roles, and schedule events keep their campus assignments.
If a schedule event or group already has a deactivated campus, that campus still appears when editing so you can see (and change) the current value.
Users who had the deactivated campus in their Campus Switcher will no longer see it.
"Can one location belong to multiple campuses?"
Yes. The location-campus relationship is many-to-many. A shared delivery location can belong to two campuses, and both will show it in their filtered location lists.
"If I select a campus in the Schedule filter bar, then switch campuses in the header, what happens?"
The header Campus Switcher takes priority. If you have a campus selected in the header, the Schedule Tab's Campus filter is locked to that campus. If you are on "All Enrolment Data" in the header, you are free to use the filter bar's Campus dropdown independently.
"Will existing schedule events change when we add campuses?"
No. Existing schedule events have no campus set (the field is blank). They will continue to appear in all views and filters. Only new or edited events will have a campus selected.
"Who can set the campus access toggle for a user?"
Any administrator with access to edit the employee's record on the People page. The toggle appears automatically when the employee has campus associations.
"What happens if an admin turns the toggle OFF but the user is already logged in?"
The change takes effect on the user's next login. Their current session is unaffected.
How to Filter Campuses — Dashboard, Finance & Company Pages
Filter: Dashboard — Enrolments Tab
When a campus or "All Campuses" is active, everything on the Dashboard Enrolments tab reflects only enrolments linked to groups in your campus set:
Summary cards — Applications Received, Applications Approved, Enrolments This Month, Enrolments This Year, Programs Completed This Year, and Units Completed This Year all show counts for your campus set only.
Charts — Enrolments by Program, Enrolments by Program Instance, Units Complete by Unit End Date, % of Units Not Completed by Proposed End Date, Students at Risk, Student Attendance, and Unique Student Enrolments all reflect your campus set.
Exports — any Excel export you download from this tab contains the same filtered data you see on screen.
A blue banner at the top of the tab reminds you that a campus filter is active. When you switch back to "All Enrolment Data," the banner disappears and all data returns to the full, unfiltered view.
Filter: Dashboard — Financial Tab
The same campus context applies to the Financial Performance tab:
Revenue charts — Daily/Weekly/Monthly revenue, Revenue by Program, Revenue by Program Instance, Projected Payment Plan Revenue, and Revenue by Location all reflect your campus set.
Unpaid Invoices — aging buckets (0–30, 31–60, 61–90, 90+ days) only show invoices linked to enrolments in your campus set.
Total Revenue summary and Tuition/Resource/Others breakdown — these are calculated from the filtered chart data, so they automatically match what you see.
The same blue banner appears at the top of this tab when a campus filter is active.
All Enrolments Data:
Filter: Finance Page
The Finance page now respects your campus selection across the following tabs:
Invoices — only invoices linked to enrolments in your campus set appear. Invoices without an enrolment link are hidden when a campus filter is active.
Commissions — only commissions for matching invoices are shown. The RCTI sub-tab shows RCTIs where at least one linked invoice matches your campus set. When you expand an RCTI row, only the matching commission lines appear.
Refunds — only refunds linked to matching invoices are shown.
All existing Finance page filters (date ranges, student search, amounts, paid status) continue to work — they narrow results within the campus-filtered data.
A blue banner appears at the top of the Finance page whenever a campus filter is active. It remains visible regardless of which tab you are viewing.
Filter: Company Page
The Company page filters its data to match your campus selection:
Company dropdown — only companies with at least one enrolment in your campus set appear. When you switch to "All Enrolment Data," all companies return.
Enrolments tab — once you select a company, only enrolments matching both that company and your campus set are shown.
Invoices tab — only invoices matching both the selected company and your campus set are shown.
Company Role users are unaffected — they never see the Switcher or Company dropdown, and their data is already scoped to their assigned company. For these users, campus filtering does not apply.
A blue banner appears at the top of the Company page when a campus filter is active.
All Enrolment Data:
Campus filtered Data:
Campus Filtering: FAQs
"What does All Campuses show on these pages?"
It shows data across all campuses you have access to — your direct assignments plus any campuses inherited from your role. This is the same "All Campuses" behaviour you already know from the Student and Schedule pages, now extended to these new pages.
"Why is my Company dropdown showing fewer companies?"
The Company dropdown only lists companies that have at least one enrolment linked to your active campus set. This is intentional — it keeps the dropdown relevant to the campus context you are working in. Switch to "All Enrolment Data" to see all companies again.
"Does campus filtering affect my Dashboard exports?"
Yes. Excel exports from the Dashboard Enrolments and Financial tabs contain the same campus-filtered data you see on screen. If you need a full export, switch to "All Enrolment Data" before exporting.
"I don't see a campus banner on the Dashboard or Finance page. Why?"
Your organisation has not set up any campuses, or you have no campus access. The banner only appears when a campus filter is actively applied.
When a campus or "All Campuses" is active, everything on the Dashboard Enrolments tab reflects only enrolments linked to groups in your campus set:
Summary cards — Applications Received, Applications Approved, Enrolments This Month, Enrolments This Year, Programs Completed This Year, and Units Completed This Year all show counts for your campus set only.
Charts — Enrolments by Program, Enrolments by Program Instance, Units Complete by Unit End Date, % of Units Not Completed by Proposed End Date, Students at Risk, Student Attendance, and Unique Student Enrolments all reflect your campus set.
Exports — any Excel export you download from this tab contains the same filtered data you see on screen.
A blue banner at the top of the tab reminds you that a campus filter is active. When you switch back to "All Enrolment Data," the banner disappears and all data returns to the full, unfiltered view.
The same campus context applies to the Financial Performance tab:
Revenue charts — Daily/Weekly/Monthly revenue, Revenue by Program, Revenue by Program Instance, Projected Payment Plan Revenue, and Revenue by Location all reflect your campus set.
Unpaid Invoices — aging buckets (0–30, 31–60, 61–90, 90+ days) only show invoices linked to enrolments in your campus set.
Total Revenue summary and Tuition/Resource/Others breakdown — these are calculated from the filtered chart data, so they automatically match what you see.
The same blue banner appears at the top of this tab when a campus filter is active.
All Enrolments Data:
The Finance page now respects your campus selection across the following tabs:
Invoices — only invoices linked to enrolments in your campus set appear. Invoices without an enrolment link are hidden when a campus filter is active.
Commissions — only commissions for matching invoices are shown. The RCTI sub-tab shows RCTIs where at least one linked invoice matches your campus set. When you expand an RCTI row, only the matching commission lines appear.
Refunds — only refunds linked to matching invoices are shown.
All existing Finance page filters (date ranges, student search, amounts, paid status) continue to work — they narrow results within the campus-filtered data.
A blue banner appears at the top of the Finance page whenever a campus filter is active. It remains visible regardless of which tab you are viewing.
The Company page filters its data to match your campus selection:
Company dropdown — only companies with at least one enrolment in your campus set appear. When you switch to "All Enrolment Data," all companies return.
Enrolments tab — once you select a company, only enrolments matching both that company and your campus set are shown.
Invoices tab — only invoices matching both the selected company and your campus set are shown.
Company Role users are unaffected — they never see the Switcher or Company dropdown, and their data is already scoped to their assigned company. For these users, campus filtering does not apply.
A blue banner appears at the top of the Company page when a campus filter is active.
All Enrolment Data:
"What does All Campuses show on these pages?"
It shows data across all campuses you have access to — your direct assignments plus any campuses inherited from your role. This is the same "All Campuses" behaviour you already know from the Student and Schedule pages, now extended to these new pages.
"Why is my Company dropdown showing fewer companies?"
The Company dropdown only lists companies that have at least one enrolment linked to your active campus set. This is intentional — it keeps the dropdown relevant to the campus context you are working in. Switch to "All Enrolment Data" to see all companies again.
"Does campus filtering affect my Dashboard exports?"
Yes. Excel exports from the Dashboard Enrolments and Financial tabs contain the same campus-filtered data you see on screen. If you need a full export, switch to "All Enrolment Data" before exporting.
"I don't see a campus banner on the Dashboard or Finance page. Why?"
Your organisation has not set up any campuses, or you have no campus access. The banner only appears when a campus filter is actively applied.
How to Filter Campuses — Reports Pages
Reports Page
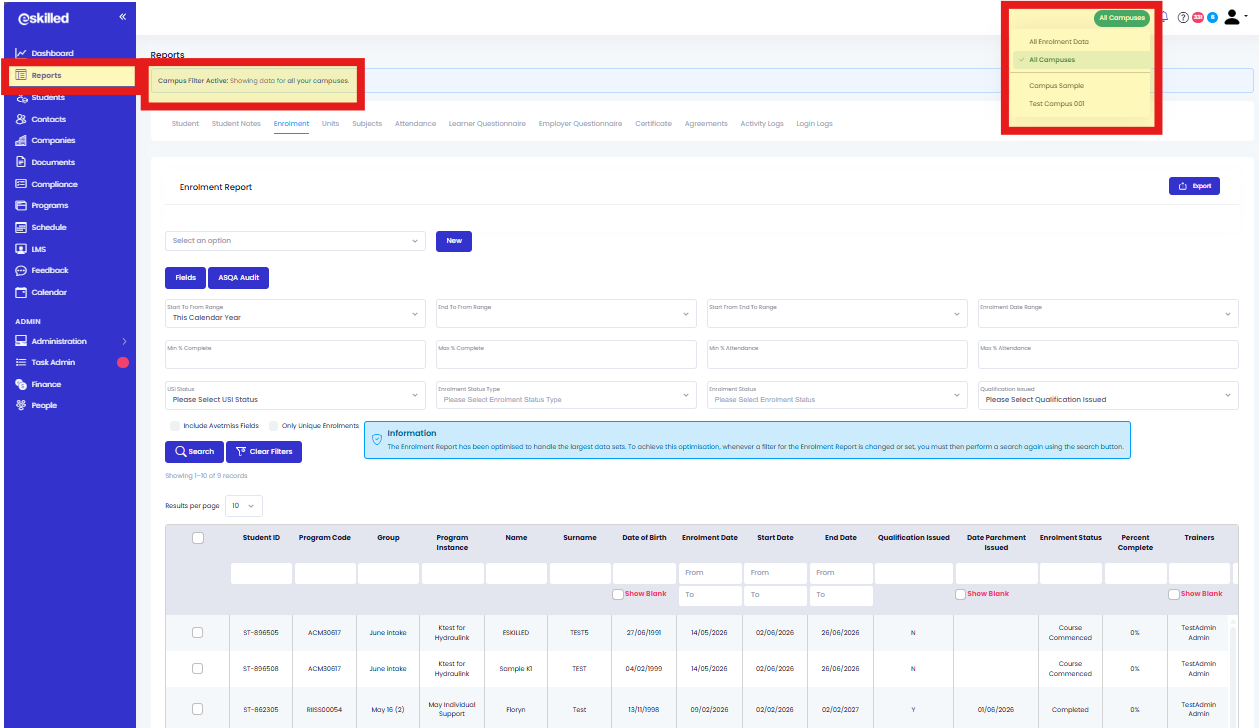
The Reports page responds to the Campus Switcher in the header bar. When you select a campus or "All Campuses," every report and tool on this page filters its data to show only records linked your selected campus set.
The areas covered are:
- Student — students with enrolments in the campus set
- Student Notes — notes tied to campus-matching enrolments or students
- Enrolments — enrolments in groups belonging to the campus set
- Units — competency units from campus-matching enrolments
- Subjects — subjects from campus-matching enrolments
- Attendance — attendance records for groups in the campus set
- Agreements — signing records for students with campus-matching enrolments
- Certificate Report — all certificates issued, filtered by campus
- Create Bulk Certificates — dropdowns and Run results narrowed to the campus set
A blue Campus Filter banner now appears at the top of the Reports page whenever a campus or All Campuses is active. It stays visible regardless of which report you are viewing:
 Filter Reports Page - Student Report
When a campus or All Campuses is active, the Student Report shows only students who have at least one enrolment in a group belonging to your campus set.
Filter Reports Page - Student Report
When a campus or All Campuses is active, the Student Report shows only students who have at least one enrolment in a group belonging to your campus set.
Example: You select "Springfield Campus." A student enrolled in a group at Springfield appears. A student enrolled only in groups at other campuses does not appear. A student with no enrolments at all also does not appear.
All existing filters on the Student report — date ranges, search fields, Company or Teacher role restrictions — continue to work. They narrow results within the campus-filtered data.
Filter Reports Page - Student Notes Report
The Student Notes Report handles two types of notes differently: - Notes linked to an enrolment — shown only if that enrolment's group belongs to your campus set.
- Notes with no enrolment link — shown only if the student has at least one other enrolment whose group belongs to your campus set.
This means a note with no enrolment link is not automatically excluded — it still appears as long as the student has some connection to your campus set through another enrolment.
Example: A student has two enrolments — one at Springfield Campus, one at Riverside Campus. With Springfield selected, both a linked note tied to the Springfield enrolment and an unlinked general advisory note for this student appear. A note tied to the Riverside enrolment does not.
Filter Reports Page - Enrolments Report
The Enrolments Report filters directly by the group's campus. Only enrolments whose group belongs to your campus set are shown.
This is the simplest filter — if a group is assigned to Springfield Campus, every enrolment in that group appears when Springfield is selected. Enrolments in groups assigned to other campuses do not. All the existing Enrolments report features — paging, column filters, exports, and the Company or Teacher role restrictions — continue to work alongside the campus filter.
Filter Reports Page - Units Report
The Units Report shows competency units linked to enrolments. When a campus is active, only units from enrolments whose group belongs to your campus set are shown.
Example: A unit "CMPUnIt001 - Campus Unit 1" is linked to an enrolment at Springfield Campus. With Springfield selected, it appears. The same unit linked to a different enrolment at Riverside Campus does not appear.
Filter Reports Page - Subjects Report
The Subjects Report works the same way as Units — only subjects linked to enrolments whose group belongs to your campus set are shown.
If a subject belongs to an enrolment in a Springfield group, it appears when Springfield is selected. If it belongs to an enrolment in a group not in your campus set, it is hidden.
Filter Reports Page - Attendance Report
The Attendance Report filters to only attendance records for groups in your campus set. The path is slightly different from the other reports because attendance records are linked to schedule events, which can be connected to multiple groups. A record appears if any of the schedule event's groups belong to your campus set.
Example: A schedule event has two groups — one at Springfield, one at Riverside. With Springfield selected, attendance records for this event still appear because at least one of its groups matches.
Filter Reports Page - Agreements Report
The Agreements Report (also called Report Signing) shows signing records for students. When a campus is active, a signing record appears only if the associated student has at least one enrolment whose group belongs to your campus set.
This uses the student's entire enrolment history — if a student has any enrolment in a Springfield group, their signing records appear when Springfield is selected, even if the record itself is not directly linked to that enrolment.
Filter Reports Page - Certificate Report
The Certificate Report shows every certificate that has been issued across all enrolments. When a campus is active, the table narrows to show only certificates linked to enrolments whose group belongs to your campus set.
Example: You select Springfield Campus. A certificate issued for an enrolment at Springfield appears. A certificate for an enrolment at Riverside does not.
All existing filters on the Certificate Report — date ranges, certificate type, and search — continue to work alongside the campus filter.
Filter Reports Page - Create Bulk Certificates
The Create Bulk Certificates tab has two parts, and both respond to the campus filter:
Filter Dropdowns
When you type into the Program, Program Instance, or Group search dropdowns, the results are narrowed to your campus set. The existing cascade logic still works — selecting a Program narrows the Program Instance dropdown, and selecting a Program Instance narrows the Group dropdown — but each step only shows options with groups in your campus set.
Example: A program has two program instances — one with groups at Springfield Campus and another with groups at Riverside Campus. With Springfield selected, only the Springfield-linked program instance appears in the dropdown. Groups in the next dropdown are further narrowed to Springfield only.
Run Results When you select your dropdown options and click Run, the resulting enrolment list is also campus-filtered. Even though the dropdowns already narrow your options, the Run step applies the filter again as a safety check — you only see enrolments in campus-matching groups.
All existing inline filters on the results table (search, status columns) work on the already-campus-filtered data.
Filter Reports Page - FAQs
"How It Works with Company Users and Trainer Role Users"
For Company Users, their data is already narrowed, and all existing rules still apply. Campus Switcher will not show on Company log in since currently there is no way to relate Company Users to campuses.
For Trainer Role Users, the data is already narrowed to enrolments linked to them. When they also select a campus, both filters apply — they only see data that relates to them and the campus set.
Example: A Trainer Role user selects Springfield Campus. They see only enrolments where the group belongs to Springfield. Enrolments for other campuses are hidden.
Their data is already narrowed to their assigned students or groups. The campus filter applies on top, further narrowing to only those records in the campus set.
In all cases, the campus filter is additive — it never overrides or replaces your existing role-based restrictions.
"What about Clients Without Campuses?"
If your organisation has not set up any campuses, the Reports page works exactly as it always has. You will see no Campus Filter banner, and none of your reports will be filtered — every report and every dropdown show all data as before. There is nothing to enable, configure, or turn off. The feature simply has no effect unless your organisation has created at least one active campus.
"Why don't I see a Campus Filter banner on the Reports page?"
The banner only appears when you have selected a campus or All Campuses in the header Switcher. If the Switcher shows "All Enrolment Data," the banner is hidden and all reports are unfiltered. If your organisation has no campuses set up, the Switcher itself may not be visible at all.
"I selected All Campuses but one of the reports shows no data — is that a bug?"
Not necessarily. All Campuses filters to groups belonging to any campus in your personal campus set. If none of those groups have records that match the report's criteria, the report can legitimately be empty. Try switching to "All Enrolment Data" to see if data appears unfiltered — if it does, the campus filter is working correctly and there simply aren't matching records for your campus set.
"Does the campus filter affect my exports or saved reports?"
Yes. When you export data from any filtered report, the exported file contains only the campus-filtered data you see on screen. Switch to "All Enrolment Data" before exporting if you need a full data export.
"I'm a Company Role user — why do I see fewer results with a campus selected?"
As a Company Role user, your data is already narrowed to your assigned company. Selecting a campus adds a second filter — you now see only records that match both your company and the campus set. This is expected behaviour. Switch to "All Enrolment Data" to remove only the campus filter while keeping your company filter active.
"I can't find my program in the Create Bulk Certificates dropdown — where did it go?"
With a campus selected, the Program dropdown only shows programs that have at least one group in your campus set. If a program has no groups at the selected campus, it won't appear. Switch to "All Enrolment Data" to see all programs or check that the program has groups set up at your campus.
"I selected a program and campus in Create Bulk Certificates, but the Group dropdown is empty — why?"
This means the program you selected has no groups belonging to your campus set. The dropdown cascade narrows at each step — if no groups match both the selected Program Instance and the campus, the Group dropdown will be empty. Try switching campus or checking the group assignments.
The Reports page responds to the Campus Switcher in the header bar. When you select a campus or "All Campuses," every report and tool on this page filters its data to show only records linked your selected campus set.
The areas covered are:
- Student — students with enrolments in the campus set
- Student Notes — notes tied to campus-matching enrolments or students
- Enrolments — enrolments in groups belonging to the campus set
- Units — competency units from campus-matching enrolments
- Subjects — subjects from campus-matching enrolments
- Attendance — attendance records for groups in the campus set
- Agreements — signing records for students with campus-matching enrolments
- Certificate Report — all certificates issued, filtered by campus
- Create Bulk Certificates — dropdowns and Run results narrowed to the campus set
A blue Campus Filter banner now appears at the top of the Reports page whenever a campus or All Campuses is active. It stays visible regardless of which report you are viewing:
- Notes linked to an enrolment — shown only if that enrolment's group belongs to your campus set.
- Notes with no enrolment link — shown only if the student has at least one other enrolment whose group belongs to your campus set.
"How It Works with Company Users and Trainer Role Users"
For Trainer Role Users, the data is already narrowed to enrolments linked to them. When they also select a campus, both filters apply — they only see data that relates to them and the campus set.
Example: A Trainer Role user selects Springfield Campus. They see only enrolments where the group belongs to Springfield. Enrolments for other campuses are hidden.
Their data is already narrowed to their assigned students or groups. The campus filter applies on top, further narrowing to only those records in the campus set.
In all cases, the campus filter is additive — it never overrides or replaces your existing role-based restrictions.
"I selected All Campuses but one of the reports shows no data — is that a bug?"
Not necessarily. All Campuses filters to groups belonging to any campus in your personal campus set. If none of those groups have records that match the report's criteria, the report can legitimately be empty. Try switching to "All Enrolment Data" to see if data appears unfiltered — if it does, the campus filter is working correctly and there simply aren't matching records for your campus set.
"Does the campus filter affect my exports or saved reports?"
"I'm a Company Role user — why do I see fewer results with a campus selected?"
"I can't find my program in the Create Bulk Certificates dropdown — where did it go?"
With a campus selected, the Program dropdown only shows programs that have at least one group in your campus set. If a program has no groups at the selected campus, it won't appear. Switch to "All Enrolment Data" to see all programs or check that the program has groups set up at your campus.
"I selected a program and campus in Create Bulk Certificates, but the Group dropdown is empty — why?"
This means the program you selected has no groups belonging to your campus set. The dropdown cascade narrows at each step — if no groups match both the selected Program Instance and the campus, the Group dropdown will be empty. Try switching campus or checking the group assignments.