How to Use Agent Commissions
 Overview

Overview
Commissions for Agents, which relates to commissions based on settings and calculations that the agent will get according to an Enrolment that they are an Agent of.
Note: This exclusive feature is only available for Maximise Package subscribers. Unlock the full potential of your SMS with the Maximise Package. To upgrade your plan and access this feature, please contact support@eskilled.com.au.
Note: This exclusive feature is only available for Maximise Package subscribers. Unlock the full potential of your SMS with the Maximise Package. To upgrade your plan and access this feature, please contact support@eskilled.com.au.
 Step Tutorial
How to Add Agent Commissions?
- Login as your SMS Admin account
- Navigate to your existing Company or create a new one, if needed.
- Use/add Agent as Company Type.
- A new switch will appear once Company Type = Agent. Enable the Commissions Switch.
NOTE: This toggle is only available for Admin users and is NOT shown when Company Contact is logged in. - Once Commissions is enabled, a new section for Commission - Defaults will appear.
- Commissions - Toggles for $ and % will appear with an Amount text field. Only one toggle can be set as ON between $ and %.
- % will take a percentage out of the tuition fee to be allotted to commissions.
- $ will take fixed amount from the tuition fee and will be allotted to commissions.
- GST on Commissions - Dropdown for GST with GST Not Charged and GST Charged as options. Default value is GST Not Charged.
- Selecting GST not charged will not add GST to commission payments.
- Otherwise, selecting GST charged will add GST to commissions payments.
- Recipient-created tax invoice (RCTI) - Toggled for Recipient-created tax invoice (RCTI). Toggle to YES to enable RCTI reporting.
- Complete this section then click UPDATE.
How to Set Agent Commissions in Program Instance?
We can set Agent Commissions at the Program Instance level. Follow the steps below:
- Go to Programs
- Go to the Program Instances Tab
- Select your Program Instance
- Navigate to the Financial subtab
- Click on the Commissions subtab
- Click New
For steps 1 to 6, refer to the image below: - Select your Agent.
- Once Agent is selected, the Commission amount field will be automatically filled based on the assigned commission for that specific Agent. You may also edit this amount if needed.
- Click Save.
For steps 7 to 9, refer to the image below:
How to Add Agent Commissions During Student Enrolment?
The Commission settings will apply to student enrolments that are enrolled through the following:
- Bulk Import and Enrol in Students page
- Bulk Enrol in Reports page > Enrolment tab
- Company External Enrolment where Company Type = Agent with Commissions
- Enrolment Wizard in Students page > Enrolments tab > New Enrolment
Handling Commissions on Student Invoices?
When you create an invoice based on a student's payment plan, commissions are calculated and applied to the invoice.
Here's how it works:
- For single payment, full commission is collected from the single invoice.
- For multiple payments, the commission is deducted from the tuition fees until full commission is collected.
For example, commission is set to 10% and Tuition Fee totals is $1500:
- For single payments, 10% of the tuition fee ($150) will be applied to a single invoice.
- For multiple payments, 10% commission will be applied to the $1,500 tuition fee throughout the instalment plan totalling to $150 once all payments are complete.
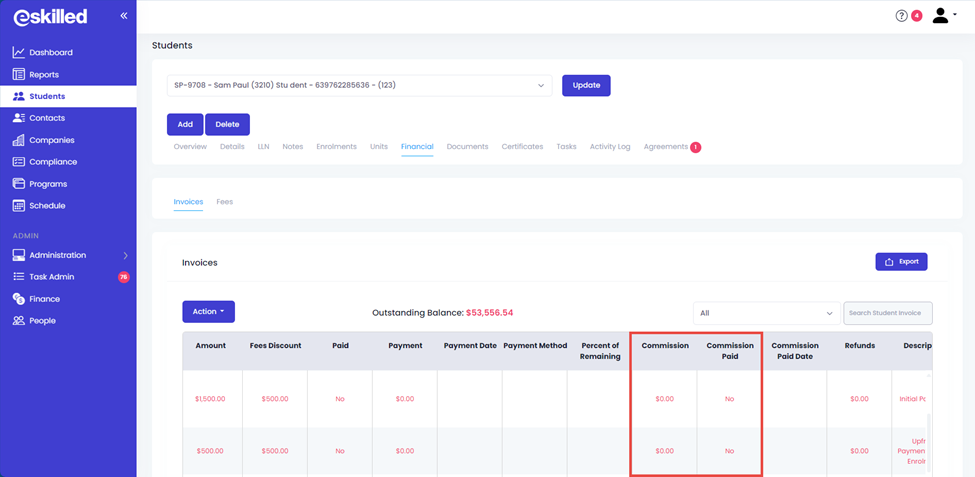
In Students page > Financial tab, new columns labelled Commission and Commission Paid will show the Commission.

How to Setup Email Templates for RCTI Report Email?
- Click on Administration, then Templates.
- Go to the Email Templates tab.
- Click Add.
- Enter your Email Template Name.
- Enter your Email Subject.
- Click on the dropdown list and select RCTI as the Email Type.
- Use the text editor to draft your Email Body.
NOTE: You may also use dynamic field related to your email. These dynamic fields are in {} e.g. {Commission Amount}, {RCTI Id}, etc.
For steps 1 to 7, refer to the image below:
Congratulations on completing this tutorial. We hope this has been helpful to you and your organisation. For any questions or concerns regarding this function, please reach out to us via email at support@eskilled.com.au
Related Articles
How to Use Custom Fields
OVERVIEW Custom fields allow you to capture specific information in your SMS that may not be included in the pre-defined forms. Using custom fields enable you to gather and store information that is unique to your organisation’s needs, allowing you ...How to Use the Form Creator (Maximise)
Overview Welcome to our tutorial on the new Form Creator in the Student Management System (SMS). This powerful tool allows users to create customised Waitlist Forms, allowing interested individuals to easily enter their details and join the waitlist ...How to Use the Attendance Report Feature
Overview You can monitor your students' attendance using the Student Management System (SMS). This feature allows you to view and generate attendance report. Please note that only scheduled training sessions are recorded. In this tutorial, we will ...How to Use RMS - Risk Management System
Overview This tutorial will guide users on how to utilise the Risk Management System from the SMS Dashboard page. Why RTOs Need a Risk Management System in Their SMS Risk management is an important part of how Registered Training Organisations (RTOs) ...How to Use Contacts and Waitlists (Maximise)
Overview We're excited to introduce a new feature called Contacts and Waitlists to our Student Management System. This feature is designed to streamline the process of managing individuals who are not yet enrolled as students but have shown interest ...