How to Integrate and Set up SMS with Xero

OVERVIEW
In this tutorial, we will show users how to integrate Xero Accounting Software with the Student Management System allowing users to export invoices to Xero, mark invoices as paid in the SMS and void invoices that are deleted in the SMS.
This tutorial will focus on integrating Xero with the SMS and how to set up the SMS to ensure that Invoices gets exported to Xero and is tagged with the correct account codes.

NOTE: This exclusive feature is only available for Performance and Compliance Plus Package subscribers. Unlock the full potential of your SMS with the Performance and Compliance Plus Package. To upgrade your plan and access this feature, please contact our Support team.

IMPORTANT
Before proceeding with the steps below, ensure that your SMS admin account has been granted access to Xero. If you haven’t yet requested this access, please contact eSkilled support at support@eskilled.com.au. Once Xero access is provided, please log out of the SMS and log back in for the settings to refresh.
Once integrated, please take note of the sync timings below between the SMS and Xero:
- All invoices set as Paid in XERO will also set the invoice status to Paid in the SMS after 2 hours.
- All payments added in XERO will reflect as Paid in the SMS after 2 hours.
- A scheduled system task will run every 2 hours to check for invoices that are qualified to be exported to Xero. All exported invoices will then appear in the “Invoices” section of Xero Accounting Software under “Business” menu.
- A scheduled system task will run every 2 hours to check for invoices that are qualified to be exported to Xero. All exported invoices will then appear in the “Invoices” section of Xero Accounting Software under “Business” menu.

STEP TUTORIAL
Integrating/Establishing Connection between SMS and Xero:
Step 1. Go to Xero Developer by visiting https://developer.xero.com/ and log in.
Step 2. In the My Apps section, click on the “New App” button located in the upper right corner.
Step 3. Fill in the required details to create a new app:
- App name: Enter the public name of the application you are registering. This is the name people will see on the screen during the grant permission process. The App Name should be a name they are familiar with. For example, "eSkilled - SMS".
- Integration type: Select “Web app”.
- Company or application URL: Enter your SMS URL, for example, https://insertyourSMSURLhere.rto.net.au/
- Redirect URI: Enter your SMS URL followed by “/Finance/Callback”, for example, https://insertyourSMSURLhere.rto.net.au/Finance/Callback
Step 4. Tick the checkbox to agree to the Terms and Conditions and click on the “Create app” button.
Step 5. Once the app is created, go to the Configuration menu. Keep note of the Redirect URI, Client Id, and generate a Client Secret Key.

 NOTE: The Client Secret Key secret key can only be generated twice so make sure to copy that into a secure document for future reference.
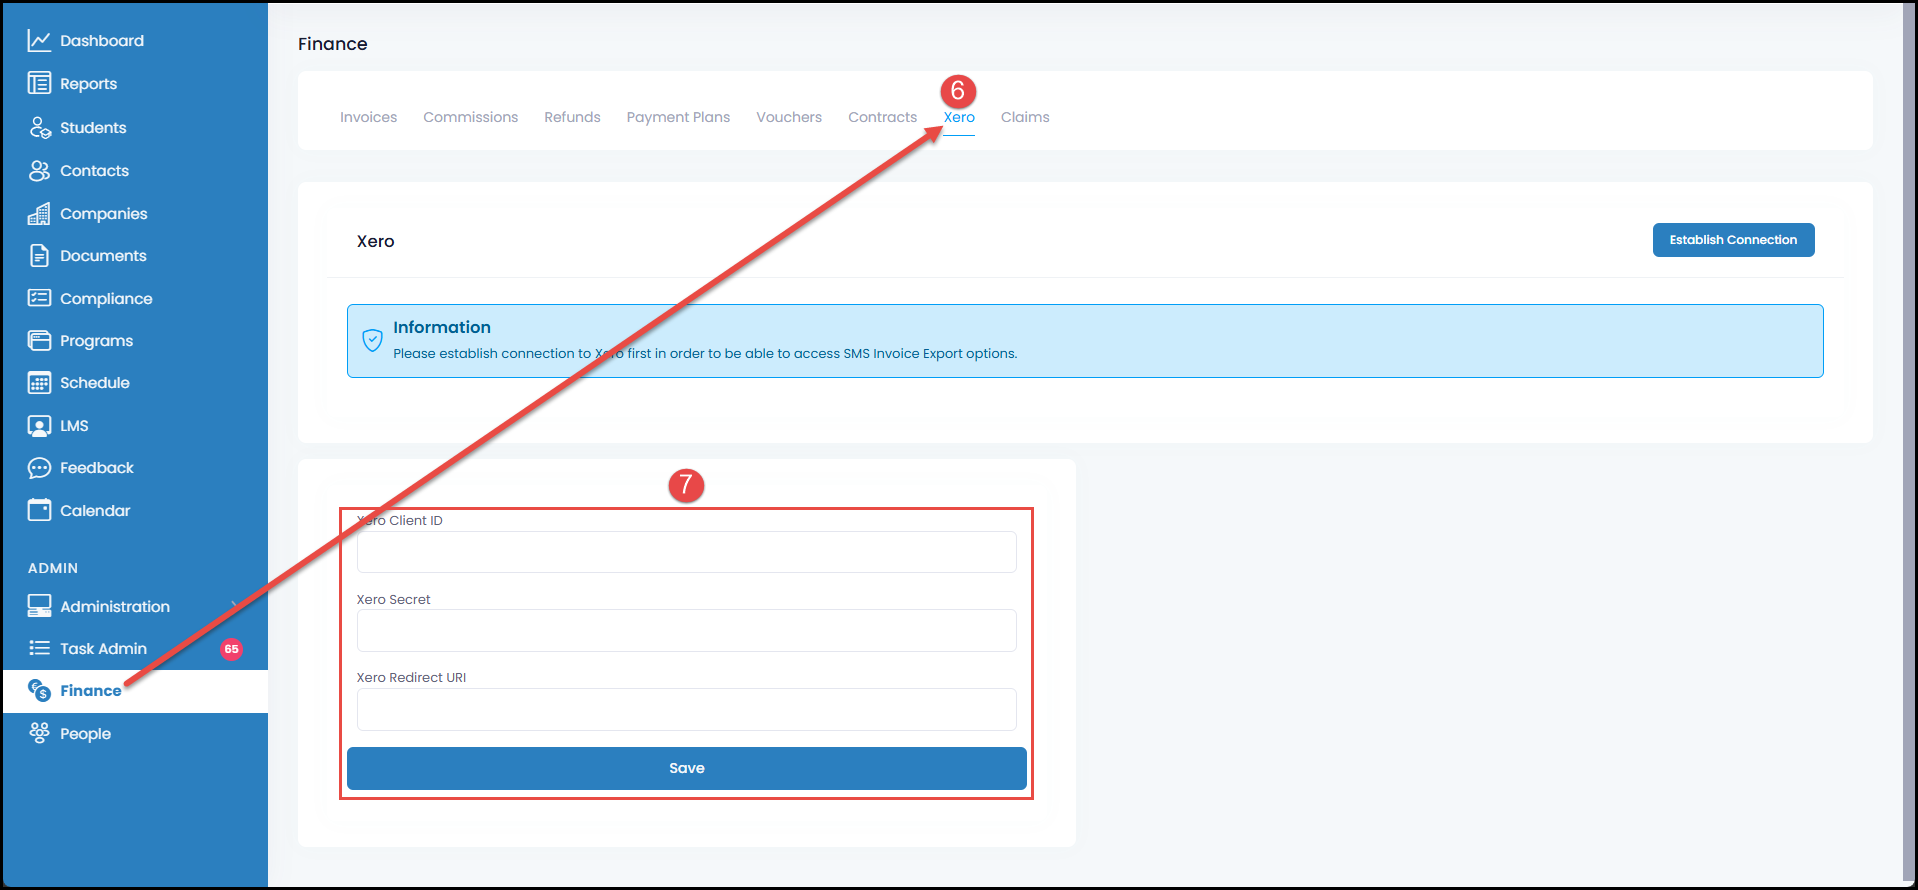
Step 6. Log in to SMS and navigate to the Finance Page > Xero Tab
Step 7. Paste the tokens copied from Xero Developer:
- Xero Client ID
- Xero Secret
- Xero Redirect URI
For steps 6 and 7, refer to the image below:
Step 8. Click on the “Save” button. Afterwards, log out of SMS and then log back in.
Step 9. After logging back in to SMS, go back to the Xero tab and click on Establish Connection then select an organisation from the dropdown menu.
Step 10. Authorize access to Xero by clicking on the “Allow access” button.
For steps 9 and 10, refer to the image below:
Setting Xero Export Options:
Once you have successfully integrated Xero with SMS, proceed to setting up Xero to allow invoice exporting. Please see steps below:
Step 1. In the SMS, go to Finance > Xero > Xero Export Options
Step 2. Enable "Export to Xero" switch. This will allow the invoices generated in the SMS to be exported to Xero.
Step 3. Export Invoices as Drafts.
Step 4. Export Unpaid Invoices _ Days Before Due Date - enter the # of days in the blank field.
Step 5. Override Default Timing for Company Invoices will allow the system to override the default export timing for Company Invoices. When enabled, this setting applies to:
- Employer Invoices
- Company Credit Invoices
- Company Purchase Order Invoices
Step 6. Set the date of the first invoice that will be exported to Xero.
- Any Invoice dated AFTER the first invoice will also be exported.
- Any Invoice with a date BEFORE the first invoice will NOT be exported.
Step 7. Set the following required fields for exporting to Xero then click Save at the bottom:
- Tuition - select the Xero Account code for Tuition.
- Resources - select the Account code for Resources.
- Others - select the Account code for Others.
- Select the Account codes for the listed feeds
Note: Only specific Xero account codes are compatible for Invoices. Examples include Revenue Accounts, Direct Costs Accounts, Expenses Accounts, etc.
We highly suggest consulting your accountant and refer to the Chart of Accounts (Chart of accounts in Xero) for which account codes to use.
We highly suggest consulting your accountant and refer to the Chart of Accounts (Chart of accounts in Xero) for which account codes to use.
Once Xero Export Options is complete, all SMS invoices will be exported to Xero every two (2) hours.
Setting Xero Account Code in Program Instance Fees:
IMPORTANT NOTE - GST in Xero
When setting up the Xero Account Code in the Student Management System (SMS), it’s essential to map them to the appropriate account codes in Xero to ensure GST is reported accurately. For example, Fees without GST should be mapped to Xero account codes classified as “No GST,” while Fees that include GST must be linked to account codes that reflect GST-inclusive amounts.
In the event that users would like to use a different account code for the program fees, the SMS will allow you to set a Xero Account Code in the Program Instance level. To set this:
Step 1. Go to Programs > Program Instance > Program Fees
Step 2. In the New Program Fees window or the Edit Program Fees window, go to the drop-down field labelled "Xero Account Code".
Step 3. Select the new Xero Account Code you would like to use for that fee. The default account code being used will be displayed in the label.
This will change the account code to be used for the fees in this Program Instance.
Integrating Xero and the Student Management System will provide your organisation with additional functionality to help save time and effort, ensuring that your account stay up to date and at the same time help you manage and monitor your payments.
Check out the related tutorials below to learn how the SMS exports invoices to Xero, how to mark invoices as paid and how to void invoices.

Related Tutorials
- Setting SMS Invoice as Paid if Paid in XERO
- Export Invoice from SMS to Xero with Multiple Item Lines
- Voiding Xero Invoice from the SMS
NOTE:
- Once Invoice is paid, it can no longer be edited since it is already exported to XERO.
- The Invoice Number in the SMS is the same as the Reference No. in Xero and can be used for searching/sorting of invoices.
Congratulations on completing this tutorial. We hope this has been helpful to you and your organisation. For any questions or concerns regarding this function, please reach out to the contact support via email.
Related Articles
How to Export Invoices from SMS to Xero with Multiple Item Lines
Overview This tutorial will provide information on how the Student Management System automatically exports Invoices with Multiple line items to Xero. NOTE: This exclusive feature is only available for Performance Package subscribers. Unlock the full ...Setting SMS Invoice as Paid if Paid in XERO
Overview In this tutorial, we will outline how to set your exported invoices in the SMS to "Paid" when you process the payment in Xero. For users with existing Xero integration, this will give information on how the Student Management System gets ...How to Set Up a Program Instance in the SMS
Overview In the SMS a Program Instance, which serves as the different variations of your Programs, can be set up as Dynamic or Intake type. Program Instances that are set as Dynamic are useful for setting up programs that are self-paced or taken ...Voiding Xero Invoice from the SMS
Overview In this tutorial, we will show users how to void an invoice in XERO from the SMS. Any unpaid exported invoice to XERO can be voided once deleted in the SMS. NOTE: This exclusive feature is only available for Performance and Compliance Plus ...How to Set Up RTO Information in the SMS 2.0
Overview When setting up your SMS for the first time, it is important to ensure that all your SMS settings, including the RTO information is set up correctly. For RTO's who submits VET Activity data annually, the RTO information is also required in ...