How to Create and Generate Reports in the Company Portal (Maximise)

Overview
This tutorial will will demonstrate how to create and generate Reports for Companies using the Company portal. This tutorial will be beneficial to understand what types of reports can be created when logged in as a user in the Company portal, as well as show the different reports that can be accessed when user also has access to child companies.
Reports help your organisation make better business decision as well as improve the management of your students and their training, by providing information on Enrolments, Units and Attendance. This will ensure that you and your partner company is always on top of your students and their training.
This tutorial will also cover how to generate Reports for the root/parent company and for nested companies (child companies).

To use the Company Portal, the training organisation should create an access for their partner Companies by adding them as a Company in their admin portal.

Access to Nested Companies structure or Parent-child hierarchical Company feature is set by the Training Organisation.

General Information
There are three types of Reports that can be generated by a user with Company access: Enrolment, Units and Attendance Reports.
Enrolment Reports allow users to see information related to Student Enrolments.
Units Report allow users to see information and generate a report based on Student Units. This is helpful to use if users would like to monitor completion progress of their enrolled students.
Attendance Report allow users to see information and generate a report based on Student's attendance. This is helpful to use when users would like to monitor the attendance of their enrolled students.
Using the Company portal will only show reports of students that are related to the Company. This will allow better monitoring and management of training for the Companies' related students.
Companies can view reports of their own Company, or if they are a parent company, view the reports of their child companies.

Step Tutorial
CREATE AND SAVE AN ENROLMENT REPORT
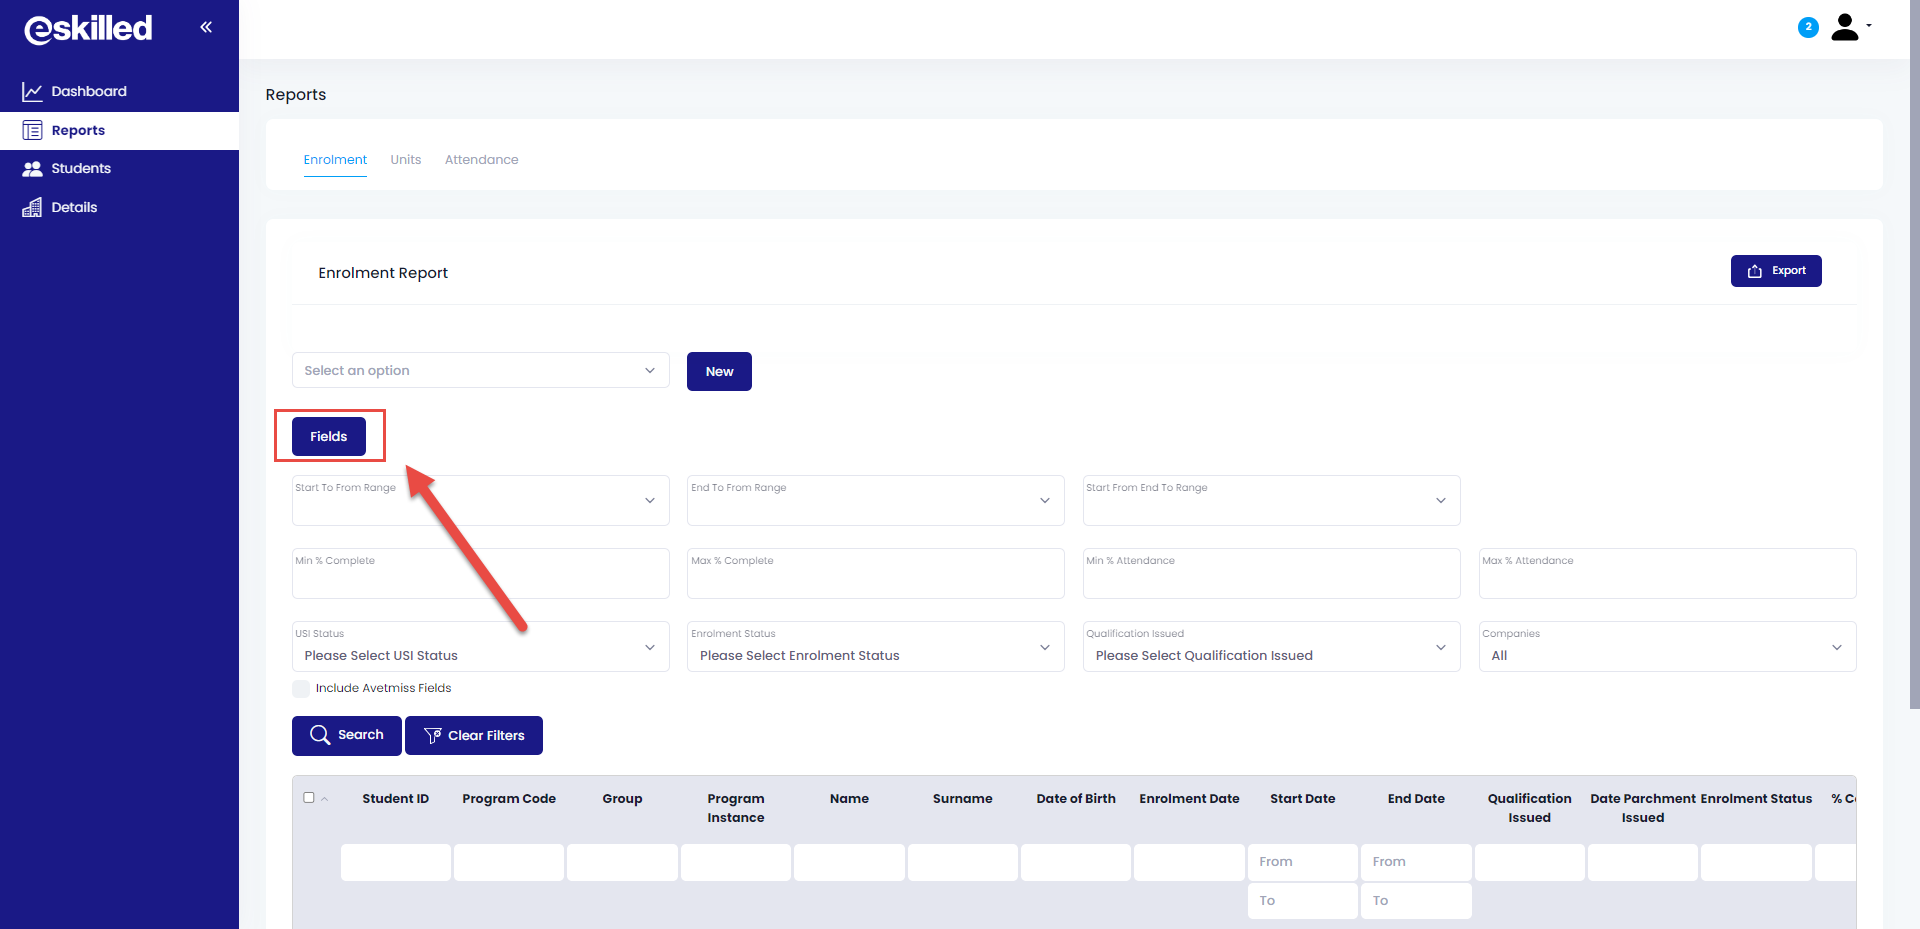
Step 1. Log in to the Company portal using the Company login credentials provided by the Training Organisation and navigate to the Reports page from the side panel.
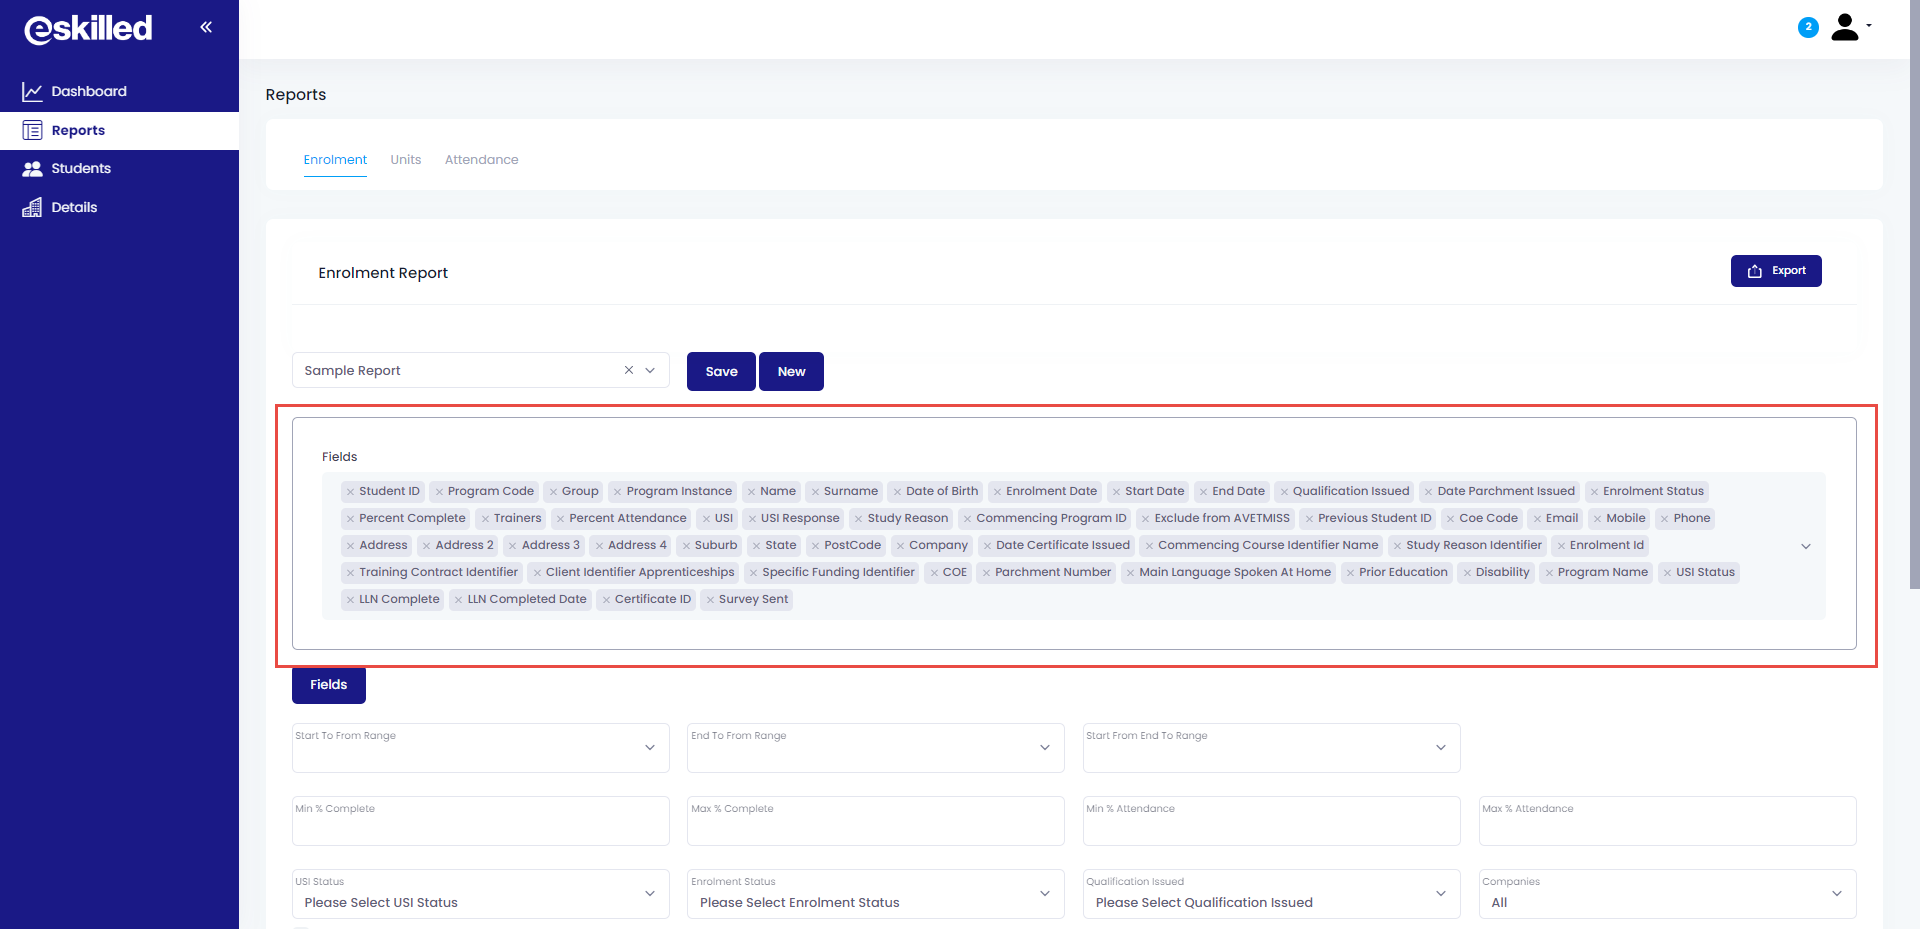
Step 2. Create a Saved Report. To create a report, select first the fields you would like to include in the report by clicking on the Fields button.
By default, all fields are added to the report. You can deselect or remove fields by clicking on the "X" mark on the field name.
Step 3. Select a date for the Report using the Date Ranges or the Inline Dates from the Data table.
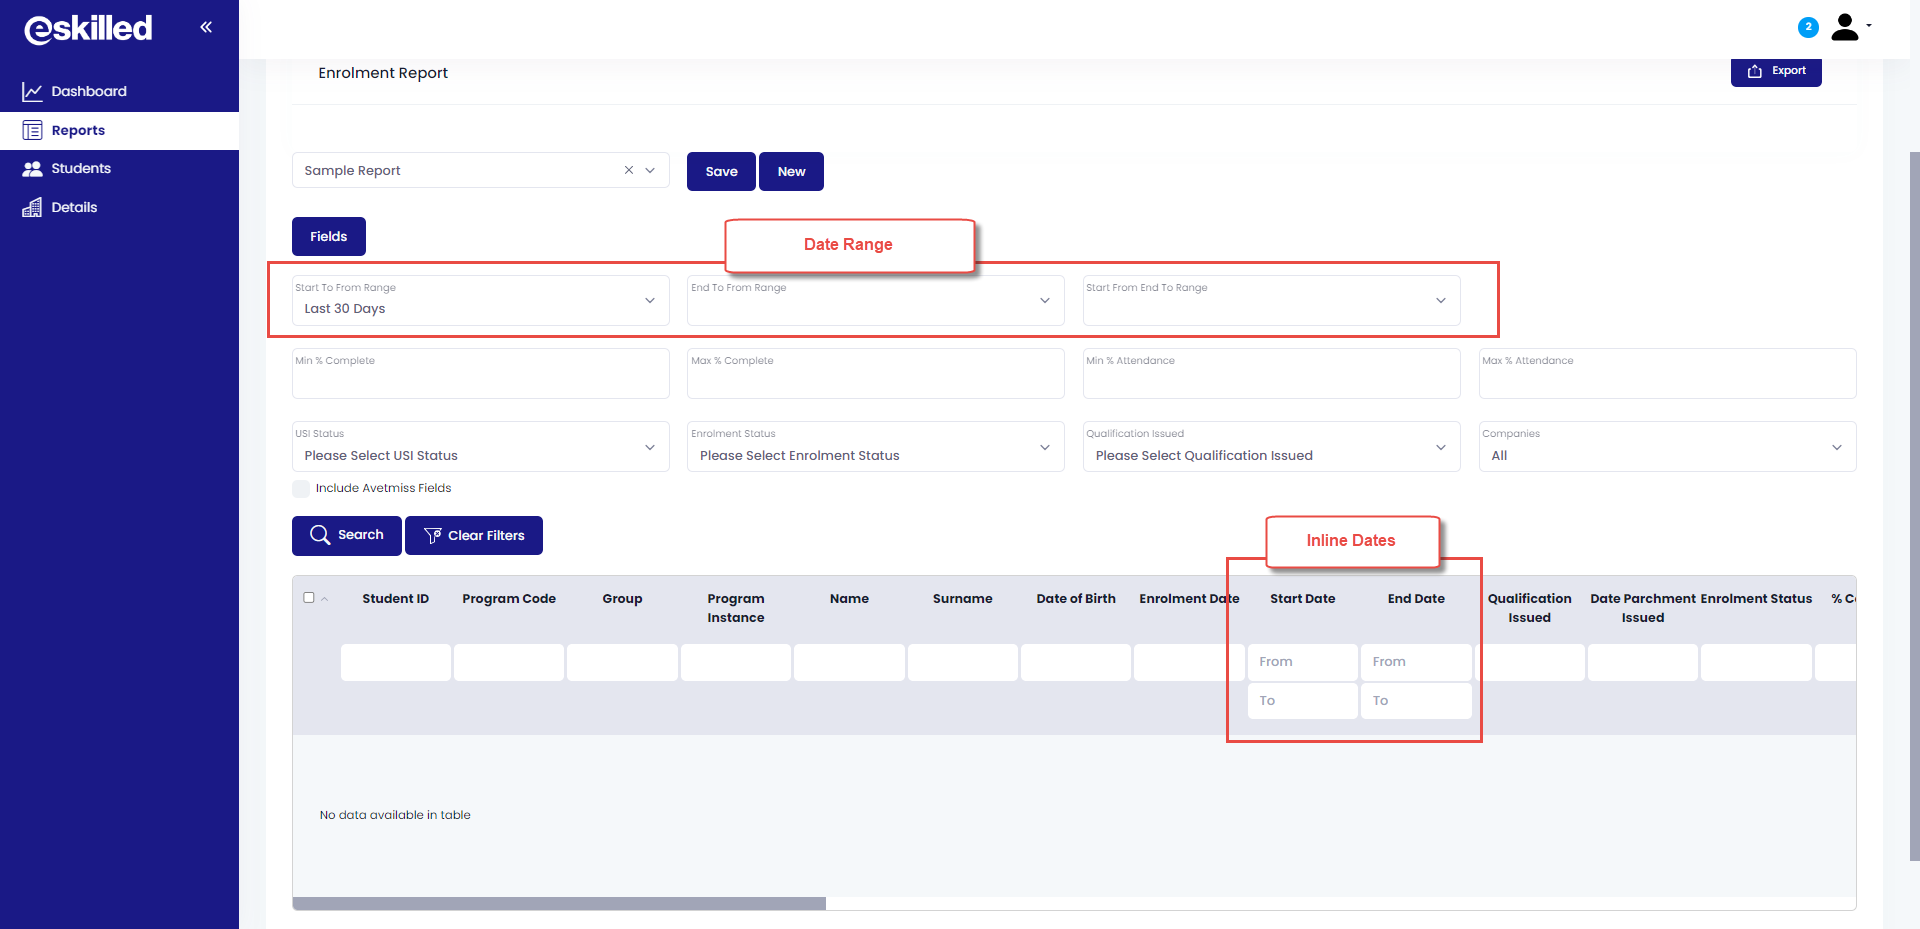
Once date filters are added, Click on New to create this as saved report. A saved report allows users to quickly generate the data for the report.

A Report needs to have a date range or inline date in order to run. If the Report does not have a date, users can still save the report, but the next time they select this report, it will show a warning message to select a date.
You can also add more filters to the reports as required. Report filters allow users to create reports that are more specific to their reporting requirements.
Filters available for Enrolment Reports:
- Date Range filters - this allows for easier report generation by using date ranges e.g "This Month", "Last Month", "This Calendar Year" etc.
- Min % or Max % Complete - will filter the report to only include those enrolments with the set Min % or Max % completion. If none are specified, it will include all enrolments regardless of completion percentage.
- Min % or Max % Attendance - will filter the report to only include those enrolments with the set % of attendance. If none are specified, it will include all enrolments regardless of attendance percentage.
- USI Status - will filter the report to include only students with Valid or Invalid USI. If none is selected, it will include all enrolments regardless of USI status.
- Enrolment Status - will filter report based on Status (e.g. Application Received, Enrolled, Completed, Withdrawn etc.). If left blank, will include all students with all enrolment status.
- Qualification issues - will filter report based on whether Qualification has been issued or not. If left blank, will include all student regardless of qualification issuance.
- Companies - this filter is specific to Companies that has nested hierarchies or has their setting allowed to create Companies. This will filter the report to include reports for the root company or the nested companies or ALL. This is set to include all by default.
The Companies filter is a filter specific to the Company portal and allows users to specify if they want their reports to include data from the parent/root company or if they want to generate report of their child/sub-companies they have access to. Users can only generate reports for sub-companies or child companies, if the child company is nested under them (created as their child).
As an example, to create a Monthly report that will include all applications received within the month for the root company will include the following filters:
- Start To From Date: This Month
- Enrolment Status: Application Received
- Companies: ABC Company Parent
This Report can be Saved as a new report e.g. Monthly Application Received for Parent Company.
Once this report is selected in the drop-down it will load the report with the all enrolments that are on Application received status for the current month for the selected company.
Reports can be Exported to an Excel file by clicking on the Export button.
FILTER REPORTS USING IN-LINE FILTERS
To narrow down the report or search the data table, in-line field filters can be used.
Typing in the field boxes will allow users to search and filter the data table to easily locate information.
Using In-line filters will only work for the data table. Export will still include all the information in the selected report, regardless if the data was filtered in the data table.
CREATE AND SAVE A UNITS REPORT
Creating a Units report is similar to creating an enrolment report except Units report will only have the following filters:
Date Range: this allows for easier report generation by using date ranges e.g "This Month", "Last Month", "This Calendar Year" etc.
Outcome: this will filter the report based on the Unit Outcome status (Competency Achieved, Not Yet Started, Continuing Activity, RPL granted etc)
Companies: this will filter the report based on the Company selected (e.g if Parent company is selected will only report Units for student enrolment associated with the Parent company; to see reports for child companies, select the child company)
Data table for Units report can also be searched using the in-line filters.
Data table information can also be exported to an Excel file.
CREATE AND SAVE AN ATTENDANCE REPORT
Creating an Attendance report will follow the same steps as creating an Enrolment report, but will have the following filters:
Date Range: this allows for easier report generation by using date ranges e.g "This Month", "Last Month", "This Calendar Year" etc.
Companies: this will filter the report based on the Company selected (e.g if Parent company is selected will only report Attendance of students associated with the Parent company; to see reports for child companies, select the child company).
Data table for Attendance reports can also be searched using the in-line filters.
Data table information can also be exported to an Excel file.
The Reports function for Companies provides your Company visibility of student progress and an easier way to manage and report your student enrolments.
Related Articles
How to Add Company Credit Invoice? (Maximise)
Overview This tutorial will introduce the function to create credit invoices for companies within the Student Management System (SMS), users can now effortlessly manage payments and enrolments. Once these credit invoices are paid, they can be used to ...Storing Documents in the Company Portal (Maximise)
OVERVIEW In this tutorial, we will show users how to store any third party-related documents in the Company Portal. This feature allows both your organisation and your Companies to have a centralized repository of all documents relevant to your ...How to Pay for Student Invoice using Company Credit (Maximise)
Overview This tutorial will introduce the function to pay for Student Invoices using Company Credit within the Student Management System (SMS). By leveraging Company Credit Invoices, companies can ensure a seamless and efficient enrolment process, ...How to Pay for Company Credit Invoice? (Maximise)
Overview This tutorial will introduce the function to pay for company credit invoices within the Student Management System (SMS). Once these credit invoices are paid for by the company, they can be used to pay for student enrolments, ensuring a ...How to View and Email Company Invoices? (Maximise)
Overview This tutorial will introduce the function to view and send Company Credit Invoices via email within the Student Management System (SMS). Once these credit invoices are paid for by the company, they can be used to pay for student enrolments, ...