Smart and Skilled Bulk Commitment ID: Complete Implementation Guide for NSW

Overview
The Smart and Skilled Bulk Commitment ID v2 is a powerful feature designed to streamline NSW training provider operations and enhance the efficiency of student enrolment management. This feature enables organisations to configure default Smart and Skilled Provider Calculator settings at the Program Instance level, automate data entry during enrolment, and seamlessly export and import bulk commitment data for processing.
Bulk Commitment ID v2 is available for Program Instances that have Reporting State = NSW and a Contract set. This feature is particularly beneficial for RTOs managing high-volume Smart and Skilled student enrolments, as it reduces manual data entry, minimises errors, and improves compliance with NSW reporting requirements.
What You'll Learn in This Guide:
This comprehensive tutorial suite walks you through every aspect of implementing and managing the Bulk Commitment ID v2 feature:
- Setting up your Program Instance with default Smart and Skilled data
- Configuring Company types (Employment Service Provider and Apprenticeship Network Provider) to support enrolment workflows
- Completing the Contracts section of the Enrolment Wizard with employment service provider and apprenticeship network details
- Managing Smart and Skilled eligibility and program details for individual student enrolments
- Recording individual eligibility information such as employment status, disability support, and qualification history
- Exporting and importing bulk commitment data to and from external Smart and Skilled systems
Whether you're setting up the feature for the first time or optimising your existing enrolment processes, this guide provides step-by-step instructions, field-level explanations, and comprehensive FAQs to address common questions and conditional logic scenarios.
Prerequisites:
- Your Program Instance must have AVETMISS tab > Reporting State = NSW
- A Contract must be set on the Program Instance
- Your organisation should have configured appropriate Company types (Employment Service Provider and/or Apprenticeship Network Provider)
- Users should have appropriate access permissions to Program Instance, Company, and Enrolment Wizard functions
Let's get started!

Step Tutorial
How to Set Up Bulk Commitment ID on Program Instance
 Overview
Overview
The Bulk Commitment ID feature allows you to configure default Smart and Skilled Provider Calculator data at the Program Instance level. This feature is available for NSW Program Instances that have a Contract set. By enabling this feature and setting default values, you can streamline the student enrolment process and reduce manual data entry.
In this tutorial, we will guide you through the step-by-step process of setting up the Bulk Commitment ID feature on your Program Instance.
 Step Tutorial
Step Tutorial
1. Navigate to the Program Instance AVETMISS Settings
From the sidebar menu, navigate to Programs page > Program Instance tab > AVETMISS subtab
2. Scroll down and enable the Smart and Skilled Provider Calculator Section
Scroll down to find the section labeled "Smart and Skilled Provider Calculator – Bulk Upload".
This section will only display when the related Program Instance meets the following conditions:
- Reporting State = NSW
- A Contract is set
The placement of this section depends on your Program Type:
- If your Program Instance is set to Apprentice/Traineeship/SBAT Program: This section appears below the Training Plans section
- Otherwise: This section appears below the Contract section

3. Enable the Bulk Upload Feature
In the Smart and Skilled Provider Calculator – Bulk Upload section, you will see a toggle switch labeled Turn on Smart and Skilled Provider Calculator – Bulk Upload.
By default, this toggle is set to No. Click the toggle to set it to Yes to enable the feature.

4. Configure the Default Fields
When you set the toggle to Yes, the following fields will appear. These fields represent the default data that will be pre-populated when a student enrolls to this Program Instance through the Enrolment Wizard.
Complete the following required fields:
- PAS No. – Enter the Provider Approval Status number for this Program Instance
- Training Location Region – Select the primary training location region
- Program Stream – Select the program stream classification
- Activity Period – Select the activity period for this training
- Part Qual – Specify whether this is a partial qualification and which part it represents

IMPORTANT: These default values are set at the Program Instance level but can be changed for each individual student enrolment in the Enrolment Wizard. Changing them for specific students will not affect the Program Instance settings.
5. Save Your Configuration
Once you have completed all the fields, scroll up and click the Update button to apply your configuration.
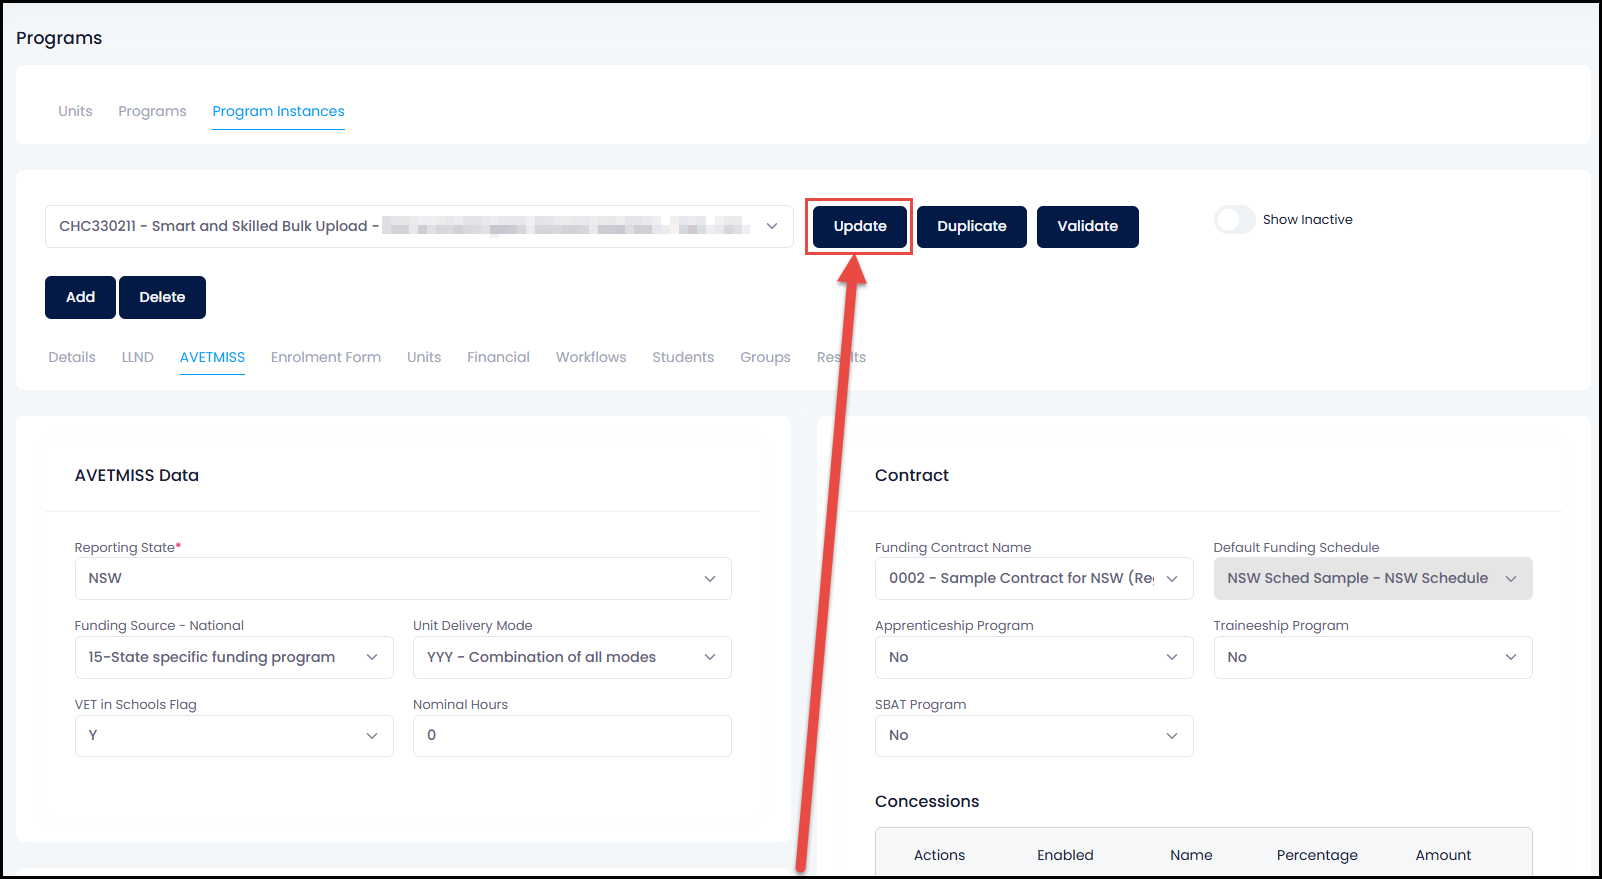

NOTE: If you need to make changes to these default values in the future, simply return to this section, update the fields as needed, and save again.
And that's how to set up Bulk Commitment ID on your Program Instance in the SMS!
Congratulations on completing this tutorial. We hope this has been helpful to you and your organisation. For any questions or concerns regarding this function, please reach out to support via email.
FAQs
When will the Smart and Skilled Provider Calculator – Bulk Upload section appear on my Program Instance?
This section only displays when BOTH of the following conditions are met:
- The Program Instance has Reporting State = NSW
- A Contract is set on the Program Instance
If you don't see this section, verify that both conditions are in place.
Can I change the default values I set here for individual student enrolments?
Yes, absolutely. The default values set at the Program Instance level are pre-populated in the Enrolment Wizard for convenience, but can be modified for each student. Changes made during individual enrolments will not affect the Program Instance defaults.
What happens if I turn off the Bulk Upload toggle?
If you set the toggle to No, the fields will become hidden and are no longer required. Any previously saved values will be retained but won't be used for new enrolments until you toggle the feature back on.
Are all five fields (PAS No, Training Location Region, Program Stream, Activity Period, Part Qual) required?
Yes, when the toggle is set to Yes , all five fields must be completed. You cannot save the Program Instance configuration without filling in all these fields.
How to Configure Companies for Smart and Skilled Provider Calculator
Overview
Overview
To support the Bulk Commitment ID feature, changes have been made to how Companies are configured in the system. This tutorial will guide you through the new company type configurations, including the renamed Employment Service Provider company type and the new Apprenticeship Network Provider type.
These company configurations are essential for populating dropdown fields in the Enrolment Wizard and ensuring data validation during the enrolment process.
In this tutorial, we will guide you through the step-by-step process of configuring your Companies for the Bulk Commitment ID feature.
Understanding the Company Type Changes
Two company types are involved in the Bulk Commitment ID feature:
- Employment Service Provider(formerly called "Employment Network Provider") – This is used to track employment support organisations that refer or support students in training
- Apprenticeship Network Provider(new) – This is used to track organisations that provide apprenticeship and traineeship support
Step Tutorial
Step Tutorial
1. Navigate to the Company Details Page
From the sidebar menu, navigate to Companies page > Details tab.

2. Set the Company Type to Employment Service Provider
In the Company Type dropdown, select Employment Service Provider.
NOTE: The previous company type called "Employment Network Provider" has been renamed to Employment Service Provider. If you have existing companies with this type, they will automatically appear as Employment Service Provider in the system.
3. Complete Required Fields for Employment Service Provider
When you select Company Type = Employment Service Provider, the following fields will appear and become required:
Company Type = NOT Employment Service Provider
Company Type = Employment Service Provider
Complete all visible required fields based on your selections.
Important Note on Org ID:
The Org ID field will only appear if you select NSW in the Jurisdiction dropdown. If you select NSW, you must provide a 3-digit Org ID.
4. Configure Apprenticeship Network Provider (Optional)
If your company is an Apprenticeship Network Provider, use the Company Type dropdown to select Apprenticeship Network Provider. 
When you select Company Type = Apprenticeship Network Provider, the Provider ID field becomes required.
- Provider ID – User input field; maximum 20 characters (required for this company type)
5. Save Your Configuration
Once you have entered all required information, click the UPDATE button to store your company configuration.
And that's how to configure your Companies for the Smart and Skilled Provider Calculator feature!
Congratulations on completing this tutorial. We hope this has been helpful to you and your organisation. For any questions or concerns regarding this function, please reach out to support via email.
FAQs
What is the difference between Employment Service Provider and Apprenticeship Network Provider?
- Employment Service ProviderOrganisations that provide employment support, referrals, and services to help students find work or employment during training
- Apprenticeship Network ProviderOrganisations that provide apprenticeship and traineeship support and coordination
Do I need to create separate companies for Employment Service Provider and Apprenticeship Network Provider roles?
Yes, if your organisation operates in both capacities, you should create two separate company records—one for each company type. This allows the system to properly filter and assign the correct organisation based on context.
Why does the Org ID field only appear for NSW?
The Org ID field is specific to NSW reporting requirements and only needs to be recorded for companies operating in NSW. If you select a Jurisdiction that doesn't include NSW, this field will not appear.
Can a company have multiple Jurisdictions?
Yes. The Jurisdiction field is a multiple select dropdown, allowing a single company to operate in multiple reporting states. Simply select all applicable jurisdictions from the list.
Is Provider ID required for all company types?
No. Provider ID is required for:
- Employment Service Provider (always required)
- Apprenticeship Network Provider (always required)
For other company types, Provider ID is not required.
How to Complete Enrolment Wizard for Bulk Commitment ID – Contracts Section
Overview
The Enrolment Wizard has been updated to support the Bulk Commitment ID feature. This tutorial focuses on the Contracts section of the AVETMISS tab, where you will configure employment service provider information and apprenticeship network provider settings.
When enrolling a student in a Program Instance that has Bulk Commitment ID enabled, you will encounter new fields and options in the Contracts section. This tutorial will guide you through these updates.
Step Tutorial
1. Navigate to the Enrolment Wizard – AVETMISS Tab
From the Student Management System, open a student enrolment record and navigate to the AVETMISS tab.
2. Locate the Contracts Section
In the AVETMISS tab, find the Contracts section. You may notice that the Schedule Name field has been repositioned. This field has been moved to the left side of the Enrolment Wizard to make space for new Bulk Commitment ID fields.

3. Configure Employment Service Provider Settings (Optional)
Below the Schedule Name field, you will see a toggle switch labelled Employment Service Provider Client.
By default, this toggle is set to No. To indicate that this student is being supported by an Employment Service Provider, toggle this switch to Yes.

When you set this toggle to Yes, the following fields will appear:
4. Configure Employment Service Provider Referral (If Applicable)
After setting the Employment Service Provider Client toggle to Yes, you will see an additional toggle labelled Referred By Employment Service Provider?
By default, this toggle is set to No. If the student was referred to this training program by an Employment Service Provider, toggle this switch to Yes.

When you set "Referred By Employment Service Provider?" to Yes, the following field will appear:
5. Configure Apprenticeship Network Provider (Training Plan Tab)
NOTE: Apprenticeship Network Provider configuration occurs in the Training Plan tab, not in the Contracts section. See Tutorial 3 Supplemental Section below for details.
6. Save Your Enrolment
Once you have completed the Contracts section with all relevant employment service provider information, proceed through the remaining Enrolment Wizard sections and click  to create the enrolment.

Supplemental Section: Training Plan Tab Updates
Step 1: Navigate to the Training Plan Tab
Within the Enrolment Wizard for a student enrolled in an Apprenticeship, Traineeship, or SBAT Program, navigate to the Training Plan tab.

Step 2: Update Apprenticeship Provider Field
In the Training Plan section, the field previously labelled Apprenticeship Provider has been renamed to Apprenticeship Network Provider.
This dropdown field now displays only companies with Company Type = Apprenticeship Network Provider set.

Step 3: Select the Apprenticeship Network Provider
From the dropdown, select the appropriate Apprenticeship Network Provider company for this student's training.
This dropdown will only show organisations you have configured as Apprenticeship Network Provider companies in your Companies page.

And that's how to complete the Contracts and Training Plan sections of the Enrolment Wizard for Bulk Commitment ID!
Congratulations on completing this tutorial. We hope this has been helpful to you and your organisation. For any questions or concerns regarding this function, please reach out to support via email.
FAQs
When should I toggle "Employment Service Provider Client" to Yes?
Toggle this to Yes if the student is currently receiving support from an Employment Service Provider, or if an Employment Service Provider is facilitating their engagement with the training program.
If I select "Employment Service Provider Client = Yes," are all the sub-fields required?
Yes. When you toggle this to Yes, both Employment Service Provider ID and Client ID
become required fields. You must complete them before saving the enrolment.
What determines which companies appear in the "Employment Service Provider ID" dropdown?
The dropdown shows only companies that meet BOTH criteria:
- Company Type = Employment Service Provider
- Jurisdiction includes the same reporting state as the selected Contract
If "Referred By Employment Service Provider? = No," will the Employment Service Provider Referral ID field appear?
No. The Employment Service Provider Referral ID field only appears when "Referred By Employment Service Provider? = Yes". When set to No, this field remains hidden.
Why has the label changed from "Apprenticeship Provider" to "Apprenticeship Network Provider"?
This change aligns with the new Apprenticeship Network Provider company type introduced in the Bulk Commitment ID feature. The field now specifically references the new company type and filters accordingly.
The Apprenticeship Network Provider field is empty (no options available). What does this mean?
This means you have not yet created any companies with Company Type = Apprenticeship Network Provider in your Companies page. You must first set up at least one Apprenticeship Network Provider company before this field will have selectable options.
Can I have both "Employment Service Provider Client" and an "Apprenticeship Network Provider" on the same enrolment?
Yes. These are independent features. A student can be supported by an Employment Service Provider whilst also being enrolled through an Apprenticeship Network Provider. Configure them separately as needed.
How to Complete Enrolment Wizard for Bulk Commitment ID – Smart and Skilled Details
Overview
Overview
The Enrolment Wizard now includes new sections for the Smart and Skilled Provider Calculator when the Bulk Commitment ID feature is enabled on the Program Instance. These sections allow you to record subsidy eligibility, programme details, and strategic initiative information for each student enrolment.
This tutorial covers three sections:
- Smart and Skilled Provider Calculator – Bulk Upload Data (Required eligibility information)
- Smart and Skilled Programme Details (Programme configuration and quote information)
- Culture Section updates (Residency Status modifications for NSW)
Prerequisites
These sections will only appear in the Enrolment Wizard when ALL of the following conditions are met:
- The Program Instance has Turn on Smart and Skilled Provider Calculator – Bulk Upload = Yes (set in Program Instance > AVETMISS)
- You are enrolling a student in an NSW Program Instance
- A Contract is set on the Program Instance
Step Tutorial
Step Tutorial
1. Navigate to the Enrolment Wizard – AVETMISS Tab > Contracts Section
From the Student Management System, open a student enrolment record and navigate to the AVETMISS tab > Contracts section.

2. Locate the Smart and Skilled Provider Calculator – Bulk Upload Data Section
Below the Contracts section fields, you will see a new section labelled Smart and Skilled Provider Calculator – Bulk Upload Data. This section contains eligibility information for the Smart and Skilled program.

3. Configure CT/RPL Status
The first field in this section is Is CT or RPL being applied when calculating subsidy and/or loading? By default, this toggle is set to No.

Important: If you set this toggle to Yes:
- All other Smart and Skilled sections and fields will become hidden
- The student's subsidy and loading will be calculated based on Credit Transfer or Recognition of Prior Learning principles
Set this toggle based on whether Credit Transfer or Recognition of Prior Learning is being applied.
4. Set Eligibility Status (If CT/RPL = No)
If you set the previous toggle to No (CT/RPL not being applied), continue with the Eligibility Status field.
By default, this dropdown is disabled and cannot be edited. To enable editing, click the Edit button next to the field.
When you click Edit, a security confirmation modal will appear. Type EDIT (in all capitals) to confirm and enable the field for editing.

Once confirmed, the field becomes editable. Select the student's eligibility status from the dropdown:
- Eligible – Student meets all Smart and Skilled eligibility requirements
- Ineligible – Student does not meet Smart and Skilled eligibility requirements
- Notified – Student has been notified of their eligibility
- Cancelled – Student's eligibility has been cancelled
- Expired – Student's eligibility period has expired
5. Add Ineligibility Reason (If Applicable)
If you selected Eligibility Status = Ineligible, an additional field labelled Ineligibility Reason will appear.
Enter the reason why the student is ineligible for Smart and Skilled support in this text field.
6. Set Enquiry or Notification
The Enquiry or Notification field is required and determines the type of communication or event that triggered the eligibility assessment.
From the dropdown, select one of the following:
- Enquiry – Student made an enquiry about Smart and Skilled support
- Notification – Formal notification was sent to the student about their eligibility status
This selection will affect which date fields appear in the next section (Smart and Skilled Programme Details).
7. Proceed to Smart and Skilled Programme Details Section
If you set CT/RPL = No in Step 3, the Smart and Skilled Programme Details section will appear below. This section is populated with the default values from the Program Instance, but can be customised for each student.
See Steps 8–14 below to complete this section.
8. Review and Edit Programme Stream, Training Location Region, Activity Period, PAS No., and Part Qual
At the top of the Smart and Skilled Programme Details section, you will see five fields with pre-filled values from the Program Instance:
These fields are enabled by default. If you need to update any of these values for this student, edit them directly. Leave them as-is to use the Program Instance defaults.
NOTE: Changes you make here apply only to this student's enrolment and do not affect the Program Instance's default values.
9. Configure Quote ID (Disabled Field with Edit Access)
Below the editable fields, you will see Quote ID, which is disabled by default.
The Quote ID field is used to store the Smart and Skilled system's quote reference. This field is disabled because it typically comes from external systems.
To manually edit this field, click the Edit button and type EDIT in the confirmation modal (same process as Eligibility Status).
Once enabled, enter the quote ID if you have this information from the Smart and Skilled system.
10. Configure Enquiry Date and Notified Date (Conditional Fields)
Two date fields will appear based on your Enquiry or Notification selection:
If Enquiry or Notification = Notification
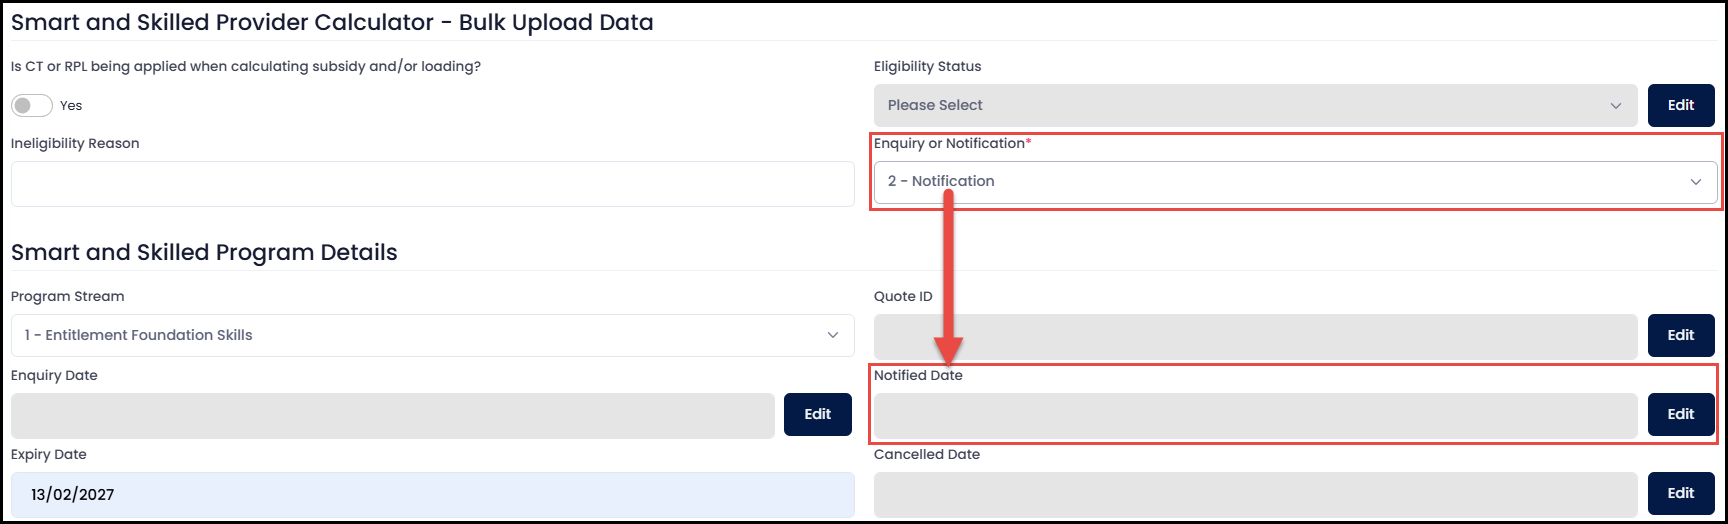
If Enquiry or Notification = Enquiry
These fields are disabled by default. Click the Edit button next to each field, type EDIT in the confirmation modal, and enter the appropriate date.
11. Configure Expiry Date and Cancelled Date (Conditional Fields)
Two additional date fields appear based on the student's status:
Both fields are disabled by default. Click Edit, confirm with EDIT, and enter the appropriate date for each.
12. Configure Strategy Initiative (Optional)
Below the date fields, you will see a toggle switch labelled Strategy Initiative.
By default, this toggle is set to No. If this student's training is part of a specific government or organisational strategy initiative (such as a skills priority initiative), toggle this to Yes.
When you set Strategy Initiative to Yes, the following fields will appear and become required:
13. Update Culture Section – Residency Status (NSW Only)
Navigate to the Culture section in the AVETMISS tab.
NOTE: The following changes only apply to NSW Program Instances with Bulk Commitment ID enabled. Other states will not see these modifications.
The Residency Status dropdown options have been modified. The available options have been updated to align with NSW Smart and Skilled reporting requirements.
Select the appropriate residency status for the student from the updated dropdown options.
14. Save Your Enrolment
Once you have completed all sections of the Enrolment Wizard including Smart and Skilled details, click SUBMIT to create the enrolment.
And that's how to complete the Smart and Skilled Details sections of the Enrolment Wizard!
Congratulations on completing this tutorial. We hope this has been helpful to you and your organisation. For any questions or concerns regarding this function, please reach out to support via email.
FAQs
When do the Smart and Skilled sections appear in the Enrolment Wizard?
These sections only appear when ALL of the following are true:
- The Program Instance has Turn on Smart and Skilled Provider Calculator – Bulk Upload = Yes
- The student is being enrolled in an NSW Program Instance
- A Contract is set on the Program Instance
If I set "Is CT or RPL being applied = Yes," will I still see the other Smart and Skilled fields?
No. When CT/RPL is set to Yes, all other Smart and Skilled sections and fields become hidden. This is because subsidy and loading calculations under CT/RPL principles don't use the standard Smart and Skilled eligibility fields.
Why is the Eligibility Status field disabled by default?
The field is disabled to prevent accidental changes. Since eligibility status is often determined by external Smart and Skilled systems, the Edit/confirmation process ensures intentional updates only.
What is the difference between "Enquiry" and "Notification" in the Enquiry or Notification field?
- Enquiry = Student actively enquired about Smart and Skilled support; typically results in a quote
- Notification = RTO or provider formally notified the student of their eligibility status
If I select "Enquiry," will the Notified Date field appear?
No. The Notified Date field only appears when Enquiry or Notification = Notification. When set to Enquiry, only the Enquiry Date field appears.
Can I save the Expiry Date without first setting an Eligibility Status?
The Expiry Date field is only visible when Eligibility Status = Eligible. If the student is not Eligible, this field remains hidden.
What happens if I set Strategy Initiative to "No"?
The Strategy Code, Sub Strategy Code, and Voucher No. fields will be hidden. If you later change this to Yes, you will need to re-enter these values.
Are the Strategy Code and Sub Strategy Code always required when Strategy Initiative = Yes?
Yes. Both are marked as required when the toggle is set to Yes. The Voucher No. field is optional.
Can I use the pre-filled Programme Details values from the Program Instance, or must I change them?
You can leave them as-is to use the Program Instance defaults, or change them for individual students. It's entirely up to you. The choice doesn't affect the Program Instance's default values.
Why do some fields require typing "EDIT" for confirmation?
This additional confirmation step helps prevent accidental modifications to sensitive fields like Eligibility Status, Quote ID, and dates. It ensures intentional, deliberate updates.
How to Complete Enrolment Wizard for Bulk Commitment ID – Individual Eligibility Details
Overview
Overview
The Smart and Skilled Individual Eligibility Details section captures essential information about each student's circumstances, support needs, and eligibility factors for Smart and Skilled support. This comprehensive section contains multiple fields that conditionally appear based on your selections.
This tutorial will guide you through each field in the Individual Eligibility Details section, explaining when fields appear and what selections affect other fields.
Prerequisites
The Smart and Skilled Individual Eligibility Details section only appears in the Enrolment Wizard when:
- The Program Instance has Turn on Smart and Skilled Provider Calculator – Bulk Upload = Yes
- Is CT or RPL being applied = No (in the Smart and Skilled Provider Calculator section)
- The student is enrolled in an NSW Program Instance with a Contract set
Important Interdependencies
Many fields in this section are interdependent—selecting a value in one field affects the availability or requirement of other fields. Pay close attention to the conditional logic as you work through this section.
Step Tutorial
Step Tutorial
1. Navigate to Smart and Skilled Individual Eligibility Details Section
In the Enrolment Wizard, after completing the Smart and Skilled Provider Calculator section (with CT/RPL = No), scroll down to locate the Smart and Skilled Individual Eligibility Details section.

2. Configure Long Term Unemployed Status
The first field in this section is Has Evidence for being Long Term Unemployed?
By default, this toggle is set to No.
Important Requirement: If you set this to Yes, the student's enrolment must not have an Employer set in the Details tab. If an Employer is already assigned, you must remove it before setting this toggle to Yes.
Toggle this to Yes only if the student is long-term unemployed and has supporting evidence.

3. Configure "Does the Individual work in NSW?" Status
The next field is Does the Individual work in NSW?
By default, this toggle is set to No.
Important Requirements: If you set this to Yes:
- The student's enrolment must have an Employer set in the Details tab
- The selected Employer must have Postcode and Suburb details configured in the Companies page
- This toggle will disable the "Has Evidence for being Long Term Unemployed?" toggle (you cannot have both selected)
Set this to Yes only if the student works in NSW at a registered employer.

Cascading Effect: If you select "Does the Individual work in NSW? = Yes," the Long Term Unemployed toggle will become disabled and set to No. This ensures students are not simultaneously marked as both employed and long-term unemployed.
4. Configure Apprentice Trainee Status (If Applicable)
The Apprentice Trainee field only displays if the Program Instance has Apprenticeship, Traineeship, or SBAT Programme set to Yes.
If this field is visible, you will see a dropdown with options. The options include:
- 0 – No (default)
- 1 – Apprentice
- 2 – Trainee
- [Other applicable options]
By default, this is set to 0 – No.

5. Configure Apprentice Trainee Type (Conditional)
If you set Apprentice Trainee to any value EXCEPT "0 – No", an additional required field labelled e Apprentice Trainee Type will appear.
This is a required dropdown field that provides further classification of the apprenticeship or traineeship type. Select the appropriate type from the dropdown.

NOTE: If you set Apprentice Trainee back to 0 – No, the Apprentice Trainee Type field will disappear.
6. Configure Fee and/or Waiver Application
The next field is Has the individual applied for fee and/or waiver for fee eligibility?
By default, this toggle is set to No.
Set this to Yes if the student has applied for a fee waiver or fee assistance from Smart and Skilled.

7. Configure Fee Waiver Code (Conditional)
If you set the previous toggle to Yes, a required field labelled Fee Waiver Code will appear.
From the dropdown, select the appropriate fee waiver code category that applies to this student.

NOTE: The Fee Waiver Code field only appears when "Has the individual applied for fee and/or waiver for fee eligibility? = Yes".
8. Configure Disability Status (Complex Field) The Disability Status field is required and will conditionally display other fields based on your selection.
From the dropdown, select:
- 0 – No disability (or equivalent)
- 1 – Disability (or equivalent)
- [Other applicable disability classifications]

When you select "Disability Status = 0 – No disability":
An additional required field labelled Welfare Status will appear. This field determines whether the student is a welfare recipient.
From the Welfare Status dropdown, select:
- 0 – Not a welfare recipient (or equivalent)
- 1 – Welfare recipient (or equivalent)
- [Other applicable welfare status options]

When you select "Welfare Status = any option EXCEPT 0 – Not a welfare recipient":
An additional required field labelled Welfare Type will appear.
From the Welfare Type dropdown, select the specific type of welfare support the student receives (e.g., Disability Support Pension, Unemployment Benefits, etc.).

When you select "Disability Status = any option EXCEPT 0 – No disability":
The Welfare Status and Welfare Type fields will not appear. Instead, a required field labelled Disability Assess Type will appear.
From the Disability Assess Type dropdown, select how the student's disability has been assessed (e.g., formal medical assessment, self-reported, etc.).

9. Configure Undertaking Another Qual (Toggle)
The next field is Undertaking another Smart and Skilled Qual now or in the past calendar year?
This is a toggle switch, by default set to No.
Set this to Yes if the student is currently undertaking or has recently completed another Smart and Skilled-supported qualification in the current or previous calendar year.

10. Configure Has Achieved A Qual Since Turning 17 (Conditional)
The next field is Has Achieved A Qual Since Turning 17?
This is a required dropdown field with options such as:
- 0 – No
- 1 – Yes, before leaving school (pre-school qualification)
- 2 – Yes, after leaving school (post-school qualification)
- [Other applicable options]

When you select "Has Achieved A Qual Since Turning 17? = 2 – Yes, after leaving school (post-school qualification)":
An additional required field labelled Highest Port School Qual (Highest Post-School Qualification) will appear.
From the dropdown, select the highest post-school qualification the student has achieved.

NOTE: The Highest Port School Qual field only appears when the student has achieved a qualification after leaving school. If you select a different option, this field will not appear.
11. Configure Social Housing Status (Toggle) The next field is In Social Housing Resident or Wait List. This is a toggle switch, by default set to No.
Set this to Yes if the student is currently living in social housing or is on the waitlist for social housing.

12. Confirm Declaration (Checkbox)
At the bottom of the Individual Eligibility Details section, you will see a checkbox labelled Declaration.
This checkbox must be marked to confirm that you have recorded:
- Evidence of the individual's consent
- The individual's declarations regarding the information provided
Check this box to confirm before saving the enrolment.

IMPORTANT: You cannot save the enrolment without checking the Declaration checkbox.
13. Save Your Enrolment
Once you have completed all fields in the Individual Eligibility Details section (and all other required Enrolment Wizard sections), click Save to create the enrolment.

And that's how to complete the Individual Eligibility Details section of the Enrolment Wizard!
Congratulations on completing this tutorial. We hope this has been helpful to you and your organisation. For any questions or concerns regarding this function, please reach out to support via email.
FAQs
Can a student be both "Long Term Unemployed" and "Works in NSW" at the same time?
No. These are mutually exclusive conditions. If you set "Does the Individual work in NSW? = Yes," the Long Term Unemployed toggle will automatically become disabled and set to No. You cannot have both selected.
What happens if the student works in NSW, but the Employer doesn't have Postcode and Suburb details?
You cannot set "Does the Individual work in NSW? = Yes" unless the Employer has Postcode and Suburb details configured. You must first update the Employer company record with this information.
The Apprentice Trainee field is not visible. Why?
This field only appears if the Program Instance has
Apprenticeship, Traineeship, or SBAT Programme set to Yes
. If you don't see it, check that the Program Instance is configured as an apprenticeship or traineeship programme.
If I set Apprentice Trainee = "0 – No," will the Apprentice Trainee Type field remain?
No. The Apprentice Trainee Type field only appears when Apprentice Trainee is set to any value OTHER than "0 – No." If you change the selection back to No, this field will disappear.
Is the Fee Waiver Code field required if I set "Has the individual applied for fee and/or waiver = Yes"?
Yes. Once you toggle this field to Yes, the Fee Waiver Code becomes a required field and you must select an option before saving.
What is the difference between Welfare Status and Welfare Type?
- Welfare Status= Whether the student is or is not a welfare recipient
- Welfare Type= The specific type of welfare support (only appears if they ARE a welfare recipient)
If Disability Status = "0 – No disability," why do Welfare Status and Welfare Type appear instead of Disability Assess Type?
When there is no disability, the system focuses on whether the student receives welfare support. When there IS a disability, the focus shifts to how the disability has been formally assessed, so Disability Assess Type appears instead.
Can a student have both disability and welfare support?
The system is structured so that either:
- No Disability→ Welfare Status and Type are captured
- Disability Present→ Disability Assess Type is captured
The fields are conditional and cannot both appear simultaneously.
Is "Has Achieved A Qual Since Turning 17" a required field?
Yes, this is a required dropdown field.
The "Highest Port School Qual" field is not appearing even though I selected a qualification. Why?
This field only appears when
"Has Achieved A Qual Since Turning 17? = 2 – Yes, after leaving school (post-school qualification)". If you selected a different option (e.g., "No" or "Yes, before leaving school"), this field will not appear.
Must the Declaration checkbox be checked?
Yes. The Declaration checkbox is required and must be checked to confirm consent and accuracy of the recorded information before you can save the enrolment.
What if I miss checking the Declaration box? Can I still save the enrolment?
No. You will receive a validation error indicating that the Declaration must be checked. You must check this box before saving.
Are all fields in this section required?
Most fields are required (indicated by red asterisks or "Required" labels). However, some fields only become required when specific conditions are met (e.g., Welfare Type only becomes required if Welfare Status ≠ "Not a welfare recipient"). Review the conditional logic carefully.
How to Export and Import Bulk Commitment Data
Overview
The RTO Settings now include two new buttons for managing Smart and Skilled Bulk Commitment data: Smart and Skilled – Bulk Upload (for exporting) and Smart and Skilled – Import Result (for importing CSV files). These tools allow you to extract student enrolment data and import processed Smart and Skilled results back into the system.
This tutorial will guide you through the export and import processes, including how to map CSV columns to system fields.
Step Tutorial
1. Navigate to RTO Settings
From the sidebar menu, navigate to RTO Settings.

2. Locate the Smart and Skilled Buttons In the RTO Settings, locate the buttons area. You will see a button called
VSN Report (or similar). Immediately after this button, you will see two new buttons:
- Smart and Skilled – Bulk Upload (Export button)
- Smart and Skilled – Import Result (Import button)

Part A: Exporting Bulk Commitment Data
3. Click the "Smart and Skilled – Bulk Upload" Button
Click the Smart and Skilled – Bulk Upload button to export student enrolment data.

4. Understand What Data Gets Exported
When you click this button, a file will be automatically generated and downloaded. This file contains records of all student enrolments that meet BOTH of these criteria:
- The student has No Commitment ID assigned yet
- The related Program Instance has Turn on Smart and Skilled Provider Calculator – Bulk Upload = Yes

The exported file includes all data entered in the Smart and Skilled sections of the Enrolment Wizard:
- Eligibility Status, Ineligibility Reason
- Enquiry or Notification type and dates
- Programme Details (PAS No, Programme Stream, Training Location Region, etc.)
- Individual Eligibility information (Long Term Unemployed, Works in NSW, Disability Status, etc.)
- Strategy Initiative information (codes and voucher numbers)
- Fee waiver codes and other related data
5. Save the Exported File
The exported file will be in Excel format (.xlsx). Save this file to a secure location on your computer or network.

6. Send the File to Smart and Skilled System (External Process)
The exported file is now ready to be sent to the Smart and Skilled system or any external processing system that calculates commitment IDs and subsidy information.
NOTE: The external Smart and Skilled system will process this file and return a results file containing commitment IDs, subsidy amounts, and other calculated values.
Part B: Importing Smart and Skilled Results
7. Click the "Smart and Skilled – Import Result" Button
Once you have received the processed results file back from the Smart and Skilled system, click the Smart and Skilled – Import Result button in RTO Settings.

8. The File Upload Modal Appears
A modal dialogue will appear titled "Smart and Skilled – Import Result" with a file upload area.

9. Prepare Your CSV File
The Smart and Skilled system will provide you with a CSV file containing the processed results. Before uploading, ensure:
- The file is in CSV format
- The file contains the required columns (see field mapping table below)
- Each student record includes: Surname, First Name, and Date of Birth to match against existing students in the system

Important: The system will match student records using
Surname, First Name, and Date of Birth. If these fields don't match exactly with existing students in your system, the import will fail for those records.
10. Upload the CSV File In the upload modal, click the upload area or drag and drop your CSV file to upload it.

11. The Import Process Runs Once you upload the file, the system will:
- Read each row in the CSV file
- Match the student using Surname, First Name, and Date of Birth
- Update the corresponding enrolment record with the data from the CSV
- Apply the field mapping rules shown in the table below
The system will process all matching records and display a summary of successful imports and any errors.

Field Mapping Reference
Use this table to understand how CSV columns are mapped to system fields in the Enrolment Wizard:
12. Review Import Results
After the import completes, the system will display a summary showing:
- Number of records successfully imported
- Number of records with errors
- Details of any failed matches or validation errors

13. Address Any Errors
If there are failed records, review the error details. Common reasons for failures include:
- Student surname, first name, or date of birth don't match exactly
- Enrolment doesn't exist in the system
- Data validation errors (e.g., invalid dates or values)
Correct the issues in the CSV file and re-upload if needed.
14. Verify Updated Enrolments
Once the import completes successfully, navigate to individual student enrolments to verify that the Smart and Skilled data has been correctly updated:
- Commitment ID (if assigned)
- Quote ID (if applicable)
- Eligibility Status
- Dates (Enquiry, Notified, Expiry, Cancelled)
- Fee Waiver Code
- Strategy information

And that's how to export and import Bulk Commitment data in the SMS!
Congratulations on completing this tutorial. We hope this has been helpful to you and your organisation. For any questions or concerns regarding this function, please reach out to support via email.
FAQs
What determines which student enrolments are included in the export file?
The export includes all enrolments that meet BOTH conditions:
- No Commitment ID has been assigned yet
- The related Program Instance has Turn on Smart and Skilled Provider Calculator – Bulk Upload = Yes
Can I export enrolments multiple times?
Yes. Each time you click the export button, a new file is generated with the current set of eligible enrolments. If you've already imported results for some enrolments, they will not be included in the next export (since they now have Commitment IDs).
What format is the export file in?
The export file is in Excel format (.xlsx).
What format should the import file be in?
The import file must be in CSV format (.csv).
How does the system match students during import?
The system uses Surname, First Name, and Date of Birth to match CSV rows to enrolments in the system. These three fields must match exactly. The matching is case-sensitive, so ensure data consistency.
What happens if a student record in the CSV doesn't match any student in the system?
That record will be marked as an error during import. No data will be updated for that student. You must correct the name or date of birth in the CSV and re-upload.
Can I import the same file twice?
Whilst technically possible, you should avoid this as it may create duplicate updates. The system will attempt to match and update records using the same matching criteria. If the Commitment ID already exists, re-importing the same data may cause issues.
What does "Reference ID" in the CSV map to – Quote ID or Commitment ID?
It depends on the Eligibility Status (Column N):
- If Status = Eligible → Reference ID updates Quote ID
- If Status = Notified, Cancelled, or Expired → Reference ID updates Commitment ID
Will the import process overwrite existing values?
Yes. The import process will overwrite the current values in the mapped fields with the values from the CSV file. Be cautious and verify your CSV data before importing.
Can I select which fields to update during import, or does it update all fields?
The import updates all mapped fields that have data in the CSV. You cannot selectively choose which columns to update.
What if the CSV file has extra columns that aren't in the field mapping table?
Extra columns will be ignored. Only the columns listed in the field mapping table will be processed.
What if the CSV file is missing some of the mapped columns?
The import will process the columns that are present and skip the missing ones. However, ensure that your CSV at minimum includes the student matching columns: Surname, First Name, and Date of Birth.
Are there any validation rules applied during import?
Yes. The system will validate:
- Date formats (must be valid dates)
- Dropdown field values (must be valid options)
- Data type compatibility (e.g., numbers for codes, dates for date fields)
- Student matching (Surname, First Name, Date of Birth must exist)
Invalid data will result in error messages during import.
Can I import data for students not enrolled in Bulk Commitment ID-enabled programmes?
The import will attempt to match and update records based on student identification. However, it will only successfully update enrolments that have the Smart and Skilled sections available (i.e., in Bulk Commitment ID-enabled programmes).
What is the recommended workflow for bulk commitment processing?
- Click "Smart and Skilled – Bulk Upload" to export pending enrolments
- Send the .xlsx file to the Smart and Skilled system for processing
- Receive the processed CSV file back from Smart and Skilled
- Click "Smart and Skilled – Import Result" and upload the CSV
- Verify the import results and review updated enrolments
- Repeat the process for the next batch of students
How often can I run exports and imports?
You can run them as frequently as needed. Typical workflows involve weekly or monthly batch processing, but this depends on your organisation's requirements.
Congratulations on completing this tutorial. We hope this has been helpful to you and your organisation. For any questions or concerns regarding this function, please reach out to the contact support via email.