How to Use the Validation Management System (VMS)

Overview
The Validation Management System (VMS) in SMS (Compliance Plus subscription) provides an end-to-end platform for managing risk-based assessment validation aligned with the 2025 Standards. It automates sampling, verifies panel credentialing, structures validation findings, and connects outcomes directly to your Quality Management System (QMS), Continuous Improvement (CI) Register, and Risk Register.

Step Tutorial
1. How to Set Up Risk Ratings & Sample Sizes
Before scheduling validation events, ensure your Units and Programs have configured risk profiles. Risk ratings drive automated prioritization and sample size calculations across the system.
Unit-Level Configuration
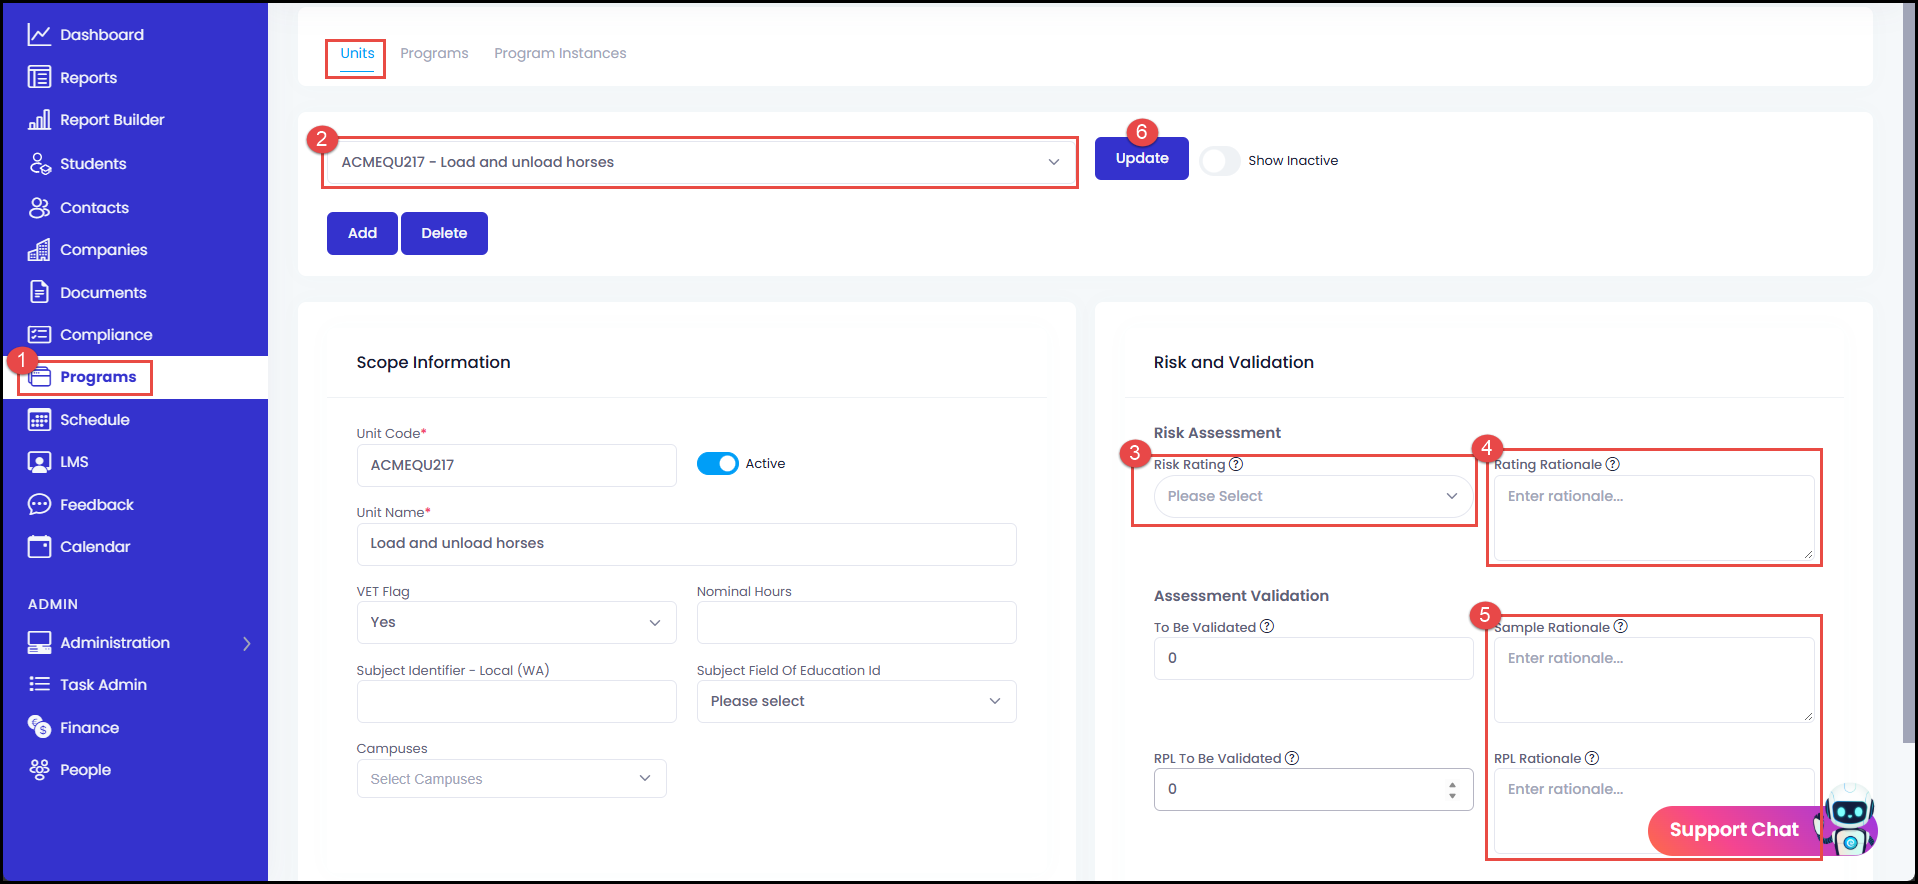
1. Go to the Units tab in the SMS. (Programs > Units tab)
2. Select a unit and look for the Risk and Validation section.
3. Assign a Risk Rating (1 to 5):
- 5 – Critical: Identified invalid assessments, serious safety/legal/licensing/regulatory risk, or systemic failure evidence. Requires frequent, in-depth validation.
- 4 – High: High-consequence outcomes, new/changed tools, new delivery modes, inexperienced assessors, or regulator priority areas.
- 3 – Medium: Moderate complexity and consequence, stable tools, experienced assessors, and compliant validation history.
- 2 – Low: Low safety/regulatory impact, stable tools, low complaints, and consistent past compliance.
- 1 – Minimal: Very low-impact, simple assessment design, minimal cohorts, and negligible consequence of incorrect judgements.
4. Enter the required Risk Rationale justifying the rating (e.g., licensing requirements, cohort complexity, assessor changes).
5. Specify the Sample Size ("To Be Validated ") and Sample Rationale for:
- Completed Assessments
- Recognition of Prior Learning (RPL)

TIP: Use the built-in tooltip guidance to align with statistical benchmarks (such as ASQA calculator benchmarks) and adjust upward for risk factors like multiple assessors or diverse cohorts.
6. Click on Update to save your changes.
2. How to Schedule a Risk-Based Validation Event
The VMS prioritises scheduling based on risk and time elapsed since the last review than arbitrary calendar dates.
1. Navigate to the Compliance Calendar or Dashboard > Validation Tab
2. On the right side of the page, click the  button to create a Validation Event.
Select Validation Event
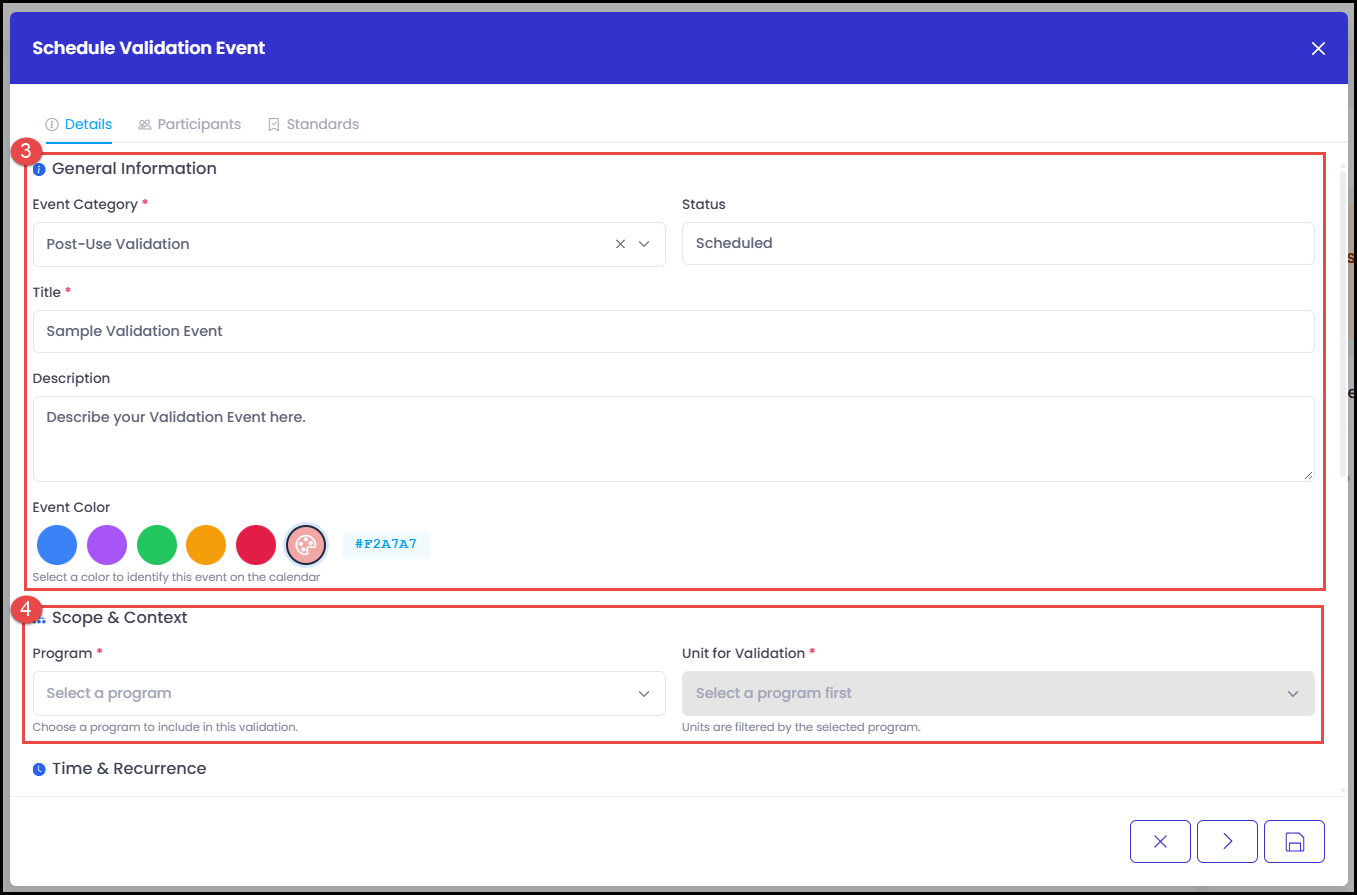
3. In the Details tab:
- Select the Event Category: Pre-Assessment Validation (tool review) or Post-Assessment Validation (student work and judgements).
- Enter the Title and Description.
4. Select the Scope & Context:
- Choose the Program and Unit.
- The pickers automatically list items in priority order:
a. Highest risk rating descending (Critical down to Minimal).
b. Oldest last-validated date ascending within each risk band (unvalidated products appear at the top of their band).
5. Set the Time & Recurrence
- Choose the Date and Start/End Time.
- Indicate if the event is a repeating occurrence.
- Indicate if the Reminders need to be set.
- Indicate if the Reminders need to be set.
- Set the Location as physical (campus and room) or virtual (meeting URL)
- If set to Physical, an Address field will show.
- If set to Virtual, a URL address for the online meeting will show.
6. Click on the  logo to save your event.
3. How to Manage Participants & Verify Collective Credentials
The 2025 RTO Standards require the validation panel to collectively hold relevant training and assessment credentials, industry currency, and professional development (PD).
1. Open the Participants tab inside the validation event.
2. Search and select Trainer/s:
- Check the verification boxes after reviewing the uploaded evidence. Ticking off credential types here will also remove them from the Validation Compliance Check section. This will be relevant later at step 5: Check the Compliance
- Set the attendance status (Accepted, Pending, Tentative, Declined)
and indicate if they are an independent reviewer. - Click Save and Continue.
- Select how the information from this event will apply or not apply to other events in the series.
3. Add External Expert/s:
- Click enter their First Name, Last Name, Email, and Role.and upload supporting documents (credentials, industry currency, PD). Save once done.
- Check the verification boxes after reviewing the uploaded evidence. Ticking off credential types here will also remove items from the Validation Compliance Check section.
- Set the attendance status (Accepted, Pending, Tentative, Declined)
and indicate if they are an independent reviewer. - Click Save and Continue.
- Select how the information from this event will apply or not apply to other events in the series.
5. Check the Compliance Banner:
- Review the Validation Compliance Check banner at the top of the Participants tab.
- If the collective panel lacks any of the three required areas (Industry Currency, PD, or Trainer Credential), an alert will display.
- Tick off credential evidence accordingly before the event proceeds to avoid compliance issues.
4. Attaching Assessment Tools & Collating Samples
Pre-Assessment Validation: Reviewing Tools
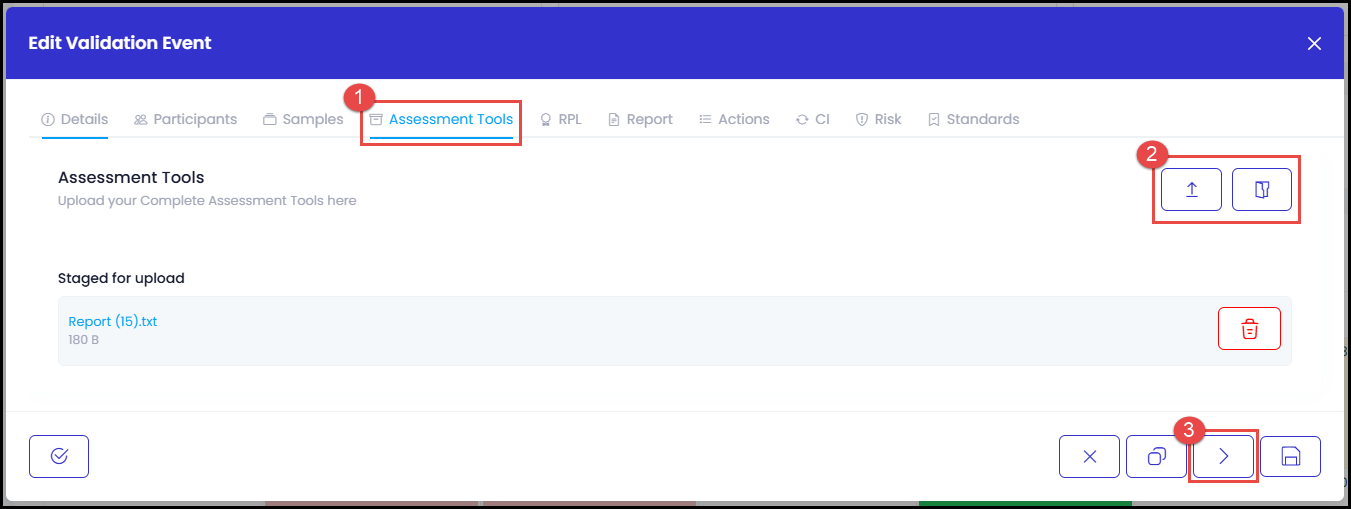
1. Open the Assessment Tools tab.
2. Upload the instruments to be validated (mapping documents, marking guides, observation checklists, benchmark answers). Entire folders or individual documents can be uploaded in one action for panel review prior to student delivery.
3. Click Save and Continue.
Post-Assessment Validation: Sampling Student Evidence
1. Open the Samples tab.
- The sample size automatically defaults based on the unit's risk-based calculation.
- Select a date range (e.g., "Assessments Completed in Last 12 Months"), assessors, or outcome types.
2. Choose a retrieval method:
- Get from LMS (Default): Generates sample cards automatically with student details, assessor names, outcomes, and activity tables containing one-click links directly to submissions in the LMS.
- Upload Manually: For external or archived evidence, create blank sample cards and upload submission files or folders directly.
3. Select the Assessors and the Sample Outcome
NOTE: If RPL is included in scope, navigate to the RPL Validation sub-section to review RPL samples, candidate records, and rationales separately from standard assessment pathways.

5. Conducting the Validation & Recording Findings
During the validation session, panel members record structured findings directly into the Report tab rather than using external text documents.
Section 1: Assessment System Findings (Principles of Assessment)
- Expand the green guidance card to review regulatory criteria and practice examples for Fairness, Flexibility, Validity, and Reliability.
- Record structured findings in the rich-text editor regarding the design of the assessment system and tools.
Section 2: Assessment Judgement Findings (Rules of Evidence)
- Expand the guidance card covering Validity, Sufficiency, Authenticity, and Currency.
- Review specific prompts for academic integrity, AI-generated evidence, and student identity verification.
- Enter the panel's findings regarding assessor judgements and evidence quality.
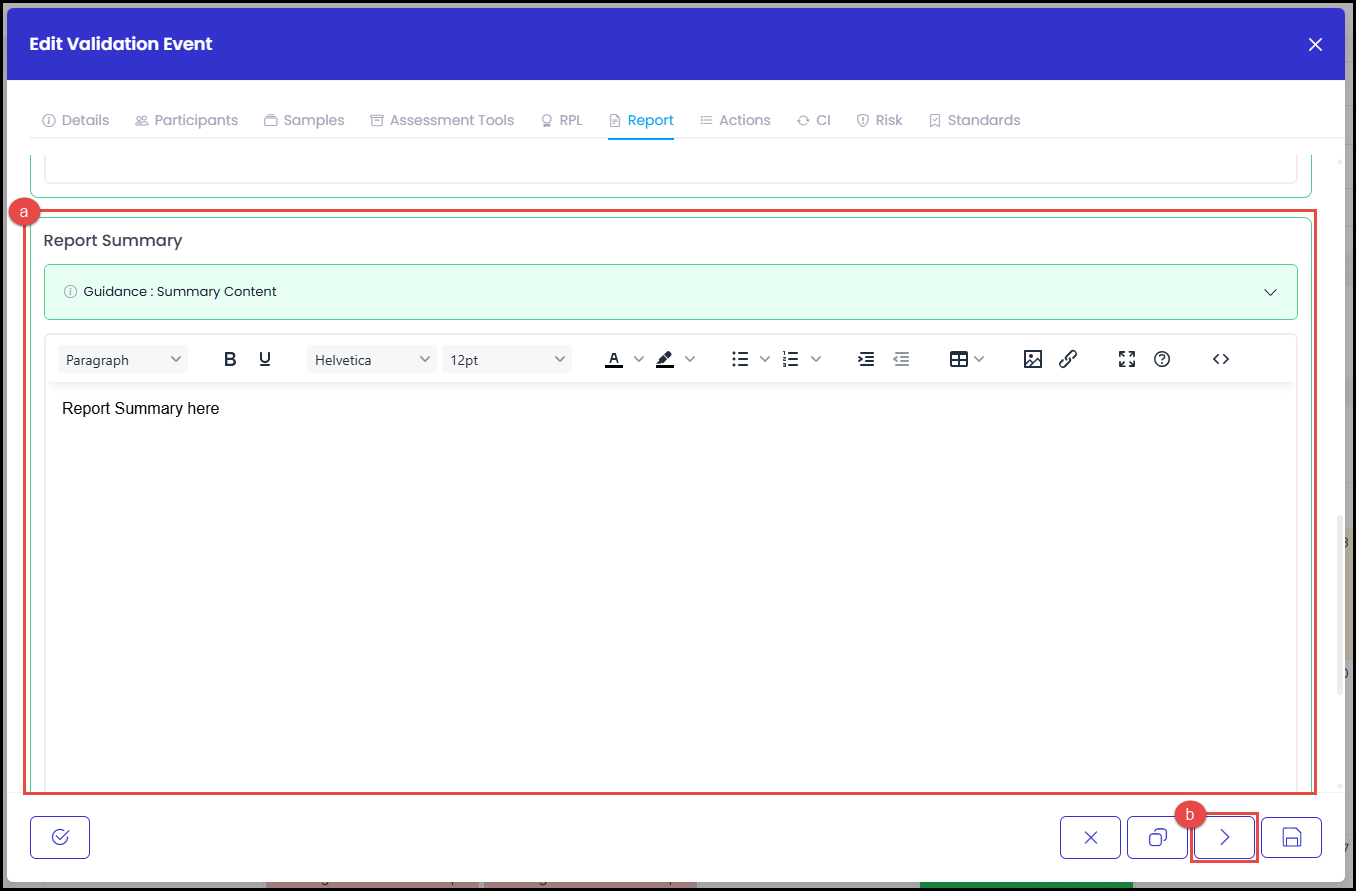
Section 3: Report Summary
a. Complete the structured summary prompts:
- Gaps in assessment tools
- Issues with student evidence
- Issues with assessor judgements
- System-level issues
- Arising risks and overall impact
b. Click Save and Continue
6. Closing the Loop: Actions, Continuous Improvement, and Risk
The VMS ensures all validation outcomes propagate directly into operational registers.
1. Actions Tab:
- Add assigned tasks resulting from the review.
- Tasks automatically appear on the assignee's My Task Kanban board and/or the organization's Task Admin page, linked back to the validation event. To view your tasks, click on the numbered icons beside your profile logo on the upper-right corner of the SMS.
2. Continuous Improvement (CI) Tab:
- Add continuous improvement initiatives directly from findings. Refer to this tutorial on How to Add Feedback to the Continuous Improvement Register
- Records post to the central CI Register with the validation event recorded as the source. To view the CI Register, refer to the image below:
3. Risk Tab:
- Add compliance, safety, or quality concerns.
- Logged items immediately post to the Risk Management System (RMS) with author and event details. You may refer to How to Use RMS - Risk Management System for more information.
7. Standards Mapping, QMS Integration, and Monitoring
Pre-Populated Standards Mapping
Events automatically link to the 2025 Outcome Standards without manual configuration:
- Pre-Assessment Validation: Quality Areas 1 and 4; Standards 1.3, 1.4, 4.4; Performance Indicators 1.3(a)–(c), 1.4(a)–(b), 4.4(a)–(b).
- Post-Assessment Validation: Quality Areas 1 and 4; Standards 1.3, 1.4, 1.5, 4.4; Performance Indicators 1.3(a)–(c), 1.4(a)–(b), 1.5(a)–(g), 4.4(a)–(b).
Quality Management System (QMS) Evidence
- Open any relevant Performance Indicator (e.g., PI 1.5) in the QMS to view a live, rolling 5-year log of all completed validation events.
- Auditors and managers can click directly into any event to inspect panel members, LMS samples, findings, and linked CI/Risk records.
Live Validation Dashboard & Progress Tracking
Track progress toward your 3-year (50% coverage) and 5-year (100% coverage) obligations via the Validation Dashboard:
- Action Cards: Monitor Programs Requiring Attention (unvalidated or >4 years since last validation), Overdue Events, and Participant Issues (missing credentials/currency).
- Schedule Health Banner: Verify whether future scheduled events are sufficient to meet upcoming 5-year targets (Schedule On Track vs. Schedule Coverage Gap).
- Drill-Down Modals: Click on any dashboard card or summary figure to open filtered tables, export data to Excel, or jump directly into scheduling and resolution workflows.
Congratulations on completing this tutorial. We hope this has been helpful to you and your organisation. For any questions or concerns regarding this function, please reach out to the contact support via email.