How to Set Up a Program Instance in the SMS
 Overview
Overview
In the SMS a Program Instance, which serves as the different variations of your Programs, can be set up as Dynamic or Intake type. Program Instances that are set as Dynamic are useful for setting up programs that are self-paced or taken Online. Dynamic Program Instances have dynamic start or end dates, which are based on a student's enrolment date, as compared to Intake programs where all students in the class are expected to start the program all at the same time.

NOTE: Before beginning this tutorial, make sure that Programs are created, and Units are added already in the SMS. Users may refer to this tutorial to learn more how to create Programs and Add Units: How to Create a Program for a Qualification, Accredited Course, Unit/Modules or Skill Sets
 Step Tutorial
Step Tutorial
Part A - Creating a Program Instance
1. To create your Program Instance, go to Programs in the side bar menu. Navigate to Program Instances tab. Click "Add".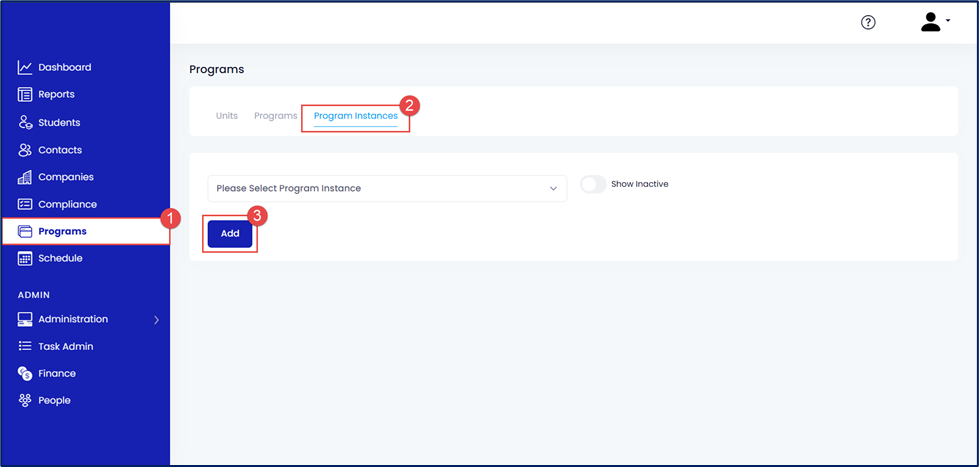
2. In the Details sub-tab, complete the Program Instance Information. This section includes the following fields:
a. Program - Select the Program from the dropdown. The program instance will be a variation of the selected Program.b. Active - Toggle to set the Program Instance as active or inactive. Default is set to Active.NOTE: Once this is toggled off (set as inactive):
- It will no longer appear in the main Program Instance drop-down menu.
- Students will no longer be able to self-enrol in the Program Instance.
- It will not appear on the Smart Enrol forms.
c. Program Instance ID - This is an automated numbering created by the system which uniquely identifies the Program Instance through a number.d. Program Instance Name - Enter a name for the program instance.NOTE: Use a name the describes the Program Instance well to make it easier to locate or identify later on.e. Duration (Days) - Set the duration of the program in Days. The duration set will be used in calculating the Start and end date of students enrolling in the program instance.f. Weeks Attended - Specify how many weeks a student will attend the program instance.g. Program Participation - Select the program participation type from the dropdown. Program can be Full time, Part Time or Self Paced.h. Program Type - Select the program instance type from the dropdown. Program type can be Intake or Dynamic.IMPORTANT: Dynamic program instances are useful for setting up programs that are self-paced or taken online, have flexible start or end dates. While Intake program instances expect students to start the program at the same time.i. LMS Course (Program to Single Course) - If the SMS is integrated with eSkilled's Learning Management System and the program instance is a single-course, select the course here. Otherwise, do not change.j. Requires LLN - Toggle to indicate if the Program Instance requires LLN as part of the completion requirements. The default settings is No. Toggle to Yes to require LLN. If the toggle is set to YES, the LLN LMS course field will also display.a. LLN LMS Course - Select the LLN course from the dropdown menu to link the correct LLN course in your eSkilled LMS.b. Require LLN Successful Completion Before Enrolling Units in LMS - Toggle to select if LLN is required to be completed before the student is enrolled in the rest of their units in the LMS. (Applicable only for SMS integrated with the eSkilled LMS).k. Colour - The Colour field set in Program Instance will be set as the default Colour when adding new Events in Schedule page.l. CRICOS Course ID No - Enter the CRICOS Course ID number if applicable.m. Allow Letter of Offer for Domestic Students - Enables the generation and issuance of a Letter of Offer for domestic students during the enrolment process.n. Core Units - Enter the number of Core units for the program instanceo. Automate Certificate Creation - Toggle to automate the creation of certificates once students complete all units. This is set to "No" by default. Learn more here: How to Automate Certificate Creation and Certificate Emailp. Requires Vocational Placement/Host Employer - Toggle to select if the program instance requires vocational placement/host employer. This is set to "No" by default. If set to "Yes," an additional field to select the vocational placement/host employer will display in the enrolment wizard.q. Delivered with Partner Training Organisation - Toggle to tag the program instance as being delivered with a partner training organisation. This is set to "No" by default.r. Custom Theme - Applicable only for SMS integrated with eSkilled LMS. This allows users to set a custom theme in the LMS for the program instance.s. Allow Letter of Offer - This toggle specifies if the program instance allows a letter of offer.t. Enrolments Expire - Toggle to set if the enrolments expire. This is set to "No" by default.u. Enrolment Expires After (Days) - A field to enter the expiration period of the enrolment.v. Enrolment Units Expire - Toggle to set if the enrolment units expire. This is set to "No" by default.
3. Once done, scroll to the top of the page and click the "Save" button.
NOTE: Once you complete this stage, the program instance will be saved automatically. Continue making modifications by proceeding to the next tabs.
Part B - Setting Up AVETMISS
NOTE: The AVETMISS sub-tab will only be available if the program is set to nationally recognised training. Users may skip this step if the program instance is for a non-accredited course.
1. Go to the AVETMISS sub-tab. Fill in the required fields:
a. Reporting State - Identify which state your RTO reports to.b. Funding Source - National - Select the Funding Source for the program instancec. Unit Delivery Mode - Select the unit delivery mode for the program instance from the dropdown. Options are: Internal only, External only, Workplace-based only, and combinations of the first three choices.d. VET in Schools Flag - Select if the program instance is being offered as part of the VET in Schools program.e. Nominal Hours - This field auto-calculates based on the nominal hours of all the units added to the program instance.f. Funding Source - State Training Authority - Identify the funding source – State Training Authority.
2. Once done, scroll to the top of the page and click the "Update" button.
Part C - Setting Up Enrolment Form
1. The Enrolment Form sub-tab allows users to set up the online enrolment form for the program instance. Complete the setup of the enrolment form using the basic guide below:
General Settings
- Smart Enrol Template - Offering a fully customisable enrolment form. It allows organisations to control which fields are displayed during the enrolment process, providing greater flexibility and a tailored user experience. (Related Tutorial: How to Create and Use Smart Enrol Form in the SMS)
- Accepting Enrolments - Set this toggle to "Yes" to start accepting enrolments for the program instance.
- Allow Blank Student Email - Set to "Yes" if students can enrol without providing their email address.
- Show Prompt on Enrolment Submission - Set to "Yes" to show a prompt to students that their enrolment has been successfully submitted.
- Allow International Students - Set to "Yes" if international students are allowed to enrol in the program instance. If toggled "Yes," the field "Hide International Student Question" will be disabled for editing. The question "Are you an international student?" will be displayed in the enrolment form. If toggled "No," once a student selects that they are an international student, a message window will appear informing them that international students are not eligible to apply for the program instance.
- Enforce Use of External Account - Determines whether users must sign in using a third-party identity provider rather than creating or using a local system account. Supported identity providers include Google and Microsoft.
- Allow Elective Unit Selection - Controls whether students are permitted to choose elective units during enrolment, based on the configured training package or course structure.
- Maximum Elective Units - Only applicable when Allow Elective Unit Selection is enabled. It defines the maximum number of elective units a student can select within a course or qualification.
Financial Settings
- Invoice Student On - Select from the dropdown menu when students will be invoiced based on their enrolment status. Options are:
- Application Received - Payment plans and related invoices will be initiated when the student's status is "Application Received." If the program instance has a contract set up, this option will not be displayed.
- Application Approved - Payment plans and related invoices will be initiated when the student's enrolment status becomes "Approved." If selected, the "Pay Later" toggle will be set to "Yes."
- Enrolled - Payment plans and related invoices will be initiated once the student's status becomes "Enrolled." If selected, the "Pay Later" toggle will be set to "Yes."
- Set Enrolled On - Select whether students will automatically be set as "Enrolled" based on the following:
- Leave as application received - Default selection: Any applications created will be set as "Application Received," and any further changes must be made manually.
- With payment - Upon submission of a paid enrolment application, the student's status will be changed to "Enrolled."
- Without payment - Upon submission of an enrolment application, the student's status will be changed to "Enrolled," even if no payment has been received.
- Allow Pay Later - Set the toggle to "Yes" if the "Pay Later" option will be displayed during the payment stage of the enrolment form. When set to "Yes," the "Remove Payment Stage" field will be hidden in the settings, and additional fields will appear:
- Allow Pay Later For - Dropdown for the "Pay Later" option to be available for: All, Students Only, or Company Only.
- Pay Later Description - Enter the text to display for the "Pay Later" option.
- Remove Payment Stage - Set the toggle to "Yes" if the payment stage will not show in the enrolment form. Use this setting if payment will not be required for the application to progress.
- Invoice to Student Only - Set the toggle to "Yes" to automatically set the student as the "Invoice To" option in the enrolment form. If set to "Yes," the "Invoice to Employer" toggle will be grayed out. Leave both settings off if the selection will be made in the enrolment form.
- Invoice to Employer Only - Set the toggle to "Yes" to automatically set the employer as the "Invoice To" option in the enrolment form. If set to "Yes," the "Invoice to Student Only" toggle will be greyed out. Leave both settings off if the selection will be made in the enrolment form.
- Show Course Fee on Front Page (External Enrolment) - Set to "Yes" to display the total course fee in the external enrolment form.
2. Once done, scroll to the top of the page and click the "Update" button.
NOTE: For a more detailed tutorial on the Program Instance Enrolment Form, refer to this link: How to Create and Use Smart Enrol Form in the SMS
Part D - Setting Up Units
1. To add units to the program instance, go to the Units sub-tab and click New.
2. Fill in the required information:
a. Unit Code - Select the unit code to be added from the dropdown menu.b. Unit Name - This is a non-editable field that displays the unit name.c. Expires After (days) - This field becomes available when Enrolment Units Expire is enabled in the Program Instance > Details tab. Enter the number of days after which the units will expire.For more information, please refer to the tutorial: How to Set Expiry Date for Enrolments and Unitsd. Unit Duration (days) - Enter the duration (in days) for the unit. (Applicable only for SMS integrated with eSkilled LMS.)e. Unit Start Date Delay (days) - Enter the start date delay (in days) for the unit. (Applicable only for SMS integrated with eSkilled LMS.)f. LMS Course - Select the course to sync the unit with the LMS course. (Applicable only for SMS integrated with eSkilled LMS.)g. Only Enrol after Unit - Set the prerequisite unit required before a student is enrolled in the LMS course. (Applicable only for SMS integrated with eSkilled LMS.)h. Unit Delivery Mode - This field is pre-filled based on the selected unit delivery mode in the program instance setup. Select from the dropdown if changes are required. See below for
Code Definition Typical Example YYY Combination of Internal, External, and Workplace-based delivery Blended training that includes classroom sessions, online learning, and workplace training. YYN Combination of Internal and External delivery Face-to-face classes supported by online learning resources and activities. YNY Combination of Internal and Workplace-based delivery Classroom training combined with structured workplace training or work placement. NYY Combination of External and Workplace-based delivery Online learning combined with workplace-based practical training. YNN Internal delivery only Traditional classroom, workshop, laboratory, or simulated training delivered face-to-face. NYN External delivery only Self-paced online learning, correspondence, or remote delivery completed away from an RTO delivery location. NNY Workplace-based delivery only Training conducted entirely in the workplace, such as structured on-the-job training or field placement. NNN Not applicable Recognition of Prior Learning (RPL) or Credit Transfer. AVETMISS requires NNN where the outcome is RPL or Credit Transfer. What each position represents
Position Y N 1st Character Internal delivery is used. Internal delivery is not used. 2nd Character External delivery is used. External delivery is not used. 3rd Character Workplace-based delivery is used. Workplace-based delivery is not used. Definitions of each delivery mode
Delivery Mode Definition Internal Training where the learner and trainer interact in real time at a physical training location organised or managed by the RTO, such as a classroom, workshop, laboratory, or simulator. Live delivery via video or internet links is also considered internal if both parties attend organised delivery locations. External Training undertaken away from an RTO delivery location using online or correspondence materials. This includes self-paced online learning or live online sessions where the learner participates from a location of their choosing. Workplace-based Training conducted in the workplace, whether delivered by the RTO or the employer, including structured workplace training, industrial experience, field placement, or fully on-the-job training.
i. Predominant Delivery Mode - The field options are based on what is set in the Unit Delivery Mode. For example, if the Unit Delivery Mode is "External Only," the predominant delivery mode will default to external delivery, and so on.j. Scheduled Hours - This comes from the nominal hours set for the unit on the Units page.k. Override Nominal Hours - Tick the box to override the nominal hours for this unit in this program instance.
3. Click Create. The unit will be added to the Units sub-tab. Continue adding all the core and elective units for the program instance.
4. Click Update to save the changes.
Part E - Setting Up Financial
NOTE: Before accepting enrolments for your program instance, ensure that your program fees and payment plans are created and added. This will ensure that payments are settled and managed properly.Allow Tuition Selection - This toggle is only available for Program Instance that has no Contract set. Upon manual enrolment, this requires user to select a Tuition fee. If it is set to Yes, when adding new Program Fees with Type = Tuition, a dropdown called Set Tuition Fee As becomes available. Users can set the tuition fee as Default or Optional.
Part E1 - Creating a Program Fee/s
1. Go to the Financial sub-tab. In the Program Fees section, click New.
2. Select the Fee Type from the dropdown. There are three fee types: Tuition, Resource, and Other. Select Tuition to start creating the Tuition fee.
3. Selecting the Fee type will display additional fields. Fill in the required information:
a. Description - Enter a description for the new fee. This will be displayed on the invoice.b. Student Fee - Enter the student fee amount.c. Discount - Enter the discount amount.d. GST - select from the dropdown if the GST is charged or not charged.Additional: Xero Account Code - (Applicable only for SMS with Xero integration) Select the account code for Xero. Leave blank if using the default code.
4. Click Save to save the program fee or Close to cancel. Continue adding resource or other fees if applicable.
Part E2 - Adding a Payment Plan
NOTE: A payment plan defines when students will be billed for their enrolment. Ensure that a payment plan, aligned with the total of your program fees, has already been created. To learn how to create payment plans, visit this tutorial: How to Create and Use a Payment Plan1. Go to the Financial sub-tab. In the Payment Plan section, click New.
2. Select a Payment Plan from the dropdown.
NOTE: Multiple payment plans can be added to provide students with flexible payment options. To add more, click New. All payment plans added to the program instance will appear in the payment plan data table.
Part F - Setting Up Groups
Groups can be created to organise students by location, year of enrolment, company, etc. A program instance must have at least one group to accept enrolments.
1. To add groups. go to the Group sub-tab. Click Add.
2. A new browser tab will open in the Schedules page, under the Groups/Intake tab, to create groups. Complete the fields to create the group:
a. Group Name - Enter the name for the group.b. Active - Toggle on or off to activate or deactivate the group.c. Program Instance - This is a pre-filled field with the program instance name.d. Available on Enrolment Form - Toggle to Yes to make the group available for selection in the enrolment form.e. Auto Remove - Set the auto-remove condition for the group. This will automatically remove the group from the enrolment form once the condition is met. Options are:i. Never - If this option is selected, the group will not be automatically removed.ii. Date Only - This will remove the group based on the number of days before the start date.iii. Max Student Only - This will remove the group once the maximum number of students enrolled in the group is reached.iv. Max Students or Date - This will remove the group once the maximum number of students in the group is reached or the number of days before the start date is reached, whichever comes first.f. Location - Set the location for the group. To learn more about locations, view this tutorial: How to Create Locations and Roomsg. Online Location - Enter the online location of the group (if applicable).h. Trainers - Set the trainer for the group. To learn more about creating trainers, view this tutorial: How to Add a User in the SMS
i. This group is not available for waitlisting - Toggle on to make the group available for waitlisting.
3. Click Save to create the group.
NOTE: Users can continue creating more groups as needed or create workflows to automate actions for the program instance, such as emails, tasks, and certificates.
 IMPORTANT: Always click Update to save all your changes to the program instance.
These are the steps to create a program instance in the SMS.
Congratulations on completing this tutorial. We hope this has been helpful to you and your organisation. For any questions or concerns regarding this function, please reach out to the contact support via email.
FAQs
How to Duplicate a Program Instance
Program Instance Duplication is a process that allows you to copy an existing PI to create a new one. This feature helps simplify the creation of a PI with slightly different setups. It quickly makes a copy that you can then adjust with specific settings — for example:
- A Fee for Service and a Funded version, or
- A General Public version with fees and an Internal version without course fees.
To do this:
1. From the Dashboard, go to Programs, then Program Instances. Locate the PI from the drop-down menu, and click the Duplicate button.
2. Enter a new Program Instance name, then click Submit.
3. A confirmation message indicating the successful duplication will appear. Click OK to close it.
That’s how you can duplicate a Program Instance in the SMS.