How to Create and Use Custom Fields in the SMS

Overview
Custom fields allow you to capture information in your SMS that may not be included in the predefined forms. They enable you to collect and store data tailored to your organisation’s needs, helping you build comprehensive student profiles and improve your data collection and analysis.
You can create customised questions using a range of field types, including alphanumeric fields, dropdowns, tick boxes, and file uploads. This flexibility allows you to gather meaningful data, provide more specialised support, streamline administrative processes, and enhance student engagement.
In this tutorial, we will guide you through how to add custom SMS fields that will appear in the enrolments tab, the enrolment wizard, and the Smart Enrol form.

NOTE: This exclusive feature is only available for Performance and Compliance Plus Package subscribers. Unlock the full potential of your SMS with the Performance and Compliance Plus Package. To upgrade your plan and access this feature, please contact our Support team.

Step Tutorial
Part 1 – Setting up a Custom Fields Category
A custom fields category is used to group related custom fields together within your SMS. It helps organise your fields in a structured way, making them easier to manage, locate, and maintain.
Using categories improves efficiency by keeping similar data grouped together, which is especially useful when working with large volumes of information. It also enhances the user experience by ensuring fields are logically arranged in forms such as the enrolment wizard and Smart Enrol, making data entry more intuitive and consistent.
1. From the Dashboard, navigate to Administration, then Templates, then Custom Fields, and select Categories. Click the plus icon to add a new category.
2. Enter a Name for your category. This is used internally to identify and manage the category within your SMS, so it should be clear and descriptive to help administrators easily recognise its purpose.
Next, add a Section Title for your category. This will be displayed on the enrolment wizard and the enrolment form, serving as a heading for the grouped fields. A clear section title helps guide users and ensures the form is organised and easy to follow.
Once done, click the Save button to apply and store your changes.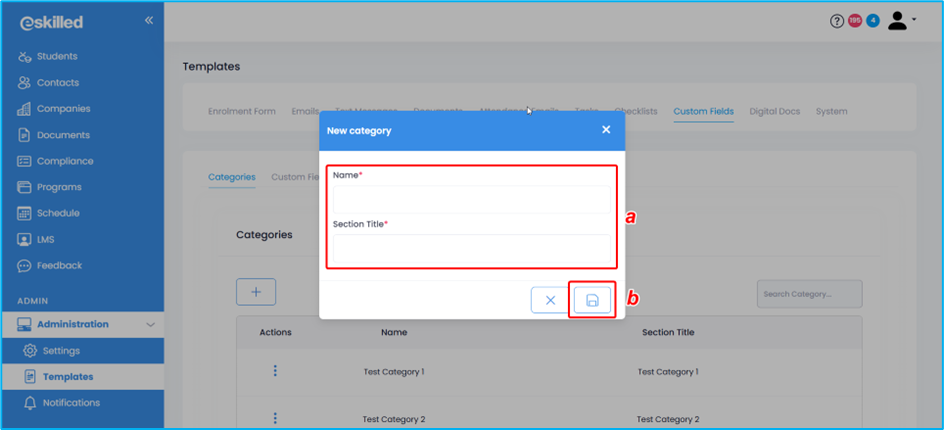
Part 2 – Adding a Custom Field into the Category
Custom fields are individual data points added within a category to collect specific information that is not available in the standard SMS forms. They allow you to tailor data collection to suit your organisation’s unique requirements, ensuring that all relevant student or enrolment information is captured accurately.
By grouping custom fields within a category, the information remains organised and easy to manage. This structure also ensures consistency across enrolment forms, improves data accuracy, and supports more efficient reporting and analysis.
1. From the Dashboard, navigate to Administration, then Templates, then Custom Fields, and select Custom Fields. Click the plus icon to add a new custom field.
2. Complete the following fields:
- Internal Reference ID - A unique identifier used by the system to distinguish this custom field from others. It is primarily used for backend reference and integrations, and should be consistent and meaningful for system management purposes.
- Short Name - A concise label for the custom field used internally within the SMS. It helps administrators quickly identify the field when managing or configuring custom fields.
- Display - The label that will be shown to users on forms such as the enrolment wizard or Smart Enrol. It should be clear and user-friendly to ensure correct data entry.
- Entity - Defines where the custom field will be applied. Selecting “Student” applies the field at the student level, while “Enrolment” applies it to a specific enrolment record.
- Category - Assigns the custom field to a previously created category, helping to organise related fields together for better structure and easier management.
- Custom Field Type - Determines the format of data that can be entered into the field. Options include numeric, alphanumeric, checkbox, toggle, dropdown, multi-select dropdown, date picker, and file upload, depending on the type of information being collected.
- Show on Contact - Controls whether the custom field is visible on the contact profile page, allowing relevant information to be displayed at the contact level.
- Show on All - Ensures the custom field is displayed across all relevant internal SMS views where applicable, improving visibility and consistency of data.
- Show on All External Enrolment Form - Determines whether the field is visible on external enrolment forms completed by users outside the system, supporting data collection at the point of enrolment.
- Required - Indicates whether the field must be completed before the form can be submitted, helping to ensure that critical information is always captured.
Once done, click the Save button to apply and store your changes.
After this step, your custom fields are now ready for use. However, if you would like to further tailor them and apply them to a specific program instance, you may continue to Part 3 below.
Part 3 – Showing Custom Fields to a Specific Program Instance
This section focuses on controlling the visibility of custom fields at the program instance level. It allows you to determine which fields are displayed when a student is enrolled into a specific program, ensuring that only relevant information is collected based on the requirements of that program.
By linking custom fields to a program instance, you can tailor data collection to suit different courses or training pathways. This helps maintain consistency and relevance in enrolment data, reduces unnecessary fields for users to complete, and ensures that each program captures only the information it needs for effective administration and reporting.
1. From the Dashboard, navigate to Programs, then Program Instances. Select the specific program instance from the dropdown menu, then go to Workflows, and click on Custom Fields.
2. Search for your specific custom field. Then, select whether this program instance will display the custom field in the internal enrolment form (Enrolment Wizard) for all enrolments.
3. Once done, click Update to save your changes.
NOTES:
- Make sure to review the Smart Enrol form with the newly added custom fields to ensure it is complete and the layout is correct before sending the URL to your students.
- Custom fields will also be displayed in Student Details if the student is enrolled in a program instance that uses the related custom fields.
The above steps outline how to create and use custom fields in the SMS.
Congratulations on completing this tutorial. We hope this has been helpful to you and your organisation. For any questions or concerns regarding this function, please reach out to the contact support via email.
Related Articles
How to Create and Use Smart Enrol Form in the SMS
Overview The Form Creator provides a flexible and customisable way to design enrolment forms that meet your organisation’s specific needs. It allows you to tailor the form layout, add essential fields, and incorporate branding elements for a seamless ...How to Use the Form Creator
Overview Welcome to our tutorial on the new Form Creator in the Student Management System (SMS). This powerful tool allows users to create customised Waitlist Forms, allowing interested individuals to easily enter their details and join the waitlist ...How to Create or Edit Email Templates
Overview Email templates are a powerful tool within student management systems, streamlining communication, and ensuring consistency. By utilising templates, administrators can save time by eliminating repetitive email creation, reduce errors, and ...How to Create and Send Recipient-Created Tax Invoice (RCTI)
Overview A Recipient-Created Tax Invoice (RCTI) is a tax invoice that documents a taxable supply and includes the necessary details for GST reporting and record-keeping. In this tutorial, we will guide you through the process of creating and sending ...How to Create a Rolling Enrolments in Your Schedule
Overview In the Student Management System, you can create program instances that uses rolling enrolments to allow students to enrol in different intake classes but still deliver training in a subject (unit) at the same time. Using Rolling enrolments ...