How to Generate Subjects Report

Overview
The Subjects Report is a new feature that supports the Subjects functionality by allowing users to view and manage student subject data across enrolments. It enables users to filter, customise, save, and export comprehensive information, making it easier to track and analyse subject-related data.
In this tutorial, we will guide you through the steps to generate and use the Subjects Report.

Step Tutorial
1. From the sidebar menu, navigate to Reports, then select Subjects tab.
2. On the Subjects Report page, you have the option to create a new report by clicking the New button.
This will open the New Report modal:
- Name – Enter a name for the report
- Default – Toggle this ON if you want this report to be displayed each time you open the Subjects Report page; otherwise, leave it OFF
Once done, click Save.
2. The Subjects Report includes a wide range of selectable fields, such as:
- Student ID, First Name, Surname
- Program, Program Instance
- Enrolment ID, Enrolment Status, Enrolment Status Type
- Subject Code, Subject Name, Units
- Proposed Start Date, Actual Start Date, Actual End Date, Proposed End Date
- Outcome
If you have VSL-related Subjects, additional fields will be available, including:
- Census Date
- Unit of Study is Full Year
- EFTSL
- Unit of Study Status Code
- Course Assurance Indicator
- Mode of Attendance
- Student Status Code
- Amount Charged, Amount Paid Upfront, Loan Fee, HELP Loan Amount
- Remission
These fields can be accessed by clicking the Fields icon. This will open the Fields modal, where the available fields are displayed. You can customise which fields to include in your report.
To add a field, select it from the 'Please select fields you want to show' column (left).
To select multiple fields, hold down the Ctrl key on your keyboard while clicking the fields you want to add, or highlight them using your mouse. Then click the right arrow button to add the selected fields.
To remove fields from the report, select them from the 'Fields selected' column (right), then click the left arrow button.
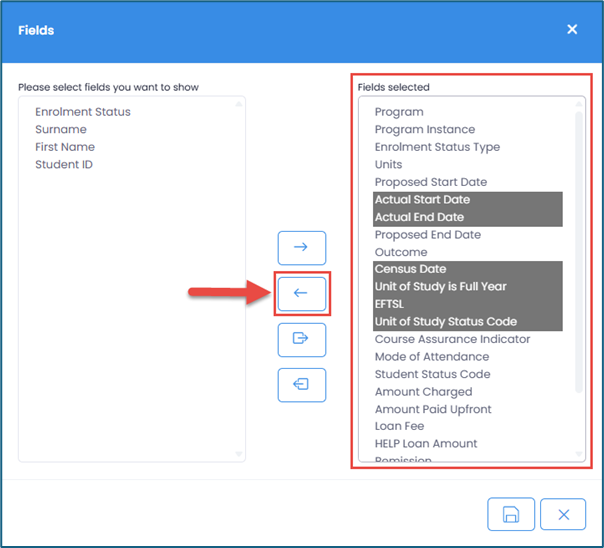
You can also move all fields at once without selecting them individually by using the following options:
- Move all fields from the 'Please select fields you want to show' column to the 'Fields selected' column
- Move all fields from the 'Fields selected' column back to the 'Please select fields you want to show' column
After selecting the fields to add or remove, click Save.
3. Set the date range for your report.
You can define the report’s date range using any of the following options:
- Start To From Range - This relates to the subject's Start Date from and Start Date to.
- End To From Range - This relates to the subject's End Date from and End Date to.
- Start From End To Range - This relates to the subject's Start Date from and End Date to.
You may use one or combine multiple options as needed.
4. After setting your fields and filters, click the Search icon to generate the report.

NOTE: You can further refine the results using the inline filters within the data table to focus on specific criteria.
5. Click the Export icon to download the report as an .xlsx file, allowing you to save, share, and further analyse the data using spreadsheet software such as Microsoft Excel.

IMPORTANT:
- When a trainer runs the report, only subjects from enrolments in groups assigned to them are displayed
- When a company contact runs the report, only subjects linked to their company enrolments are displayed.
And that's how to generate a Subjects Report in the SMS!
Congratulations on completing this tutorial. We hope this has been helpful to you and your organisation. For any questions or concerns regarding this function, please reach out to the contact support via email.
FAQs
Can I save and manage my Subjects Reports?
Yes, you can save Subjects Reports with your selected fields and applied filters.
To do this, go to the Subjects Report page and click the Save button. This will save the selected fields and all applied filters for that specific report.
To edit an existing report, open the report, apply the necessary changes, and then click the Save button to update it.
To delete an existing report, select the report from the dropdown list and click the trash icon.
Can I update multiple Student Subjects at once in the Subjects Report?
Yes, the Subjects Report supports Bulk Update, allowing you to update multiple Student Subject records simultaneously.
To do this, select one or more records using the checkbox column, then click the Bulk Update button to open the update modal.
From there, choose the fields you want to update and add them by clicking the + button.
Once added, enter the new values in the Value field to apply them to all selected records.
When finished, click Save to apply the changes.
Related Articles
How to Set Up Your Program Instance for VSL Report Collection
Overview VET Student Loans is a program that helps eligible students to enrol into approved VET Courses. All VET Student Loan (VSL) providers (‘providers’) that are approved under the VET Student Loans Act 2016 are required to report data for the VSL ...How to Generate TAMS Report
Overview A TAMS (Training Activity Management System) Report in a Student Management System (SMS) provides detailed information about a student’s training activities, including enrolments, completions, attendance, results, and progress across courses ...How to Generate Student Notes Report
Overview The Student Notes Report is a newly added feature in the Reports section of the Student Management System (SMS). This report allows users to view, export, and analyse student notes. It includes a data table with inline and top-level filters, ...How to Generate Attendance Report via Company Portal
Overview Generating an Attendance Report in a Student Management System (SMS) allows companies to track student attendance, monitor participation, and ensure compliance with attendance requirements. In this tutorial, we will guide you on how to ...How to Generate Units Report in the SMS
Overview In this tutorial, we'll discuss how to generate Units Report in the SMS. Step tutorial 1. From the Dashboard, go to Reports, then Units, then click the “New” button. 2. Add your preferred report name. You may also set it as the default. Once ...