This tutorial will guide users on how to utilise the Calendar from the SMS Menu page.
Why is it Important for RTOs to have Organisation & Governance Calendar in Their SMS
An Organisation & Governance Calendar is a critical component of an RTO's System Management System (SMS) because it provides a structured framework for planning, monitoring, and managing key governance, compliance, and quality assurance activities throughout the year. Rather than relying on ad hoc processes, the calendar helps ensure that essential organisational responsibilities are completed consistently, on time, and in accordance with regulatory requirements.
Under the Standards for RTOs 2025, RTOs are expected to demonstrate effective governance, leadership, accountability, risk management, and continuous improvement practices. An Organisation & Governance Calendar supports these requirements by clearly scheduling activities such as governance meetings, compliance reviews, self-assurance activities, policy reviews, risk assessments, validation events, industry engagement, management reporting, and strategic planning sessions.
By maintaining a documented calendar, RTO leaders and responsible persons can monitor upcoming obligations, allocate resources appropriately, and ensure that compliance activities are not overlooked. The calendar also provides evidence that governance processes are systematic, proactive, and embedded within the organisation's operations rather than being undertaken only in response to regulatory requirements.
In addition, an Organisation & Governance Calendar promotes accountability by identifying when activities must occur and who is responsible for completing them. This assists the RTO in demonstrating effective oversight, supporting informed decision-making, and maintaining a culture of continuous improvement.
Ultimately, an effective Organisation & Governance Calendar helps an RTO maintain compliance, strengthen organisational performance, manage risk, and provide confidence that governance responsibilities are being carried out in a planned and transparent manner throughout the year.
Understanding the difference
Both the Governance Calendar and the Schedule Tab allow users to manage events in the SMS, but they serve different purposes.
The Schedule Tab is primarily used to organise and manage scheduled operational activities, including events involving students and attendance. (This tab focuses on: Program Instance, Enrolment, Student class engagement and Attendance)
The Governance Calendar, on the other hand, is purpose-built for governance, compliance, quality, workforce and organisational activities. Each event can become a structured compliance record, with participants, agenda, minutes, actions, Continuous Improvement, Risk and Standards mapping captured within the event. (This tab focuses on: Compliance Dashboard, Risk assessments, and Validation Events)
Which Tab Should I Use?
Use the Governance Calendar Tab when...
The event contributes to your organisation's governance, compliance, quality, risk, continuous improvement, workforce or stakeholder management.
For example:
- Executive Management Meeting
- Quality & Compliance Review
- Risk Management Meeting
- Continuous Improvement Review
- Internal Audit
- Student Support Meeting
- Industry Consultation
- Community Engagement
- Complaint Management Review
- Appeal Management
- Regulatory/Registration Meeting
- Third-Party Management Review
- HR Management Meeting
- Professional Development activity
- Staff Leave
- Validation Event
These events can carry structured evidence and connect to other parts of the SMS. For example, an issue identified during a quality meeting can create a CI record, while a risk identified during a risk meeting can create a Risk Register entry.
Use the Schedule Tab when...
The primary requirement is simply to schedule an operational event or activity, particularly where the activity involves students, trainers or an attendance requirement.
For example:
- Scheduled training session
- Student appointment
- Class/session
- Student meeting that primarily requires attendance tracking
- Other operational activities that need to appear on the schedule
Meeting Event
Meeting Event provides an end-to-end process for managing invitations and responses for calendar events.
Every other governance meeting your RTO runs, across 20+ pre-configured categories covering the full Quality Area map: governance, compliance, risk, CI, student support, third-party management, HR, marketing, regulatory and more. would benefit from setting this type of Calendar Event.
Step 1: From the menu items on the left-hand side of the screen, click Calendar
Step 2: Click on the Calendar View
Step 3: From the Calendar view, choose the date where you would want to create the Meeting Event (Schedule a meeting).
Step 4: Click the Meeting Event button.
Fill out the necessary details for the Meeting Event, see field description on the table below:
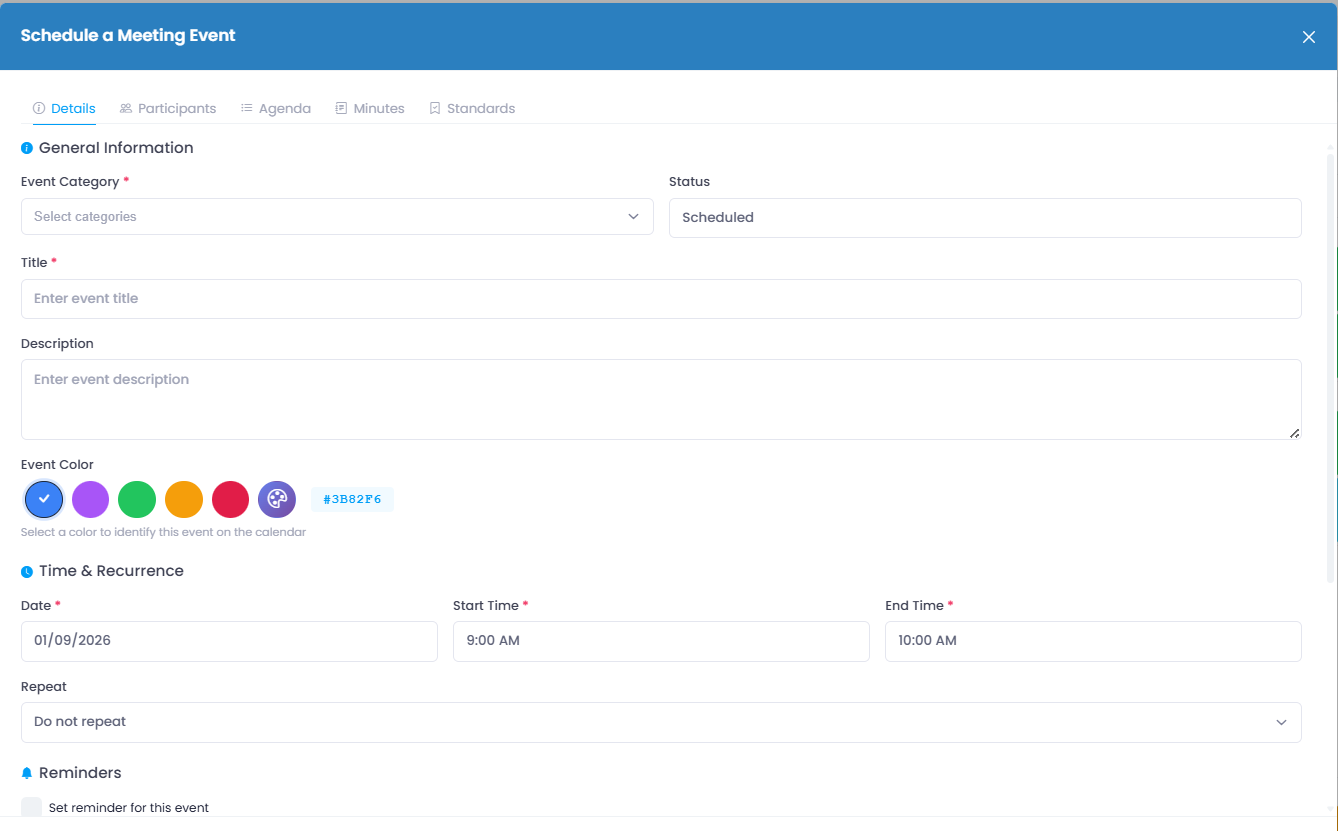
| Event Category | Choose the relevant event category of the meeting event, you can do the following actions on this field:
- Choose multiple eligible categories for a Meeting Event
- Activate/Deactivate a category
Note: When the user’s role is not assigned as an Event Admin for any event category, only the General Meeting category is displayed in the Event Category field.
|
Status | Default to "Scheduled" |
Title | Field where you can add title about the Meeting Event |
Description | Field where you can further add details about the Meeting Event |
Event Color | You can assign unique color to quickly identify the type of event, this section allows RGB, HSL, and HEX codes |
| This includes Date, Start Time, End Time, and a dropdown to determine the recurrence of the Meeting Event |
Reminders
| Toggle that would allow system to remind relevant participants and stakeholders of the Meeting Event |
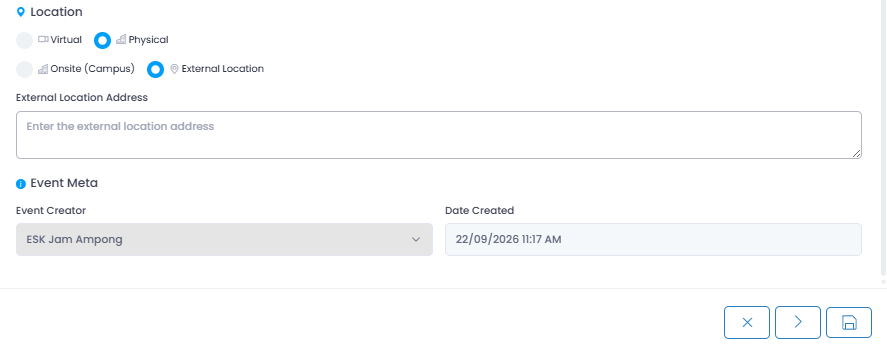
Location | You can choose between:
Virtual - You can add a Meeting URL
Physical - You can determine if it is:
Onsite (Campus) - Campus/Location and Room can be determined in this field
External Location - External Location Address can be added in this field
|
| System generated information that would add:
Event Creator - Who created the event
Date Created - When it was created
|
Identify the relevant Participants in this page, see field description on the table below:
| Internal Participants | Participants within the organisation:
- Staff Members
- Trainers
- Students
- Organisational Units
- Company
|
External Participants
| Participants outside the organisation |
Internal Participants
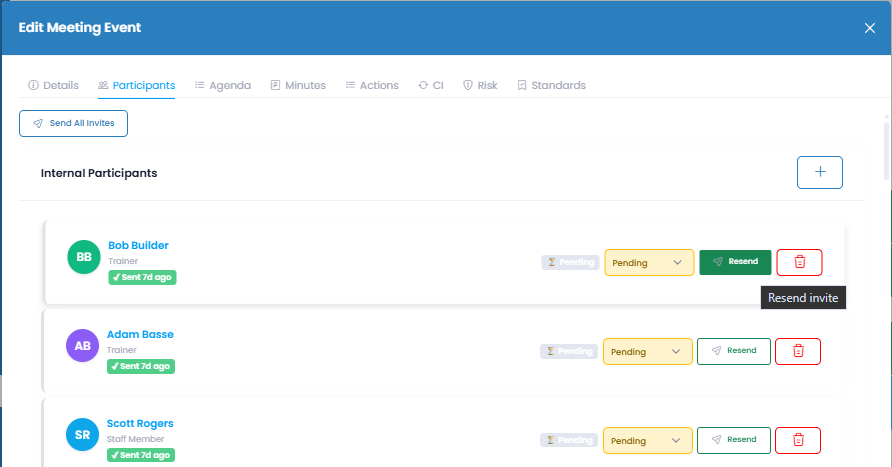
Type in keyword/s (3 characters minimum to activate the search function) then choose the desired Participant from the drop down
You can manually adjust the status of any participants, you can also delete participants from this page
Edit Meeting Participants page would also allow you to send reminders to relevant stakeholders, last reminder sent can also be seen under each participant cards
You can add external participants: First Name, Last Name, Email, and Role/Title here:
Make sure to click on the save button once done
Set the Meeting Agenda in this page, see field description on the table below:
| Agenda Items | Field |
Add Agenda Item | (+) button that would allow you to add agenda item/s |
Item Title
| Participants outside the organisation |
Duration (minutes) | Duration the agenda item was discussed |
Presenter | Dropdown that would show list of participants for the said meeting event |
Description and Notes | Field where you can add the details for the agenda discussed Editing field can also be expanded by dragging the space from the lower hand side of the editing box |
Delete Button | This will delete the entire agenda item (Note: this cannot be undone once you hit save button) |
Add Sub item | located on the lower left-hand side of each agenda item, this would allow you to add sub agenda item if needed. |
Each created Agenda items and sub items would have its counterpart in the Minutes page. This would mean that if you want more Minutes of the meeting field in this tab, you need to create the item from the agenda tab first.
You can utilise this page to document all points of the discussion per agenda and sub items:
If the Meeting Event requires Actions that needs assigning task and checklist, you can set it up on this page.
See tutorial links below to learn more on how to navigate through this tab:
If the Meeting Event requires section that involves documenting items for Continuous Improvement, this is the tab where you can set it all up:
If the Meeting Event is related to an item about Risk Management System, this is the page where you can properly document risk/s identified that is relevant to the Meeting Event.
Information added here would also reflect in the RMS Dashboard
If the Meeting Event is related to an item about Quality Management System, this is the page where you can properly setup the relevant Quality Area, Divisions, Standards, and Performance Indicators.
Information added here would also reflect in the QMS Dashboard
Once all tab is fulfilled (as needed) you can click on the save button
Editing a Meeting Event would also allow you to utilise the following buttons:
Meeting Event buttons
| Mark as completed - Clicking this button would flag the entire meeting as completed (Note: This action is irreversible. The event will become read-only.) |
| Cancel - This button would cancel all changes made during the edit/creation session. |
| Duplicate Event - This will duplicate the current event you are viewing/editing; Guide on how to duplicate event can be seen after this section below. |
| Save and Continue - This would allow you to save the current page of the Meeting Event you are adding/editing; This would help you secure any progress you have made |
| Save - Clicking this would save the entire meeting event if all required fields were fulfilled |
The Duplicate Event button allows RTOs to quickly create a new calendar event based on an existing event. Instead of entering all event details from scratch, organisers can duplicate an existing event and update only the information that has changed, such as the date, time, location, or participants.
This feature helps save time, reduce repetitive data entry, maintain consistency, and minimise configuration errors, making it particularly useful when creating multiple events with similar settings or content.
Step 1: From the Calendar View page; Click on the event you would want to duplicate:
Step 2: From the pop-up window, click the pencil icon (edit button)
Step 3: From the Edit Meeting Event page, click on the duplicate button located on the lower right-hand side of the screen:
Step 4: Choose which tab/s and details you would want to duplicate from this meeting event; once done, click on the Duplicate Button
A confirmation will show once duplicating the event is successful:
Holiday Event
Holiday Event provides a way in properly managing public holidays, institutional holidays and scheduled training breaks is important for maintaining an accurate training calendar and ensuring effective planning of training and assessment activities.
In line with the Standards for Compliance; RTOs should consider holidays when planning training schedules, assessment activities and student commitments; This section allows users to create and document Holiday Events, helping RTOs maintain accurate training calendars, avoid scheduling conflicts, and coordinate student and trainer availability.
These are pre-added AU based Holidays in the system (Territory and state specific holidays included); When users opens the Calendar page, all system-sourced holiday events are displayed when the selected month contains holidays.
User-Created Holiday Events - Users can manually create a Holiday Event (Edit permission required, see Permission section below for details).
Step 1: From the menu items on the left-hand side of the screen, click Calendar
Step 2: Click on the Calendar View
Step 3: From the Calendar view, choose the date where you would want to create the Holiday Event.
Step 4: Click the Holiday Event button.
Fill out the necessary details for the Holiday Event, see field description on the table below:
Make sure to click the save button once done
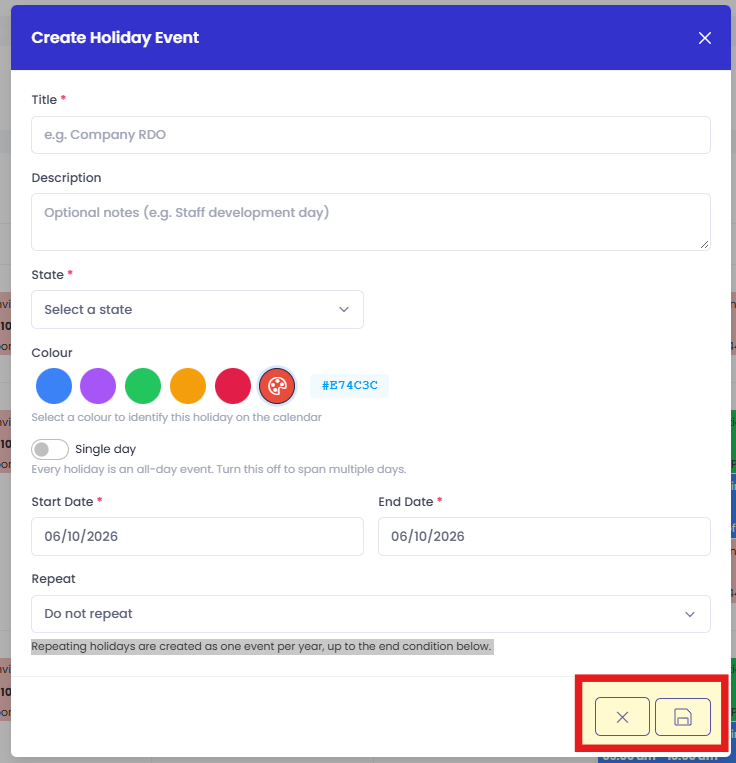
Title | This is a required field - Field where you can add title about the Holiday Event |
Description | Field where you can further add details about the Holiday Event |
State | This is a required field - You can choose which specific state or territory the Holiday is being observed. |
Time & Recurrence | This includes Date, Start Time, End Time, and a dropdown to determine the recurrence of the Meeting Event |
Reminders
| Toggle that would allow system to remind relevant participants and stakeholders of the Meeting Event |
Colour | You can assign specific colour marker to quickly identify the Holiday event.
You can choose from the available colours or enter custom RGB, HSL, HEX Codes in this section |
Single Day | Toggle on/off - Every holiday is an all-day event. Turn this off to span the Holiday Event to multiple days. |
Date | This is a required field - Settings will adjust based on the single day toggle, specify the date/s here of the Holiday event. |
Repeat | You can identify the reoccurence of this Holiday event here; Repeating holidays are created as one event per year) |
Holiday State filter in the Calendar allows users to filter holiday events by Australian state or territory, hide holiday events, or display all holidays alongside Meeting and Validation events.
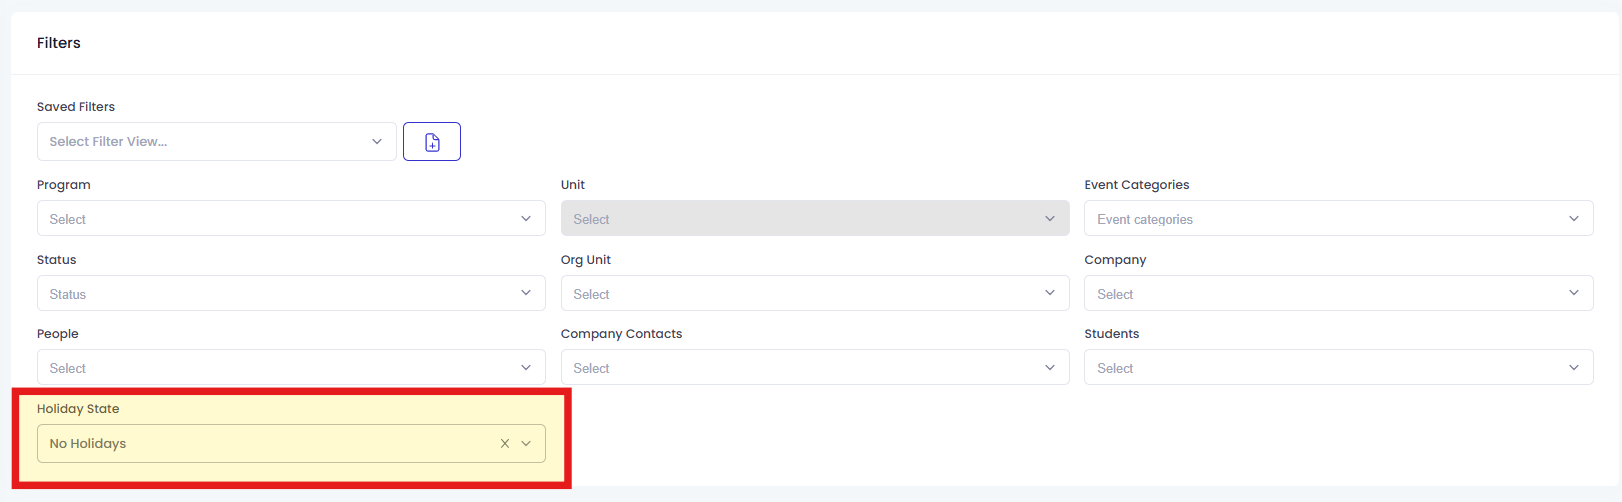
• When the user opens the Calendar page without selecting a Holiday State filter, all holiday events are displayed alongside Meeting and Validation events.
• When the user selects a specific state or territory (VIC, NSW, QLD, SA, WA, TAS, NT, or ACT), only holiday events for the selected state or territory are displayed. Meeting and Validation events are hidden.
• When the user selects No Holidays, all holiday events are hidden, while Meeting and Validation events remain displayed.
Note:
• The Holiday State filter applies to both Calendar Grid View and List View.
• When a specific state or territory is selected, the existing filter selections (e.g., Program, Unit, Categories, and Status) are preserved and remain available when the Holiday State filter is cleared.
• When the user clears the Holiday State filter, all holiday events are displayed alongside Meeting and Validation events again.
System Admin and Executive Management roles have full active permissions enabled by default. Other internal roles have only View permission enabled by default.
You need System Admin level of access to adjust the following permissions.
To grant specific permission/s:
Step 1: From the menu items on the left-hand side of the screen, click Administration → Settings
Step 2: Click on the Permissions tab
Step 3: Under Permissions, choose the role where you would want to adjust the Calendar - Holiday settings.
Step 4: Adjust the relevant toggles/permissions as needed.
Engagement Event
Coming soon, please stay tuned!
Community and Industry Engagement with direct program and unit linking, Approved By governance sign-off, and automatic flow to the Engagement Register.
Leave Event
Coming soon, please stay tuned!
Full approval workflow routing to managers and HR, with conflict detection against trainer schedules, delegation when managers are themselves on leave, and role-based visibility controls.
Professional Development Event
Coming soon, please stay tuned!
Professional Development activity surfaced per-staff-member on People records for Quality Area 3 workforce currency evidence.

